Super Smash Bros. Ultimate

Zelda (SSBU)/Up special

From SmashWiki, the Super Smash Bros. wiki
< Zelda (SSBU)
Revision as of 18:17, July 27, 2024 by Kiedan (talk | contribs)
Jump to navigationJump to search
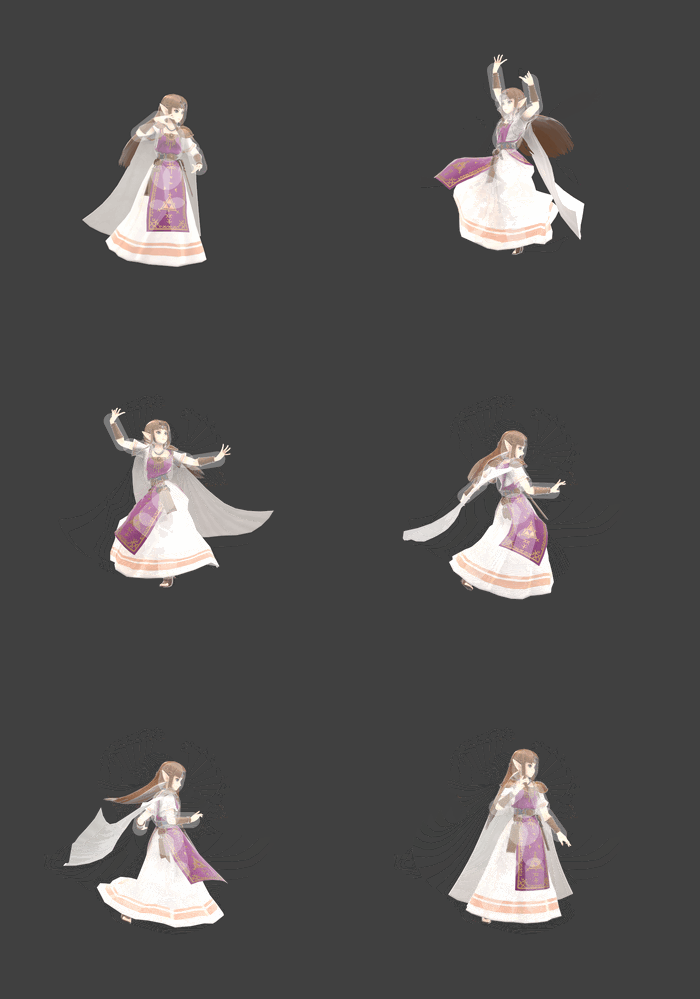
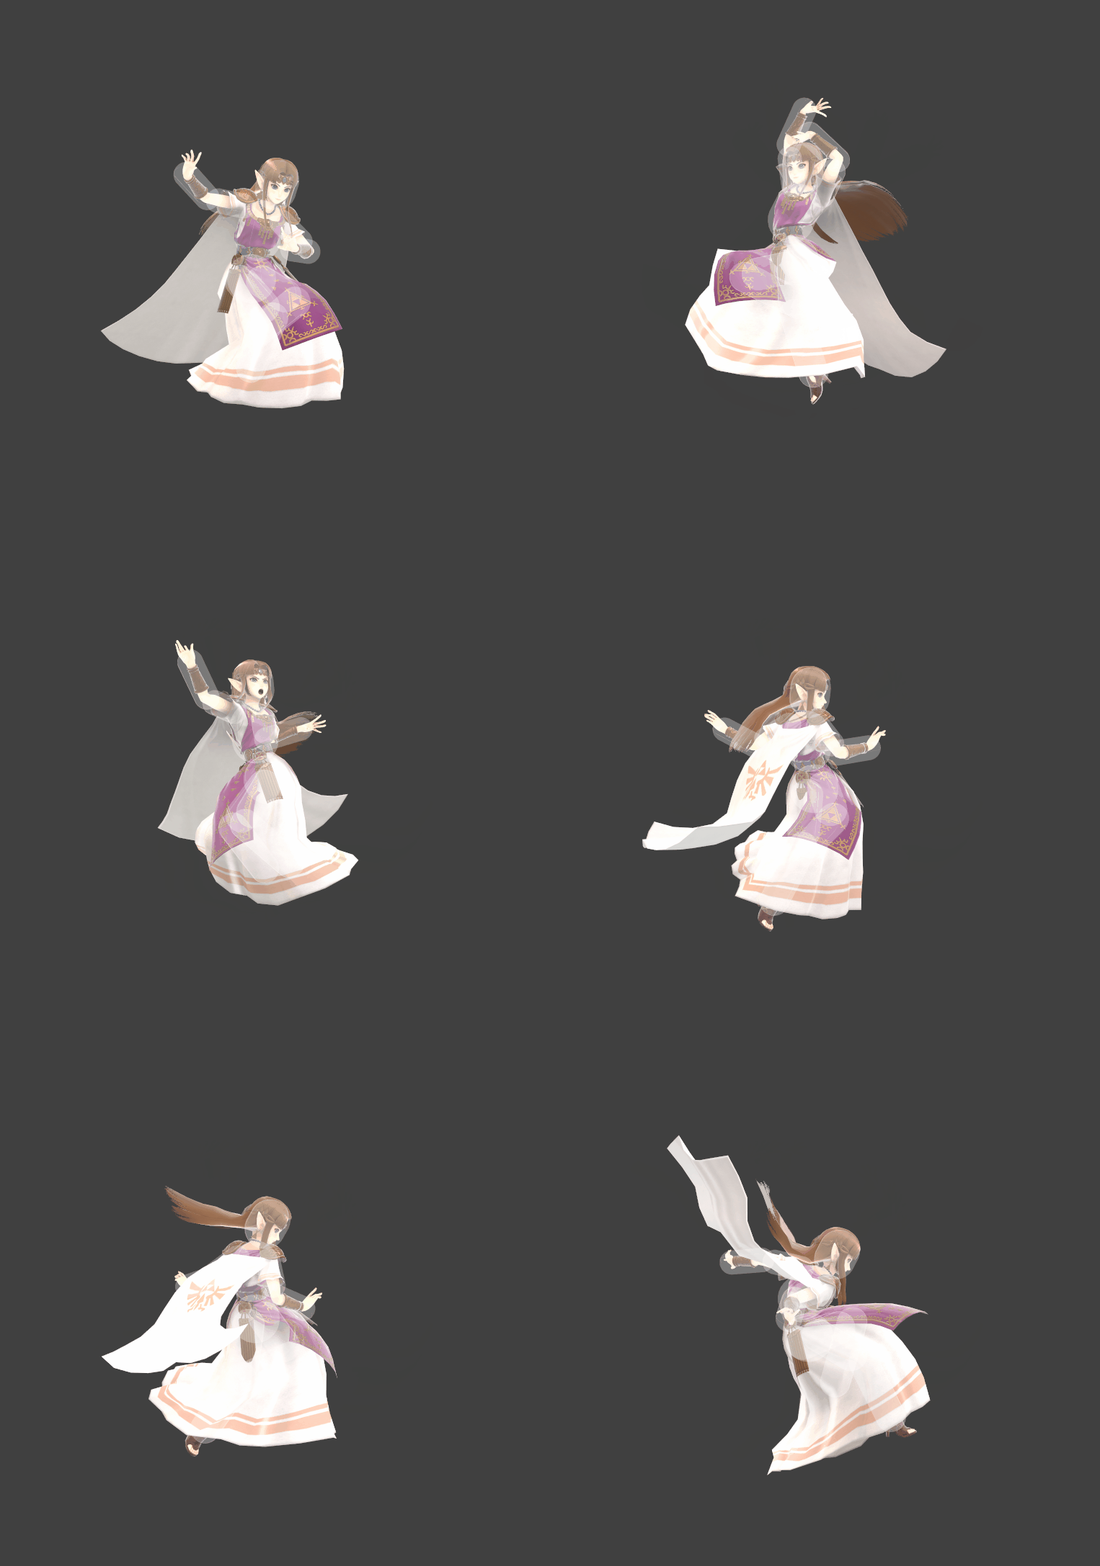
Hitbox visualization showing Zelda's up special, Farore's Wind, when grounded.
Hitbox visualization showing Zelda's up special, Farore's Wind, when aerial.

Overview

Zelda twirls to whip up a green vortex around herself before vanishing and reappearing shortly afterward. Farore's Wind is one of the most unique recoveries in the game. Due to being a teleport, she is completely invisible and intangible for up to 18 frames, and is omnidirectional, allowing her to teleport from above ledge with no vulnerability on her ledge grab. Among all teleports, it also travels the farthest. This makes Zelda very difficult to edge guard. Unlike other teleports, it has large and strong hitboxes both on startup and on reappearance, with the reappearance hitboxes in particular being massive (nearly as large as a max-charged Din's Fire). Holding down during the teleport allows Zelda to shoot past ledge or activate the reappearance hitbox before grabbing ledge. This allows her to counter shorter-ranged two-frame attempts. Overall, she has many mixups with respect to when and how she can recover.

Farore's Wind doubles as an excellent out of shield move. On startup, it covers both sides on frame 6 with decent horizontal range, making it her fastest OOS option. It is also her only option that hits ground level, allowing it to reliably hit even pancaking opponents. Overall, aside from disjoints and extremely low-lag moves, it can punish many moves on shield. The initial grounded hit launches vertically and can combo into the aerial reappearance. Its knockback is not fixed, so at low percents it may be too weak to combo, unless Zelda shortens her teleport. It will also be too strong to combo at higher percents, especially with rage. The initial aerial hit can similarly combo, but its launch angle is more diagonal. Furthermore, it has lower base knockback and much higher knockback growth, which makes the combo window into the aerial reappearance much smaller. Compared to the ground version's OOS utility, it is situational, but can combo from moves like up tilt or down throw.

The opponent can DI the initial hit, and will often do so inadvertently. In such cases, Zelda must angle her teleport slightly left or right to connect the reappearance hit. Reacting to the DI is fast and difficult, but Zelda can try to predict the opponent's DI based on their drift prior to the hit. The aerial reappearance's sweetspot is very strong, has high base knockback and sends diagonally upward. Successfully comboing into it can be very rewarding in early KOs off the top blast zone. This is especially true with rage, on platforms and/or with improper DI (i.e. in and/or up).

Instead of attempting a combo into the aerial reappearance, Zelda can also reappear on the ground after launching the opponent high up with the first hit. This is a good way to escape shield pressure and reset neutral while also inflicting small damage.

The reappearance can be used on its own as well, though situationally. The aerial reappearance can snipe opponents near the top blast zone for early KOs. However, this will leave Zelda helpless high in the air. The grounded reappearance is not quite as strong, but sends at a horizontal angle, allowing for early KOs, especially near the ledge. It cannot be comboed into from anything, but it quickly transports Zelda with generous intangibility at the cost of high ending lag. It is her fastest option to punish opponents from far away, e.g. in anti-zoning or catching landings. Either the aerial or grounded reappearance can also be used as a landing option, especially if the opponent has used or is charging a laggy option. In any case, the reappearance is reactable at frame 35 and has high ending lag, making it a poor movement option. It should only be used sparingly and be mostly reserved for true punishes.

On reappearance, Zelda retains a small fraction of momentum. In the air, this can help her make it to ledge even if the teleport per se didn't quite take her far enough. On the ground, this allows her to edge cancel. Due to her high traction, the distance she slides is short, making the technique very difficult compared to moves like Warp. There are various setups to facilitate edge cancels, such as wavelanding backward onto the edge of platforms, though at the cost of making the cancel more telegraphed. However, successfully edge canceling gives Zelda extraordinary options, such as escaping juggles with negligible lag and huge hitboxes, circumventing her normally slow speed to close distances faster, and the reappearance hitbox being up to +10 on shield.

The aerial reappearance notably has less ending lag than the grounded reappearance. This can be exploited to make Zelda's teleport slightly less punishable. For instance, Zelda can teleport between platforms, or from the end of Pokémon Stadium 2's stage to the center, landing almost immediately after reappearing in the air and incurring only 30 frames of landing lag instead of 40 frames of ending lag. Additionally, reappearing in the air near the ledge, then drifting to ledge is another way to mitigate the ending lag.

Overall, Farore's Wind is highly complex and versatile. Tripling as one of the best recoveries in the game, a great out of shield option and a kill move, it is integral to Zelda's strengths.

Hitboxes

Start (grounded)

ID Part Rehit rate Damage SD Angle Angle type BK KS FKV Set weight Radius Bone Offset SDI× T% Clang Rebound Effect Type G A Sound Direct Hit bits Hit part Blockable Reflectable Absorbable Flinchless No GFX Heedless
0 0 0 6.0% 0 AngleIcon91.png Standard 118 30 0 HitboxTableIcon(False).png 8.0 top 0.0 6.0 -4.0 to 4.0 1.0× 1.0× 0% HitboxTableIcon(Clang).png HitboxTableIcon(NoRebound).png Slash (effect) Magic (type) HitboxTableIcon(GroundedTrue).png HitboxTableIcon(AerialTrue).png M Slash SpecialsDirect.png All All HitboxTableIcon(Blockable).png HitboxTableIcon(Unreflectable).png HitboxTableIcon(Unabsorbable).png HitboxTableIcon(False).png HitboxTableIcon(False).png HitboxTableIcon(False).png

Start (aerial)

ID Part Rehit rate Damage SD Angle Angle type BK KS FKV Set weight Radius Bone Offset SDI× T% Clang Rebound Effect Type G A Sound Direct Hit bits Hit part Blockable Reflectable Absorbable Flinchless No GFX Heedless
0 0 0 6.0% 0 AngleIcon80.png Standard 60 100 0 HitboxTableIcon(False).png 10.5 rot 0.0 0.0 0.0 1.0× 1.0× 0% HitboxTableIcon(Clang).png HitboxTableIcon(NoRebound).png Slash (effect) Magic (type) HitboxTableIcon(GroundedTrue).png HitboxTableIcon(AerialTrue).png M Slash SpecialsDirect.png All All HitboxTableIcon(Blockable).png HitboxTableIcon(Unreflectable).png HitboxTableIcon(Unabsorbable).png HitboxTableIcon(False).png HitboxTableIcon(False).png HitboxTableIcon(False).png

Reappearance (grounded)

ID Part Rehit rate Damage SD Angle Angle type BK KS FKV Set weight Radius Bone Offset SDI× T% Clang Rebound Effect Type G A Sound Direct Hit bits Hit part Blockable Reflectable Absorbable Flinchless No GFX Heedless
0 0 0 10.0% 0 Sakurai angle Standard 80 90 0 HitboxTableIcon(False).png 10.0 rot 0.0 0.0 0.0 1.5× 1.0× 0% HitboxTableIcon(Clang).png HitboxTableIcon(NoRebound).png Slash (effect) Magic (type) HitboxTableIcon(GroundedTrue).png HitboxTableIcon(AerialTrue).png L Slash SpecialsDirect.png All All HitboxTableIcon(Blockable).png HitboxTableIcon(Unreflectable).png HitboxTableIcon(Unabsorbable).png HitboxTableIcon(False).png HitboxTableIcon(False).png HitboxTableIcon(False).png
1 0 0 7.0% 0 Sakurai angle Standard 60 90 0 HitboxTableIcon(False).png 15.0 rot 0.0 0.0 0.0 1.2× 1.0× 0% HitboxTableIcon(Clang).png HitboxTableIcon(NoRebound).png Slash (effect) Magic (type) HitboxTableIcon(GroundedTrue).png HitboxTableIcon(AerialTrue).png M Slash SpecialsDirect.png All All HitboxTableIcon(Blockable).png HitboxTableIcon(Unreflectable).png HitboxTableIcon(Unabsorbable).png HitboxTableIcon(False).png HitboxTableIcon(False).png HitboxTableIcon(False).png

Reappearance (aerial)

ID Part Rehit rate Damage SD Angle Angle type BK KS FKV Set weight Radius Bone Offset SDI× T% Clang Rebound Effect Type G A Sound Direct Hit bits Hit part Blockable Reflectable Absorbable Flinchless No GFX Heedless
0 0 0 12.0% 0 AngleIcon55.png Standard 80 94 0 HitboxTableIcon(False).png 11.0 rot 0.0 0.0 0.0 1.5× 1.0× 0% HitboxTableIcon(Clang).png HitboxTableIcon(NoRebound).png Slash (effect) Magic (type) HitboxTableIcon(GroundedTrue).png HitboxTableIcon(AerialTrue).png L Slash SpecialsDirect.png All All HitboxTableIcon(Blockable).png HitboxTableIcon(Unreflectable).png HitboxTableIcon(Unabsorbable).png HitboxTableIcon(False).png HitboxTableIcon(False).png HitboxTableIcon(False).png
1 0 0 8.0% 0 AngleIcon55.png Standard 60 90 0 HitboxTableIcon(False).png 16.0 rot 0.0 0.0 0.0 1.2× 1.0× 0% HitboxTableIcon(Clang).png HitboxTableIcon(NoRebound).png Slash (effect) Magic (type) HitboxTableIcon(GroundedTrue).png HitboxTableIcon(AerialTrue).png M Slash SpecialsDirect.png All All HitboxTableIcon(Blockable).png HitboxTableIcon(Unreflectable).png HitboxTableIcon(Unabsorbable).png HitboxTableIcon(False).png HitboxTableIcon(False).png HitboxTableIcon(False).png

Timing

Start

The grounded and aerial startups have different animations, but have the same timing.

Hitbox 6-7
Intangibility 17-34
Teleport 18-35
FrameIcon(Lag).png FrameIcon(Lag).png FrameIcon(Lag).png FrameIcon(Lag).png FrameIcon(Lag).png FrameIcon(Hitbox).png FrameIcon(Hitbox).png FrameIcon(Lag).png FrameIcon(Lag).png FrameIcon(Lag).png FrameIcon(Lag).png FrameIcon(Lag).png FrameIcon(Lag).png FrameIcon(Lag).png FrameIcon(Lag).png FrameIcon(Lag).png FrameIcon(Lag).png FrameIcon(Lag).png FrameIcon(Lag).png FrameIcon(Lag).png FrameIcon(Lag).png FrameIcon(Lag).png FrameIcon(Lag).png FrameIcon(Lag).png FrameIcon(Lag).png FrameIcon(Lag).png FrameIcon(Lag).png FrameIcon(Lag).png FrameIcon(Lag).png FrameIcon(Lag).png FrameIcon(Lag).png FrameIcon(Lag).png FrameIcon(Lag).png FrameIcon(Lag).png
FrameIcon(Vulnerable).png FrameIcon(Vulnerable).png FrameIcon(Vulnerable).png FrameIcon(Vulnerable).png FrameIcon(Vulnerable).png FrameIcon(Vulnerable).png FrameIcon(Vulnerable).png FrameIcon(Vulnerable).png FrameIcon(Vulnerable).png FrameIcon(Vulnerable).png FrameIcon(Vulnerable).png FrameIcon(Vulnerable).png FrameIcon(Vulnerable).png FrameIcon(Vulnerable).png FrameIcon(Vulnerable).png FrameIcon(Vulnerable).png FrameIcon(Intangible).png FrameIcon(Intangible).png FrameIcon(Intangible).png FrameIcon(Intangible).png FrameIcon(Intangible).png FrameIcon(Intangible).png FrameIcon(Intangible).png FrameIcon(Intangible).png FrameIcon(Intangible).png FrameIcon(Intangible).png FrameIcon(Intangible).png FrameIcon(Intangible).png FrameIcon(Intangible).png FrameIcon(Intangible).png FrameIcon(Intangible).png FrameIcon(Intangible).png FrameIcon(Intangible).png FrameIcon(Intangible).png

The move's travel direction is decided on frame 17. In the air, starting on frame 18, ledge grabs are enabled from both sides. The frame strips indicate full execution.

Grounded reappearance

Hitboxes (from appearance) 35-36 (1-2)
Animation length (from appearance) 75 (41)
FrameIcon(Hitbox).png FrameIcon(Hitbox).png FrameIcon(Lag).png FrameIcon(Lag).png FrameIcon(Lag).png FrameIcon(Lag).png FrameIcon(Lag).png FrameIcon(Lag).png FrameIcon(Lag).png FrameIcon(Lag).png FrameIcon(Lag).png FrameIcon(Lag).png FrameIcon(Lag).png FrameIcon(Lag).png FrameIcon(Lag).png FrameIcon(Lag).png FrameIcon(Lag).png FrameIcon(Lag).png FrameIcon(Lag).png FrameIcon(Lag).png FrameIcon(Lag).png FrameIcon(Lag).png FrameIcon(Lag).png FrameIcon(Lag).png FrameIcon(Lag).png FrameIcon(Lag).png FrameIcon(Lag).png FrameIcon(Lag).png FrameIcon(Lag).png FrameIcon(Lag).png FrameIcon(Lag).png FrameIcon(Lag).png FrameIcon(Lag).png FrameIcon(Lag).png FrameIcon(Lag).png FrameIcon(Lag).png FrameIcon(Lag).png FrameIcon(Lag).png FrameIcon(Lag).png FrameIcon(Lag).png FrameIcon(Lag).png FrameIcon(Lag).png FrameIcon(Lag).png FrameIcon(Lag).png FrameIcon(Lag).png

Aerial reappearance

Hitboxes (from appearance) 35-36 (1-2)
Animation length (from appearance) 93 (59)
FrameIcon(Hitbox).png FrameIcon(Hitbox).png FrameIcon(Lag).png FrameIcon(Lag).png FrameIcon(Lag).png FrameIcon(Lag).png FrameIcon(Lag).png FrameIcon(Lag).png FrameIcon(Lag).png FrameIcon(Lag).png FrameIcon(Lag).png FrameIcon(Lag).png FrameIcon(Lag).png FrameIcon(Lag).png FrameIcon(Lag).png FrameIcon(Lag).png FrameIcon(Lag).png FrameIcon(Lag).png FrameIcon(Lag).png FrameIcon(Lag).png FrameIcon(Lag).png FrameIcon(Lag).png FrameIcon(Lag).png FrameIcon(Lag).png FrameIcon(Lag).png FrameIcon(Lag).png FrameIcon(Lag).png FrameIcon(Lag).png FrameIcon(Lag).png FrameIcon(Lag).png FrameIcon(Lag).png FrameIcon(Lag).png FrameIcon(Lag).png FrameIcon(Lag).png FrameIcon(Lag).png FrameIcon(Lag).png FrameIcon(Lag).png FrameIcon(Lag).png FrameIcon(Lag).png FrameIcon(Lag).png FrameIcon(Lag).png FrameIcon(Lag).png FrameIcon(Lag).png FrameIcon(Lag).png FrameIcon(Lag).png FrameIcon(Lag).png FrameIcon(Lag).png FrameIcon(Lag).png FrameIcon(Lag).png FrameIcon(Lag).png FrameIcon(Lag).png FrameIcon(Lag).png FrameIcon(Lag).png FrameIcon(Lag).png FrameIcon(Lag).png FrameIcon(Lag).png FrameIcon(Lag).png FrameIcon(Lag).png FrameIcon(Lag).png

Landing

Interruptible 31
Animation length 44
FrameIcon(Lag).png FrameIcon(Lag).png FrameIcon(Lag).png FrameIcon(Lag).png FrameIcon(Lag).png FrameIcon(Lag).png FrameIcon(Lag).png FrameIcon(Lag).png FrameIcon(Lag).png FrameIcon(Lag).png FrameIcon(Lag).png FrameIcon(Lag).png FrameIcon(Lag).png FrameIcon(Lag).png FrameIcon(Lag).png FrameIcon(Lag).png FrameIcon(Lag).png FrameIcon(Lag).png FrameIcon(Lag).png FrameIcon(Lag).png FrameIcon(Lag).png FrameIcon(Lag).png FrameIcon(Lag).png FrameIcon(Lag).png FrameIcon(Lag).png FrameIcon(Lag).png FrameIcon(Lag).png FrameIcon(Lag).png FrameIcon(Lag).png FrameIcon(Lag).png FrameIcon(Interruptible).png FrameIcon(Interruptible).png FrameIcon(Interruptible).png FrameIcon(Interruptible).png FrameIcon(Interruptible).png FrameIcon(Interruptible).png FrameIcon(Interruptible).png FrameIcon(Interruptible).png FrameIcon(Interruptible).png FrameIcon(Interruptible).png FrameIcon(Interruptible).png FrameIcon(Interruptible).png FrameIcon(Interruptible).png FrameIcon(Interruptible).png
Legend (1 square = 1 frame)
Lag
Lag time
Hitbox
Hitbox
FrameIcon(Vulnerable).png
Vulnerable
Intangibility
Intangible
Interruptibility
Interruptible

Parameters

Horizontal speed divisor on startup 1.66667
Vertical speed divisor on startup 2
Gravity during startup 0.03
Maximum falling speed during startup 0.75
Ledge grab frame 16
Teleport base speed 2.2
Teleport maximum additional speed by stick tilt 2
Minimum stick sensitivity for additional teleport speed 0.5
Teleport duration 18 frames
Speed multiplier after teleport 0.2
Maximum horizontal speed after teleport 0.6
Landing lag 30 frames
Helplessness air speed multiplier 0.8