Welcome to SmashWiki! Log in or create an account and join the community, and don't forget to read this first!
Notices
The Skill parameter has been removed from Smasher infoboxes, and in its place are the new "Best historical ranking" and "Best tournament result" parameters. SmashWiki needs help adding these new parameters to Smasher infoboxes, refer to the guidelines here for what should be included in these new parameters.
When adding results to Smasher pages, include each tournament's entrant number in addition to the player's placement, and use the {{Trn}} template with the matching game specified. Please also fix old results on Smasher pages that do not abide to this standard. Refer to our Smasher article guidelines to see how results tables should be formatted.
Check out our project page for ongoing projects that SmashWiki needs help with.
Super Smash Bros. Ultimate

Zelda (SSBU)/Up tilt

From SmashWiki, the Super Smash Bros. wiki
< Zelda (SSBU)
Revision as of 19:54, July 25, 2024 by Kiedan (talk | contribs) (→‎Overview)
(diff) ← Older revision | Latest revision (diff) | Newer revision → (diff)
Jump to navigationJump to search
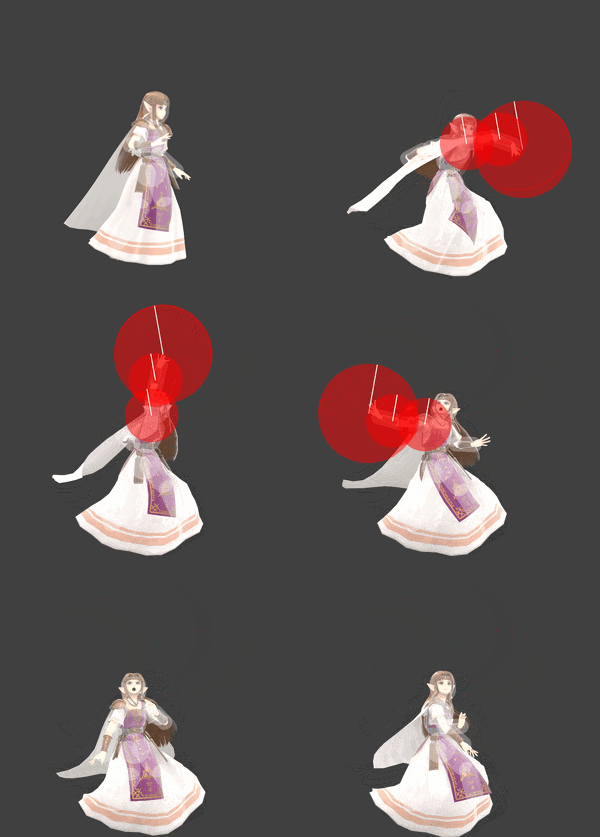
Hitbox visualization showing Zelda's up tilt.

Overview[edit]

Zelda waves her arm overhead with magic. It has large, moderately disjointed hitboxes that hit all around her, making it an effective anti-air. Additionally, it has 13 active frames, making the move excellent at catching rolls and getups. It can also catch landings directly, or frame trap directional air dodges with dash attack.

The most frequent hit frame will be the very first one at frame 7. At very low percents, it can combo into jab or up special if the opponent does not have a fast enough escape option. At low percents, it can combo into itself and up smash, then into neutral aerial and Lightning Kick at mid percents.

Its active frames comprise nearly half its duration, making it a remarkably low-lag move relative to its hit detection. Consequently, the later the move hits, the higher Zelda's frame advantage. If the late frames are landed, the follow-up window will be very generous, and most notably it will be able to KO confirm into up aerial. On shield, it can be as low as -2, in which case Zelda can perform various mixups (such as an immediate back aerial, or back aerial out of shield) if opponents try to punish her without a fast enough option.

Among its few downsides, the hitboxes are tied to her arm and will only cover one area at a time. At high percents, it loses most of its reward; it will no longer combo into anything, yet simultaneously will not KO until very high percents.

Hitboxes[edit]

ID Part Rehit rate Damage SD Angle Angle type BK KS FKV Set weight Radius Bone Offset SDI× T% Clang Rebound Effect Type G A Sound Direct Hit bits Hit part Blockable Reflectable Absorbable Flinchless No GFX Heedless
0 0 0 7.2% 0 AngleIcon100.png Standard 45 110 0 HitboxTableIcon(False).png 5.5 armr 4.0 0.0 0.0 1.0× 1.0× 0% HitboxTableIcon(NoClang).png HitboxTableIcon(NoRebound).png Magic (effect) Magic (type) HitboxTableIcon(GroundedTrue).png HitboxTableIcon(AerialTrue).png M Magic SpecialsDirect.png All All HitboxTableIcon(Blockable).png HitboxTableIcon(Unreflectable).png HitboxTableIcon(Unabsorbable).png HitboxTableIcon(False).png HitboxTableIcon(False).png HitboxTableIcon(False).png
1 0 0 7.2% 0 AngleIcon100.png Standard 45 110 0 HitboxTableIcon(False).png 3.0 armr 1.0 0.0 0.0 1.0× 1.0× 0% HitboxTableIcon(NoClang).png HitboxTableIcon(NoRebound).png Magic (effect) Magic (type) HitboxTableIcon(GroundedTrue).png HitboxTableIcon(AerialTrue).png M Magic SpecialsDirect.png All All HitboxTableIcon(Blockable).png HitboxTableIcon(Unreflectable).png HitboxTableIcon(Unabsorbable).png HitboxTableIcon(False).png HitboxTableIcon(False).png HitboxTableIcon(False).png
2 0 0 7.2% 0 AngleIcon100.png Standard 45 110 0 HitboxTableIcon(False).png 3.0 shoulderr 0.0 0.0 0.0 1.0× 1.0× 0% HitboxTableIcon(NoClang).png HitboxTableIcon(NoRebound).png Magic (effect) Magic (type) HitboxTableIcon(GroundedTrue).png HitboxTableIcon(AerialTrue).png M Magic SpecialsDirect.png All All HitboxTableIcon(Blockable).png HitboxTableIcon(Unreflectable).png HitboxTableIcon(Unabsorbable).png HitboxTableIcon(False).png HitboxTableIcon(False).png HitboxTableIcon(False).png

Timing[edit]

Hitboxes 7-19
Interruptible 30
Animation length 51
FrameIcon(Lag).png FrameIcon(Lag).png FrameIcon(Lag).png FrameIcon(Lag).png FrameIcon(Lag).png FrameIcon(Lag).png FrameIcon(Hitbox).png FrameIcon(Hitbox).png FrameIcon(Hitbox).png FrameIcon(Hitbox).png FrameIcon(Hitbox).png FrameIcon(Hitbox).png FrameIcon(Hitbox).png FrameIcon(Hitbox).png FrameIcon(Hitbox).png FrameIcon(Hitbox).png FrameIcon(Hitbox).png FrameIcon(Hitbox).png FrameIcon(Hitbox).png FrameIcon(Lag).png FrameIcon(Lag).png FrameIcon(Lag).png FrameIcon(Lag).png FrameIcon(Lag).png FrameIcon(Lag).png FrameIcon(Lag).png FrameIcon(Lag).png FrameIcon(Lag).png FrameIcon(Lag).png FrameIcon(Interruptible).png FrameIcon(Interruptible).png FrameIcon(Interruptible).png FrameIcon(Interruptible).png FrameIcon(Interruptible).png FrameIcon(Interruptible).png FrameIcon(Interruptible).png FrameIcon(Interruptible).png FrameIcon(Interruptible).png FrameIcon(Interruptible).png FrameIcon(Interruptible).png FrameIcon(Interruptible).png FrameIcon(Interruptible).png FrameIcon(Interruptible).png FrameIcon(Interruptible).png FrameIcon(Interruptible).png FrameIcon(Interruptible).png FrameIcon(Interruptible).png FrameIcon(Interruptible).png FrameIcon(Interruptible).png FrameIcon(Interruptible).png FrameIcon(Interruptible).png
Legend (1 square = 1 frame)
Lag
Lag time
Hitbox
Hitbox
Interruptibility
Interruptible