OverviewEdit
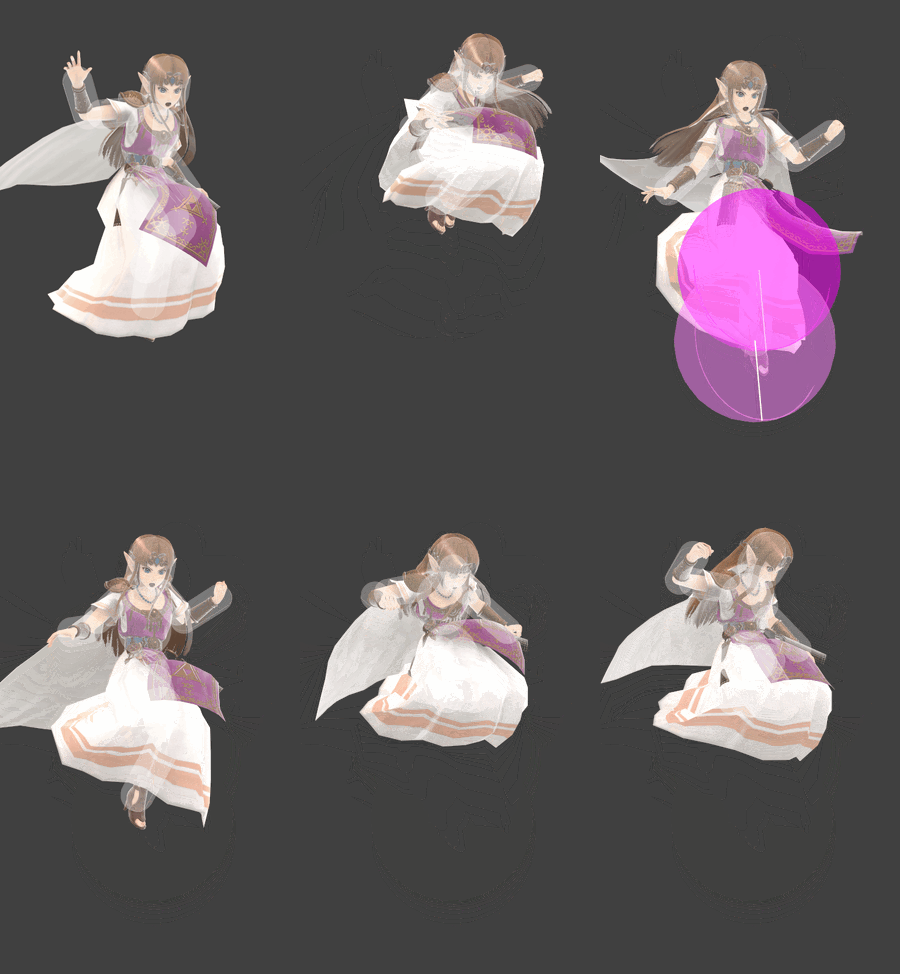
Zelda performs a slow, powerful stomp packed with magic. Dubbed the Meteor Heel, it’s a less extreme version of a Lightning Kick. In comparison, the strong hit is not as ludicrous in power, and is slow to come out at frame 14. However, it comprises the entirety of the hitbox on its single frame, and is relatively large and somewhat disjointed, covering both her lower leg and some space past her foot.
The clean hit is among the highest damaging meteor smashes. With its relatively low landing lag, it can be safe on shield (-6) with good timing and spacing. Its knockback scaling is relatively low, which makes it weaker than many lower-damage moves of its kind. It isn't very good at starting combos on aerial opponents due to being techable on stage for a long time; even when it becomes untechable, the frame advantage is tight, especially if incurring the full ending lag in midair. However, it can combo on grounded opponents for quite a large window, even when rising. It can lead into massive damage from platform tech chases, and is the go-to punish against laggy moves. It can combo into practically her entire moveset, but up tilt is the most common extension for damage racking, and Lightning Kick, up aerial, or Farore’s Wind are the most common finishers. As a combo finisher, down aerial is situational due to its slow startup, but can end a Phantom combo for a meteor smash KO if well-timed.
The late hits also launch directly downward, are fairly large and last for 10 frames. However, like the Lightning Kicks' sourspots, they are very weak and usually punishable on hit until high percentages, and since the clean hit can miss rather easily due to its single-frame duration, this makes the move inherently risky in any case. In disadvantage, down air should be carefully used as only one option among many other defensive options for landing. In advantage state, it is less risky; on stage, the late hit can cover jumps in ledge traps by knocking opponents downward into a Phantom. Off stage, Zelda can drop down from stage and either throw out a down air while falling, or use it while double jumping back to cover the area directly below ledge. Despite their minimal power, they can gimp opponents with weak recoveries; even on better recoveries, if the latest frames land, Zelda will often still be in a good position for another spike attempt.
At high percents, especially with rage, a late hit can similarly start combos, namely into down smash after landing. Interestingly, it has a sweetspot that is stronger by a significant margin, but due to its higher position, it is unlikely to connect when Zelda is descending on the opponent. At most percents, the sourspot and sweetspot are almost indistinguishable from each other (only differing in hitlag and damage by 1), but once the sweetspot sends in tumble with the meteor smash sound effect, it becomes much easier. The sweetspot will start combos much earlier and force hard-to-react techs on aerial opponents with its minimal hitlag. Because down aerial's ending lag is also relatively low at 20 frames from the last active frame, especially if connecting the later frames, it is even possible to combo from midair.
Down air is notably Zelda's fastest aerial to execute, which is useful for canceling tumble. It also auto-cancels in a short hop, which gives it some uses in combination with its long hitbox duration, such as retreating safely after attacking getup areas in ledge traps. While down aerial has limited use in neutral due to similar weaknesses to her Lightning Kicks, it is a very potent tool in Zelda’s punish game.
Update historyEdit
- Down aerial's clean hit has a larger hitbox (3.2u/3u → 4.2u/4u).
HitboxesEdit
TimingEdit
AttackEdit
| Initial autocancel | 1-3 |
|---|---|
| Clean hit | 14 |
| Late hit | 15-24 |
| Ending autocancel | 40- |
| Interruptible | 45 |
| Animation length | 60 |
Landing lagEdit
| Interruptible | 13 |
|---|---|
| Animation length | 26 |
| Lag time |
Hitbox |
Hitbox change |
Autocancel |
Interruptible |
TriviaEdit
- Between the clean and late hits, the ID 0 hitbox changes from the bottom hitbox to the top hitbox, and vice versa for ID 1. This results in an unusual hitbox interpolation, notably making the late hit's sweetspot larger and significantly easier to land on frame 15.
