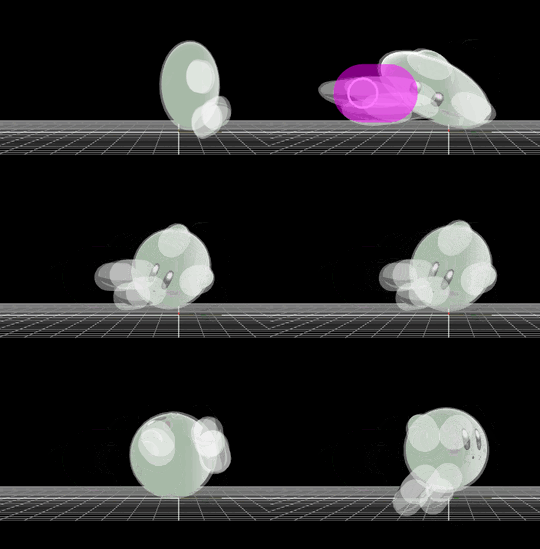
Kirby (SSB4)/Back aerial: Difference between revisions
From SmashWiki, the Super Smash Bros. wiki
Jump to navigationJump to search
(Added all remaining data.) |
SuperSqank (talk | contribs) m (→Update history) |
||
| (12 intermediate revisions by 9 users not shown) | |||
| Line 1: | Line 1: | ||
{{ArticleIcons|ssb4=y}} | |||
[[File:KirbyBAir.gif|thumb|270px|Hitbox visualization showing Kirby's back aerial.]] | |||
==Overview== | ==Overview== | ||
Kirby quickly crouches in midair, then does a back kick with both feet. A [[sex kick]]. The move has very low startup lag and good range, with a slightly disjointed hitbox. It is Kirby's fastest and strongest aerial, being the only one that can kill an onstage opponent. It can also be used for a [[Fence of Pain]]. The low lag and hitboxes make this one of his most reliable [[spacing]] moves. The knockback of the move means it won't start any combos, but it is a solid finisher. Overall, like in every game, it is a defining part and important tool in his metagame. | |||
Kirby quickly crouches in midair, then does a back kick with both feet. A [[sex kick]]. The move has very low startup lag and good range, with a slightly disjointed hitbox. It is Kirby's fastest and strongest aerial. It can be used for a [[Fence of Pain]]. | ==Update history== | ||
'''{{GameIcon|ssb4}} [[1.1.3]]''' | |||
*{{Buff|Knockback scaling (102 (clean)/110 late) → 104/112).}} | |||
==Hitboxes== | ==Hitboxes== | ||
{{SSB4HitboxTableHeader}} | {{SSB4HitboxTableHeader|special=y}} | ||
{{HitboxTableTitle|Clean hit| | {{HitboxTableTitle|Clean hit|42}} | ||
{{ | {{SSB4SpecialHitboxTableRow | ||
|id=0 | |id=0 | ||
|damage=13% | |damage=13% | ||
|sd=0 | |sd=0 | ||
|angle=361 | |angle=361 | ||
|af=4 | |||
|bk=20 | |bk=20 | ||
|ks=104 | |ks=104 | ||
| Line 19: | Line 24: | ||
|ypos=4.5 | |ypos=4.5 | ||
|zpos=-10.5 | |zpos=-10.5 | ||
|ystretch=4.5 | |||
|zstretch=7.0 | |||
|trip=0 | |trip=0 | ||
|type=Foot | |type=Foot | ||
| Line 27: | Line 34: | ||
|sfx=Kick | |sfx=Kick | ||
}} | }} | ||
{{HitboxTableTitle|Late hit| | {{HitboxTableTitle|Late hit|42}} | ||
{{ | {{SSB4SpecialHitboxTableRow | ||
|id=0 | |id=0 | ||
|damage=8% | |damage=8% | ||
|sd=0 | |sd=0 | ||
|angle=361 | |angle=361 | ||
|af=4 | |||
|bk=0 | |bk=0 | ||
|ks=112 | |ks=112 | ||
| Line 41: | Line 49: | ||
|ypos=4.5 | |ypos=4.5 | ||
|zpos=-10.0 | |zpos=-10.0 | ||
|ystretch=4.5 | |||
|zstretch=7.0 | |||
|trip=0 | |trip=0 | ||
|type=Foot | |type=Foot | ||
| Line 52: | Line 62: | ||
==Timing== | ==Timing== | ||
===Attack=== | ===Attack=== | ||
{|class="wikitable" | {|class="wikitable" | ||
!Initial autocancel | !Initial autocancel | ||
|1-2 | |1-2 | ||
| Line 66: | Line 74: | ||
|- | |- | ||
!Ending autocancel | !Ending autocancel | ||
|32 | |32- | ||
|- | |- | ||
!Interruptible | !Interruptible | ||
| Line 72: | Line 80: | ||
|- | |- | ||
!Animation length | !Animation length | ||
| | |43 | ||
|} | |} | ||
{{FrameStripStart}} | {{FrameStripStart}} | ||
{{FrameStrip|t=Lag|c=5}}{{FrameStrip|t=Hitbox|c=2|e=HitboxChangeS}}{{FrameStrip|t=Hitbox|c=7|s=HitboxChangeE}}{{FrameStrip|t=Lag|c=26}}{{FrameStrip|t=Interruptible|c= | {{FrameStrip|t=Lag|c=5}}{{FrameStrip|t=Hitbox|c=2|e=HitboxChangeS}}{{FrameStrip|t=Hitbox|c=7|s=HitboxChangeE}}{{FrameStrip|t=Lag|c=26}}{{FrameStrip|t=Interruptible|c=3}} | ||
|- | |- | ||
{{FrameStrip|t=Autocancel|c=2}}{{FrameStrip|t=Blank|c=29}}{{FrameStrip|t=Autocancel|c= | {{FrameStrip|t=Autocancel|c=2}}{{FrameStrip|t=Blank|c=29}}{{FrameStrip|t=Autocancel|c=12}} | ||
{{FrameStripEnd}} | {{FrameStripEnd}} | ||
===Landing lag=== | ===Landing lag=== | ||
{|class="wikitable" | {|class="wikitable" | ||
!Animation length | !Animation length | ||
|17 | |17 | ||
| Line 91: | Line 98: | ||
{{FrameStrip|t=Lag|c=17}} | {{FrameStrip|t=Lag|c=17}} | ||
{{FrameStripEnd}} | {{FrameStripEnd}} | ||
{{FrameIconLegend|lag=y|hitbox=y|hitboxchange=y|autocancel=y|interruptible=y}} | {{FrameIconLegend|lag=y|hitbox=y|hitboxchange=y|autocancel=y|interruptible=y}} | ||
{{MvSubNavKirby|g=SSB4}} | |||
{{MvSubNavKirby}} | |||
[[Category:Kirby (SSB4)]] | [[Category:Kirby (SSB4)]] | ||
[[Category:Back aerials (SSB4)]] | [[Category:Back aerials (SSB4)]] | ||
Latest revision as of 05:35, July 8, 2023
Overview[edit]
Kirby quickly crouches in midair, then does a back kick with both feet. A sex kick. The move has very low startup lag and good range, with a slightly disjointed hitbox. It is Kirby's fastest and strongest aerial, being the only one that can kill an onstage opponent. It can also be used for a Fence of Pain. The low lag and hitboxes make this one of his most reliable spacing moves. The knockback of the move means it won't start any combos, but it is a solid finisher. Overall, like in every game, it is a defining part and important tool in his metagame.
Update history[edit]
 Knockback scaling (102 (clean)/110 late) → 104/112).
Hitboxes[edit]
Timing[edit]
Attack[edit]
| Initial autocancel | 1-2 |
|---|---|
| Clean hit | 6-7 |
| Late hit | 8-14 |
| Ending autocancel | 32- |
| Interruptible | 41 |
| Animation length | 43 |
Landing lag[edit]
| Animation length | 17 |
|---|
Lag time |
Hitbox |
Hitbox change |
Autocancel |
Interruptible |
|
