Super Smash Bros. Ultimate

Snake (SSBU)/Back aerial: Difference between revisions

From SmashWiki, the Super Smash Bros. wiki
Jump to navigationJump to search
No edit summary
Tag: Mobile edit
No edit summary
 
(One intermediate revision by one other user not shown)
Line 2: Line 2:
[[File:SnakeBAirSSBU.gif|thumb|370px|Hitbox visualization showing Snake's back aerial.]]
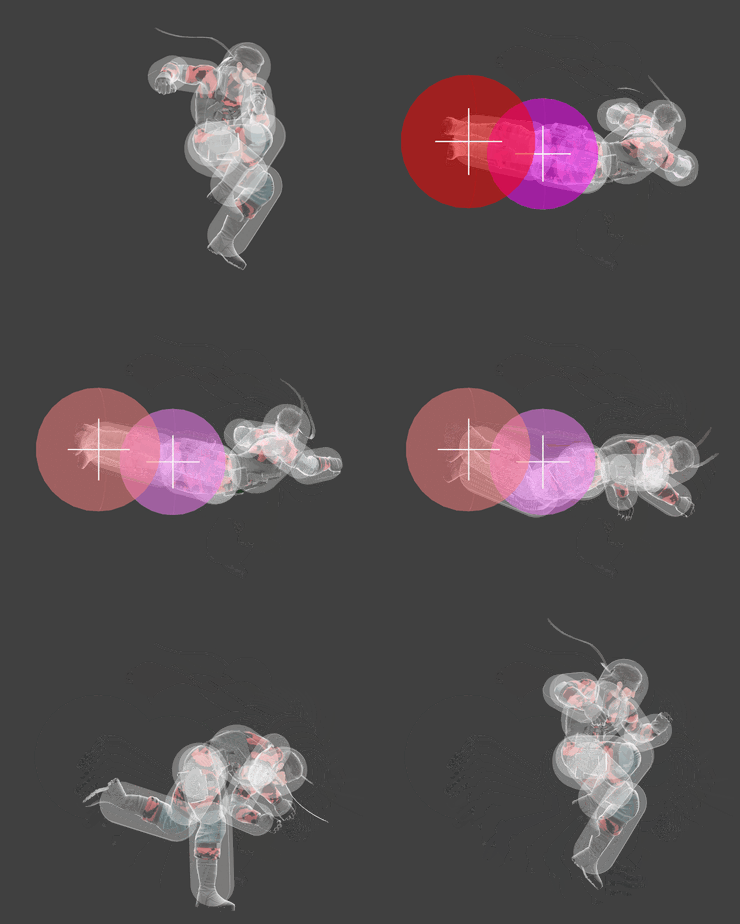
[[File:SnakeBAirSSBU.gif|thumb|370px|Hitbox visualization showing Snake's back aerial.]]
==Overview==
==Overview==
Snake does a kick backwards in the air while in a plank position. Commonly known as the '''Sleeping Bag''' by the Snake community, it has fast [[startup]] at frame 7 and possesses large, disjointed hitboxes that give the move very good [[range]]. The clean hit deals high damage and excellent knockback, easily being able to KO at high percentages, especially if it connects with the sweetspot located on Snake's feet. The late hit deals far less knockback but still sends the opponent decently far away. Its speed and power make it a useful approach option if used in a [[reverse aerial rush]], as well as a useful edgeguarding option.  
Snake does a kick backwards in the air while in a plank position. Commonly known as the '''Sleeping Bag''' by the Snake community, it has fast [[startup]] at frame 7 and possesses large, [[disjoint]]ed hitboxes that give the move very good [[range]]. The clean hit deals high damage and excellent knockback, easily being able to KO at high percentages, especially if it connects with the sweetspot located on Snake's feet. The late hit deals far less knockback but still sends the opponent decently far away. Its speed and power make it a useful approach option if used in a [[reverse aerial rush]], as well as a useful edgeguarding option.  


The attack also has a very large amount of active frames, making it a potential landing option, as the late hit can act as a "get off me" option as Snake is attempting to land.  


It does have some flaws, however. The most noteworthy is its high [[landing lag]]. Due to having high landing lag, it is unsafe on shield and is easy to punish if it misses. Additionally, while it [[autocancel]]s in a full hop, it does not in a short hop. As a result, it is unsafe on shield and easy to punish if it whiffs, similarily to Snake's other aerials.  
It does have some flaws, however. The most noteworthy is its high [[landing lag]], and while it [[autocancel]]s in a full hop, it does not in a short hop. As a result, it is unsafe on shield and easy to punish if it whiffs, much like Snake's other aerials.  


Overall, [[back aerial]] is a a highly rewarding move due to its speed, power, range and long lasting duration, making it useful both offensively and defensively. However, it must not be used carelessly as to not leave Snake vulnerable to punishment.
==Update History==
==Update History==
'''{{GameIcon|ssbu}} {{SSBU|3.0.0}}'''
Line 136: Line 137:
{{FrameStripEnd}}
{{FrameStripEnd}}
{{FrameIconLegend|lag=y|hitbox=y|hitboxchange=y|autocancel=y|interruptible=y}}
==Trivia==
*The startup of the move shifts Snake upwards slightly, and thus if he performs a full hop beneath a platform on [[Battlefield (SSBU)|Battlefield]] and does a back aerial at the peak of the jump, he will land on the platform, while his full hop normally does not go high enough to land on the platform.


{{MvSubNavSnake|g=SSBU}}
[[Category:Snake (SSBU)]]
[[Category:Snake (SSBU)]]
[[Category:Back aerials (SSBU)]]
[[Category:Back aerials (SSBU)]]

Latest revision as of 15:46, March 29, 2024

Hitbox visualization showing Snake's back aerial.

Overview[edit]

Snake does a kick backwards in the air while in a plank position. Commonly known as the Sleeping Bag by the Snake community, it has fast startup at frame 7 and possesses large, disjointed hitboxes that give the move very good range. The clean hit deals high damage and excellent knockback, easily being able to KO at high percentages, especially if it connects with the sweetspot located on Snake's feet. The late hit deals far less knockback but still sends the opponent decently far away. Its speed and power make it a useful approach option if used in a reverse aerial rush, as well as a useful edgeguarding option.

The attack also has a very large amount of active frames, making it a potential landing option, as the late hit can act as a "get off me" option as Snake is attempting to land.

It does have some flaws, however. The most noteworthy is its high landing lag, and while it autocancels in a full hop, it does not in a short hop. As a result, it is unsafe on shield and easy to punish if it whiffs, much like Snake's other aerials.

Overall, back aerial is a a highly rewarding move due to its speed, power, range and long lasting duration, making it useful both offensively and defensively. However, it must not be used carelessly as to not leave Snake vulnerable to punishment.

Update History[edit]

Super Smash Bros. Ultimate 3.0.0

  • Buff Back aerial's sweetspot deals slightly more base knockback (BKB 42 → 43).

Hitboxes[edit]

ID Part Rehit rate Damage SD Angle Angle type BK KS FKV Set weight Radius Bone Offset SDI× T% Clang Rebound Effect Type G A Sound Direct Hit bits Hit part Blockable Reflectable Absorbable Flinchless No GFX Heedless
Clean hit
1 0 0 14.0% 0 Sakurai angle Backward 42 72 0 HitboxTableIcon(False).png 4.5 top 0.0 3.0 -4.0 1.0× 1.0× 0% HitboxTableIcon(Clang).png HitboxTableIcon(Rebound).png Normal (effect) Foot (type) HitboxTableIcon(GroundedTrue).png HitboxTableIcon(AerialTrue).png L Kick SpecialsDirect.png All All HitboxTableIcon(Blockable).png HitboxTableIcon(Unreflectable).png HitboxTableIcon(Unabsorbable).png HitboxTableIcon(False).png HitboxTableIcon(False).png HitboxTableIcon(False).png
2 0 0 16.0% 0 Sakurai angle Backward 43 72 0 HitboxTableIcon(False).png 5.4 top 0.0 4.0 -10.0 1.0× 1.0× 0% HitboxTableIcon(Clang).png HitboxTableIcon(Rebound).png Normal (effect) Foot (type) HitboxTableIcon(GroundedTrue).png HitboxTableIcon(AerialTrue).png M Kick SpecialsDirect.png All All HitboxTableIcon(Blockable).png HitboxTableIcon(Unreflectable).png HitboxTableIcon(Unabsorbable).png HitboxTableIcon(False).png HitboxTableIcon(False).png HitboxTableIcon(False).png
Late hit
1 0 0 9.0% 0 Sakurai angle Backward 25 85 0 HitboxTableIcon(False).png 4.3 top 0.0 3.0 -4.0 1.0× 1.0× 0% HitboxTableIcon(Clang).png HitboxTableIcon(Rebound).png Normal (effect) Foot (type) HitboxTableIcon(GroundedTrue).png HitboxTableIcon(AerialTrue).png M Kick SpecialsDirect.png All All HitboxTableIcon(Blockable).png HitboxTableIcon(Unreflectable).png HitboxTableIcon(Unabsorbable).png HitboxTableIcon(False).png HitboxTableIcon(False).png HitboxTableIcon(False).png
2 0 0 10.0% 0 Sakurai angle Backward 25 85 0 HitboxTableIcon(False).png 5.0 top 0.0 4.0 -10.0 1.0× 1.0× 0% HitboxTableIcon(Clang).png HitboxTableIcon(Rebound).png Normal (effect) Foot (type) HitboxTableIcon(GroundedTrue).png HitboxTableIcon(AerialTrue).png M Kick SpecialsDirect.png All All HitboxTableIcon(Blockable).png HitboxTableIcon(Unreflectable).png HitboxTableIcon(Unabsorbable).png HitboxTableIcon(False).png HitboxTableIcon(False).png HitboxTableIcon(False).png

Timing[edit]

Attack[edit]

Initial autocancel 1
Clean hit 7-9
Late hit 10-26
Ending autocancel 40-
Interruptible 43
Animation length 47
FrameIcon(Lag).png FrameIcon(Lag).png FrameIcon(Lag).png FrameIcon(Lag).png FrameIcon(Lag).png FrameIcon(Lag).png FrameIcon(Hitbox).png FrameIcon(Hitbox).png FrameIcon(HitboxChangeS).png FrameIcon(HitboxChangeE).png FrameIcon(Hitbox).png FrameIcon(Hitbox).png FrameIcon(Hitbox).png FrameIcon(Hitbox).png FrameIcon(Hitbox).png FrameIcon(Hitbox).png FrameIcon(Hitbox).png FrameIcon(Hitbox).png FrameIcon(Hitbox).png FrameIcon(Hitbox).png FrameIcon(Hitbox).png FrameIcon(Hitbox).png FrameIcon(Hitbox).png FrameIcon(Hitbox).png FrameIcon(Hitbox).png FrameIcon(Hitbox).png FrameIcon(Lag).png FrameIcon(Lag).png FrameIcon(Lag).png FrameIcon(Lag).png FrameIcon(Lag).png FrameIcon(Lag).png FrameIcon(Lag).png FrameIcon(Lag).png FrameIcon(Lag).png FrameIcon(Lag).png FrameIcon(Lag).png FrameIcon(Lag).png FrameIcon(Lag).png FrameIcon(Lag).png FrameIcon(Lag).png FrameIcon(Lag).png FrameIcon(Interruptible).png FrameIcon(Interruptible).png FrameIcon(Interruptible).png FrameIcon(Interruptible).png FrameIcon(Interruptible).png
FrameIcon(Autocancel).png FrameIcon(Blank).png FrameIcon(Blank).png FrameIcon(Blank).png FrameIcon(Blank).png FrameIcon(Blank).png FrameIcon(Blank).png FrameIcon(Blank).png FrameIcon(Blank).png FrameIcon(Blank).png FrameIcon(Blank).png FrameIcon(Blank).png FrameIcon(Blank).png FrameIcon(Blank).png FrameIcon(Blank).png FrameIcon(Blank).png FrameIcon(Blank).png FrameIcon(Blank).png FrameIcon(Blank).png FrameIcon(Blank).png FrameIcon(Blank).png FrameIcon(Blank).png FrameIcon(Blank).png FrameIcon(Blank).png FrameIcon(Blank).png FrameIcon(Blank).png FrameIcon(Blank).png FrameIcon(Blank).png FrameIcon(Blank).png FrameIcon(Blank).png FrameIcon(Blank).png FrameIcon(Blank).png FrameIcon(Blank).png FrameIcon(Blank).png FrameIcon(Blank).png FrameIcon(Blank).png FrameIcon(Blank).png FrameIcon(Blank).png FrameIcon(Blank).png FrameIcon(Autocancel).png FrameIcon(Autocancel).png FrameIcon(Autocancel).png FrameIcon(Autocancel).png FrameIcon(Autocancel).png FrameIcon(Autocancel).png FrameIcon(Autocancel).png FrameIcon(Autocancel).png

Landing lag[edit]

Interruptible 20
Animation length 31
FrameIcon(Lag).png FrameIcon(Lag).png FrameIcon(Lag).png FrameIcon(Lag).png FrameIcon(Lag).png FrameIcon(Lag).png FrameIcon(Lag).png FrameIcon(Lag).png FrameIcon(Lag).png FrameIcon(Lag).png FrameIcon(Lag).png FrameIcon(Lag).png FrameIcon(Lag).png FrameIcon(Lag).png FrameIcon(Lag).png FrameIcon(Lag).png FrameIcon(Lag).png FrameIcon(Lag).png FrameIcon(Lag).png FrameIcon(Interruptible).png FrameIcon(Interruptible).png FrameIcon(Interruptible).png FrameIcon(Interruptible).png FrameIcon(Interruptible).png FrameIcon(Interruptible).png FrameIcon(Interruptible).png FrameIcon(Interruptible).png FrameIcon(Interruptible).png FrameIcon(Interruptible).png FrameIcon(Interruptible).png FrameIcon(Interruptible).png
Legend (1 square = 1 frame)
Lag
Lag time
Hitbox
Hitbox
FrameIcon(HitboxChangeS).pngFrameIcon(HitboxChangeE).png
Hitbox change
Auto-canceling
Autocancel
Interruptibility
Interruptible

Trivia[edit]

  • The startup of the move shifts Snake upwards slightly, and thus if he performs a full hop beneath a platform on Battlefield and does a back aerial at the peak of the jump, he will land on the platform, while his full hop normally does not go high enough to land on the platform.