Welcome to SmashWiki! Log in or create an account and join the community, and don't forget to read this first!
Notices
The Skill parameter has been removed from Smasher infoboxes, and in its place are the new "Best historical ranking" and "Best tournament result" parameters. SmashWiki needs help adding these new parameters to Smasher infoboxes, refer to the guidelines here for what should be included in these new parameters.
When adding results to Smasher pages, include each tournament's entrant number in addition to the player's placement, and use the {{Trn}} template with the matching game specified. Please also fix old results on Smasher pages that do not abide to this standard. Refer to our Smasher article guidelines to see how results tables should be formatted.
Check out our project page for ongoing projects that SmashWiki needs help with.
Super Smash Bros. Ultimate

Snake (SSBU)/Side special

From SmashWiki, the Super Smash Bros. wiki
Jump to navigationJump to search
This article is about the hitbox visualization in Super Smash Bros. Ultimate. For the move itself, see Remote Missile.
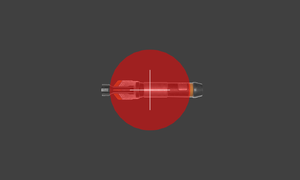
Hitbox visualization showing Snake's side special, Remote Missile, when weak.
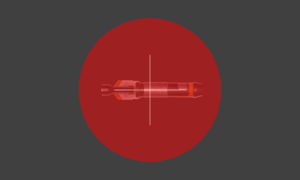
Hitbox visualization showing Snake's side special, Remote Missile, when strong.
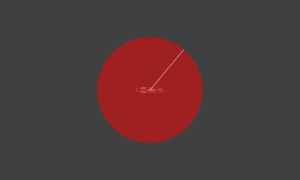
Hitbox visualization showing Snake's side special, Remote Missile's weak explosion.
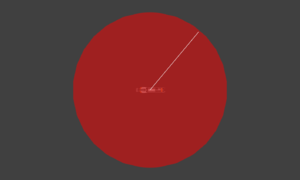
Hitbox visualization showing Snake's side special, Remote Missile's strong explosion.
Competitive.png This article or section may require competitive expertise.
You can discuss this issue on the talk page or edit this page to improve it.

Overview[edit]

Update History[edit]

Super Smash Bros. Ultimate 3.0.0

  • Nerf Remote Missile has a smaller hitbox.

Hitboxes[edit]

ID Part Rehit rate Damage SD Angle Angle type BK KS FKV Set weight Radius Bone Offset SDI× T% Clang Rebound Effect Type G A Sound Direct Hit bits Hit part Blockable Reflectable Absorbable Flinchless No GFX Heedless
Weak
0 0 0 0.0% 0 Sakurai angle Standard 0 0 0 HitboxTableIcon(False).png 2.0 top 0.0 0.0 0.0 0.0× 1.0× 0% HitboxTableIcon(NoClang).png HitboxTableIcon(NoRebound).png Normal (effect) Typeless (type) HitboxTableIcon(GroundedTrue).png HitboxTableIcon(AerialTrue).png S None SpecialsIndirect.png All All HitboxTableIcon(Unblockable).png HitboxTableIcon(Unreflectable).png HitboxTableIcon(Unabsorbable).png HitboxTableIcon(False).png HitboxTableIcon(False).png HitboxTableIcon(False).png
Strong
0 0 0 0.0% 0 Sakurai angle Standard 0 0 0 HitboxTableIcon(False).png 3.5 top 0.0 0.0 0.0 0.0× 1.0× 0% HitboxTableIcon(NoClang).png HitboxTableIcon(NoRebound).png Normal (effect) Typeless (type) HitboxTableIcon(GroundedTrue).png HitboxTableIcon(AerialTrue).png S None SpecialsIndirect.png All All HitboxTableIcon(Blockable).png HitboxTableIcon(Unreflectable).png HitboxTableIcon(Unabsorbable).png HitboxTableIcon(False).png HitboxTableIcon(False).png HitboxTableIcon(False).png
Weak explosion
0 0 0 7.0% 0 AngleIcon50.png Speed-based 50 90 0 HitboxTableIcon(False).png 9.0 top 0.0 0.0 0.0 1.0× 1.0× 0% HitboxTableIcon(NoClang).png HitboxTableIcon(NoRebound).png Flame (effect) Explosive (type) HitboxTableIcon(GroundedTrue).png HitboxTableIcon(AerialTrue).png M Bomb SpecialsIndirect.png All All HitboxTableIcon(Blockable).png HitboxTableIcon(Unreflectable).png HitboxTableIcon(Unabsorbable).png HitboxTableIcon(False).png HitboxTableIcon(False).png HitboxTableIcon(False).png
Strong explosion
0 0 0 14.0% 0 AngleIcon50.png Speed-based 75 70 0 HitboxTableIcon(False).png 13.0 top 0.0 0.0 0.0 1.0× 1.0× 0% HitboxTableIcon(NoClang).png HitboxTableIcon(NoRebound).png Flame (effect) Explosive (type) HitboxTableIcon(GroundedTrue).png HitboxTableIcon(AerialTrue).png L Bomb SpecialsIndirect.png All All HitboxTableIcon(Blockable).png HitboxTableIcon(Unreflectable).png HitboxTableIcon(Unabsorbable).png HitboxTableIcon(False).png HitboxTableIcon(False).png HitboxTableIcon(False).png

Timing[edit]

Missile generated 41
Animation length (starting) 47
Interruptible (ending animation) 36
Animation length (ending animation) 41
FrameIcon(Lag).png FrameIcon(Lag).png FrameIcon(Lag).png FrameIcon(Lag).png FrameIcon(Lag).png FrameIcon(Lag).png FrameIcon(Lag).png FrameIcon(Lag).png FrameIcon(Lag).png FrameIcon(Lag).png FrameIcon(Lag).png FrameIcon(Lag).png FrameIcon(Lag).png FrameIcon(Lag).png FrameIcon(Lag).png FrameIcon(Lag).png FrameIcon(Lag).png FrameIcon(Lag).png FrameIcon(Lag).png FrameIcon(Lag).png FrameIcon(Lag).png FrameIcon(Lag).png FrameIcon(Lag).png FrameIcon(Lag).png FrameIcon(Lag).png FrameIcon(Lag).png FrameIcon(Lag).png FrameIcon(Lag).png FrameIcon(Lag).png FrameIcon(Lag).png FrameIcon(Lag).png FrameIcon(Lag).png FrameIcon(Lag).png FrameIcon(Lag).png FrameIcon(Lag).png FrameIcon(Lag).png FrameIcon(Lag).png FrameIcon(Lag).png FrameIcon(Lag).png FrameIcon(LagPropS).png FrameIcon(LagPropE).png FrameIcon(Lag).png FrameIcon(Lag).png FrameIcon(Lag).png FrameIcon(Lag).png FrameIcon(Lag).png FrameIcon(LagLoopS).png FrameIcon(LagLoopE).png FrameIcon(Lag).png FrameIcon(Lag).png FrameIcon(Lag).png FrameIcon(Lag).png FrameIcon(Lag).png FrameIcon(Lag).png FrameIcon(Lag).png FrameIcon(Lag).png FrameIcon(Lag).png FrameIcon(Lag).png FrameIcon(Lag).png FrameIcon(Lag).png FrameIcon(Lag).png FrameIcon(Lag).png FrameIcon(Lag).png FrameIcon(Lag).png FrameIcon(Lag).png FrameIcon(Lag).png FrameIcon(Lag).png FrameIcon(Lag).png FrameIcon(Lag).png FrameIcon(Lag).png FrameIcon(Lag).png FrameIcon(Lag).png FrameIcon(Lag).png FrameIcon(Lag).png FrameIcon(Lag).png FrameIcon(Lag).png FrameIcon(Lag).png FrameIcon(Lag).png FrameIcon(Lag).png FrameIcon(Lag).png FrameIcon(Lag).png FrameIcon(Lag).png FrameIcon(Interruptible).png FrameIcon(Interruptible).png FrameIcon(Interruptible).png FrameIcon(Interruptible).png FrameIcon(Interruptible).png FrameIcon(Interruptible).png
Legend (1 square = 1 frame)
Lag
Lag time
FrameIcon(BlankLoopS).pngFrameIcon(BlankLoopE).png
Loop point
FrameIcon(BlankPropS).pngFrameIcon(BlankPropE).png
Prop event
Interruptibility
Interruptible