Final Destination (SSBB): Difference between revisions
(→Trivia) |
m (not anymore.) |
||
| Line 4: | Line 4: | ||
|location = ''[[Super Smash Bros. Brawl]]'' | |location = ''[[Super Smash Bros. Brawl]]'' | ||
|name = Final Destination | |name = Final Destination | ||
|image = [[ | |image = [[File:Final Destination Brawl.JPG|256px|Final Destination]] | ||
|caption = [[File:SmashBrosSymbol.png|50px]] | |caption = [[File:SmashBrosSymbol.png|50px]] | ||
|universe = ''{{uv|Super Smash Bros.}}'' | |universe = ''{{uv|Super Smash Bros.}}'' | ||
| Line 32: | Line 32: | ||
Characters in ''Brawl'' that have been proven to be able to do this are: | Characters in ''Brawl'' that have been proven to be able to do this are: | ||
*{{SSBB|Charizard}} - Charizard glides under the stage and uses [[Fly]]. | *{{SSBB|Charizard}} - Charizard glides under the stage and uses [[Fly]]. | ||
*{{SSBB|Diddy Kong}} - Diddy Kong can use his [[Peanut Popgun]] to propel him backward, [[Monkey Flip]], his midair jump, and then [[Rocketbarrel Boost]] to grab the ledge. | *{{SSBB|Diddy Kong}} - Diddy Kong can use his [[Peanut Popgun]] to propel him backward, [[Monkey Flip]], his midair jump, and then [[Rocketbarrel Boost]] to grab the ledge. | ||
*{{SSBB|Ice Climbers}} - A midair jump, followed by [[Squall Hammer]]. Requires both Climbers. | *{{SSBB|Ice Climbers}} - A midair jump, followed by [[Squall Hammer]]. Requires both Climbers. | ||
*{{SSBB|Jigglypuff}} - Jigglypuff can use its midair jumps in conjunction with [[Pound]] to reach the other end of the stage. One of the easiest characters to do the jump. | *{{SSBB|Jigglypuff}} - Jigglypuff can use its midair jumps in conjunction with [[Pound]] to reach the other end of the stage. One of the easiest characters to do the jump. | ||
*{{SSBB|Kirby}} - Kirby uses his five midair jumps to go under the stage and finishes with [[Final Cutter]]. He can also copy other characters' neutral special moves and use them to help him recover. | *{{SSBB|Kirby}} - Kirby uses his five midair jumps to go under the stage and finishes with [[Final Cutter]]. He can also copy other characters' neutral special moves and use them to help him recover. | ||
*{{SSBB|Link}} - Link can use his [[Bomb]] for [[Bomb recovery]], though this only works at higher percentages. | *{{SSBB|Link}} - Link can use his [[Bomb]] for [[Bomb recovery]], though this only works at higher percentages. | ||
*{{SSBB|Lucario}}- Lucario can aim [[ExtremeSpeed]] into the wall to [[wall cling]], then wall jump up above the ledge, allowing it to land on the stage. | *{{SSBB|Lucario}}- Lucario can aim [[ExtremeSpeed]] into the wall to [[wall cling]], then wall jump up above the ledge, allowing it to land on the stage. | ||
*{{SSBB|Lucas}}- Lucas can use his [[Magnet Pull]], midair jump, and finish with a PK Thunder 2. | *{{SSBB|Lucas}}- Lucas can use his [[Magnet Pull]], midair jump, and finish with a PK Thunder 2. | ||
*{{SSBB|Luigi}} - Luigi uses a charged [[Green Missile]] off of one edge of the stage. He will then use a midair jump, followed by a [[Luigi Cyclone]] to propel him upwards and a [[Super Jump Punch]] to reach the other edge. | *{{SSBB|Luigi}} - Luigi uses a charged [[Green Missile]] off of one edge of the stage. He will then use a midair jump, followed by a [[Luigi Cyclone]] to propel him upwards and a [[Super Jump Punch]] to reach the other edge. | ||
*{{SSBB|Marth}} - Marth can B-reverse a fully charged [[Shield Breaker]], double jump and use the first hit of [[Dancing Blade]], then aim [[Dolphin Slash]] horizontally upwards. | *{{SSBB|Marth}} - Marth can B-reverse a fully charged [[Shield Breaker]], double jump and use the first hit of [[Dancing Blade]], then aim [[Dolphin Slash]] horizontally upwards. | ||
*{{SSBB|Meta Knight}} - Meta Knight can use a combination of his glides, midair jumps, and special moves to perform the jump. | *{{SSBB|Meta Knight}} - Meta Knight can use a combination of his glides, midair jumps, and special moves to perform the jump. | ||
*{{SSBB|Peach}} - Peach can float under the stage and then reach the ledge with a [[Peach Parasol]]. | *{{SSBB|Peach}} - Peach can float under the stage and then reach the ledge with a [[Peach Parasol]]. | ||
*{{SSBB|Pikachu}} - Pikachu can use [[Skull Bash]] to get it across under the stage. It then follows up with [[Quick Attack]] to reach the edge. | *{{SSBB|Pikachu}} - Pikachu can use [[Skull Bash]] to get it across under the stage. It then follows up with [[Quick Attack]] to reach the edge. | ||
| Line 48: | Line 48: | ||
*{{SSBB|Samus}} - Samus can use [[Bomb (Samus)|Bomb]] to extend her horizontal recovery and finish with [[Screw Attack]]. | *{{SSBB|Samus}} - Samus can use [[Bomb (Samus)|Bomb]] to extend her horizontal recovery and finish with [[Screw Attack]]. | ||
*{{SSBB|Toon Link}} - Same as Link, but can do at 0 percent due to his better air speed and distance of [[Spin Attack]]. | *{{SSBB|Toon Link}} - Same as Link, but can do at 0 percent due to his better air speed and distance of [[Spin Attack]]. | ||
*{{SSBB|Snake}} - Snake can use [[C4]] to refresh his [[Cypher]] recovery. | *{{SSBB|Snake}} - Snake can use [[C4]] to refresh his [[Cypher]] recovery. | ||
*{{SSBB|Sonic}} - Can use [[Homing Attack]] on the base of the stage and [[Spin Dash]] to go under most of the stage, and then [[Spring Jump]]. | *{{SSBB|Sonic}} - Can use [[Homing Attack]] on the base of the stage and [[Spin Dash]] to go under most of the stage, and then [[Spring Jump]]. | ||
*{{SSBB|Wario}} (and as [[Wario-Man]]) - Wario can use his great air speed and [[Wario Bike]] to get under the stage, and then finish up with [[Corkscrew]]. | *{{SSBB|Wario}} (and as [[Wario-Man]]) - Wario can use his great air speed and [[Wario Bike]] to get under the stage, and then finish up with [[Corkscrew]]. | ||
| Line 64: | Line 64: | ||
File:Wall cling.jpg|{{SSBB|Lucario}} [[wall cling]]ing on the wall section underneath the right ledge of the stage. | File:Wall cling.jpg|{{SSBB|Lucario}} [[wall cling]]ing on the wall section underneath the right ledge of the stage. | ||
</gallery> | </gallery> | ||
==In [[competitive play]]== | ==In [[competitive play]]== | ||
Final Destination, due to its simple design and lack of disruptive features, has always been considered to be one of the fairest stages, and is usually a starter stage. | Final Destination, due to its simple design and lack of disruptive features, has always been considered to be one of the fairest stages, and is usually a starter stage. | ||
Final Destination's flat layout favors characters with projectiles such as {{SSBB|Falco}} and {{SSBB|Pit}}, since the opponent doesn't have any platforms they can use to jump on. The stage's large size makes KOing more difficult than on smaller stages such as [[Smashville]], especially vertically. The large size also allows {{SSBB|King Dedede}} to [[chain]] throw opponents more than he can on smaller stages. The stage lips are notorious for causing some characters' recoveries to be "caught" in them, which can cause them to miss the ledge sweetspot. The stage lips also allow [[stage spike]]s, such as {{mvsub|Donkey Kong|SSBB|forward throw|poss=y}}, that send the opponent vertically downward if they don't [[tech]]. | Final Destination's flat layout favors characters with projectiles such as {{SSBB|Falco}} and {{SSBB|Pit}}, since the opponent doesn't have any platforms they can use to jump on. The stage's large size makes KOing more difficult than on smaller stages such as [[Smashville]], especially vertically. The large size also allows {{SSBB|King Dedede}} to [[chain]] throw opponents more than he can on smaller stages. The stage lips are notorious for causing some characters' recoveries to be "caught" in them, which can cause them to miss the ledge sweetspot. The stage lips also allow [[stage spike]]s, such as {{mvsub|Donkey Kong|SSBB|forward throw|poss=y}}, that send the opponent vertically downward if they don't [[tech]]. | ||
==Trivia== | ==Trivia== | ||
*''Brawl'''s Final Destination was the first one whose surface isn't in the shape of an octagon (especially if one ignores the thin panels on either side of the stage). | *''Brawl'''s Final Destination was the first one whose surface isn't in the shape of an octagon (especially if one ignores the thin panels on either side of the stage). | ||
*This is also the only non-''Melee'' stage to have only one starting track in [[My Music]]. | *This is also the only non-''Melee'' stage to have only one starting track in [[My Music]]. | ||
| Line 82: | Line 83: | ||
{{Smash universe}} | {{Smash universe}} | ||
[[Category:Stages]] | [[Category:Stages]] | ||
Revision as of 19:29, October 12, 2014
| Final Destination | |
|---|---|
 File:SmashBrosSymbol.png | |
| Universe | Super Smash Bros. |
| Appears in | Brawl |
| Availability | Starter |
| Crate type | Futuristic |
| Tracks available | Final Destination Credits (Super Smash Bros.) Opening (Super Smash Bros. Melee) Final Destination (Melee) Giga Bowser (Melee) Bolded tracks must be unlocked |
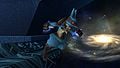
Final Destination (終点 Shūten, Endpoint) is a Special Stage in Super Smash Bros. Brawl. It has the feel of its Super Smash Bros. Melee counterpart (also called Final Destination), except Brawl's Final Destination is smaller, most notably it has a lower ceiling. It is a perfectly flat stage with no environmental hazards or background dangers. It functions exactly like the Melee version, but has updated graphics and a boxier bottom side. Also, rather than a wide platform, its layout looks more like a walkway. In Brawl, Final Destination flies through exquisitely detailed backgrounds such as a galaxy, a wormhole, a starry sky, and finally, a "lovely ocean view", among many in-between scenarios, similar to the one at the end of Subspace Emissary. Players often employ the stage's thick lips to stage spike opponents, as stage spiking them here will often send opponents straight down.
Fighting on Final Destination is often quite straightforward, as there are no platforms or hazards on the stage. Projectile combat is often employed because it is always a straight shot at the opponent. Characters without projectiles are often forced to go on the offensive against those with projectiles to negate the range advantage that said projectiles give.
Given that the stage is, from a fighting perspective, the same as the one in Melee, the controversy that surrounded the old Final Destination still applies to this one. Like its Melee counterpart, its neutrality is disputed.
Final Destination is a starter stage in Brawl, unlike in Melee.
Master Hand (and, under certain conditions, Crazy Hand) will fight the player here when playing Classic Mode. Additionally, both Hands are fought here during Boss Battles Mode in separate battles.
The length of Final Destination is often used as a unit of measurement when describing attacks and/or techniques. For example, when comparing Link and Toon Link's Final Smashes, it is stated that Link's Final Smash covers the whole length of Final Destination while Toon Link's only covers half.
Final Destination jump
A jump similar to the Hyrule Jump can be employed on Final Destination, where certain characters can travel under the stage from one end and emerge at the other. The Final Destination jump can be used as a method to surprise one's opponent. It is often used as a test of a character's horizontal recovery. For example, Meta Knight's ability to perform the jump several ways is an indicator of his above-par recovery.
Characters in Brawl that have been proven to be able to do this are:
- Charizard - Charizard glides under the stage and uses Fly.
- Diddy Kong - Diddy Kong can use his Peanut Popgun to propel him backward, Monkey Flip, his midair jump, and then Rocketbarrel Boost to grab the ledge.
- Ice Climbers - A midair jump, followed by Squall Hammer. Requires both Climbers.
- Jigglypuff - Jigglypuff can use its midair jumps in conjunction with Pound to reach the other end of the stage. One of the easiest characters to do the jump.
- Kirby - Kirby uses his five midair jumps to go under the stage and finishes with Final Cutter. He can also copy other characters' neutral special moves and use them to help him recover.
- Link - Link can use his Bomb for Bomb recovery, though this only works at higher percentages.
- Lucario- Lucario can aim ExtremeSpeed into the wall to wall cling, then wall jump up above the ledge, allowing it to land on the stage.
- Lucas- Lucas can use his Magnet Pull, midair jump, and finish with a PK Thunder 2.
- Luigi - Luigi uses a charged Green Missile off of one edge of the stage. He will then use a midair jump, followed by a Luigi Cyclone to propel him upwards and a Super Jump Punch to reach the other edge.
- Marth - Marth can B-reverse a fully charged Shield Breaker, double jump and use the first hit of Dancing Blade, then aim Dolphin Slash horizontally upwards.
- Meta Knight - Meta Knight can use a combination of his glides, midair jumps, and special moves to perform the jump.
- Peach - Peach can float under the stage and then reach the ledge with a Peach Parasol.
- Pikachu - Pikachu can use Skull Bash to get it across under the stage. It then follows up with Quick Attack to reach the edge.
- Pit - Can use his wings which provides him with three midair jumps and with the ability to glide. Wings of Icarus is also useful for the jump.
- R.O.B.- A jump and Robo Burner is enough for R.O.B. to perform this.
- Samus - Samus can use Bomb to extend her horizontal recovery and finish with Screw Attack.
- Toon Link - Same as Link, but can do at 0 percent due to his better air speed and distance of Spin Attack.
- Snake - Snake can use C4 to refresh his Cypher recovery.
- Sonic - Can use Homing Attack on the base of the stage and Spin Dash to go under most of the stage, and then Spring Jump.
- Wario (and as Wario-Man) - Wario can use his great air speed and Wario Bike to get under the stage, and then finish up with Corkscrew.
- Yoshi - Uses multiple Egg Throws under the stage to propel him horizontally, followed by his midair jump, then another Egg Throw.
- Zero Suit Samus - A Flip Jump underneath the stage, followed by a midair jump and Plasma Wire.
Features
- No hazards or unusual features effecting the stage.
- Large, but not too large, fighting area.
- A flat area with no obstructions.
- Sections under each ledge has the properties of a wall, thus allowing players to Wall jump and Wall cling.
- Boxier bottom under edges do not always allow players that are beneath to hug the stage to ledge grab, which complicates recovery and frequently cause recoveries to fail.
- A changing background.
Lucario wall clinging on the wall section underneath the right ledge of the stage.

In competitive play
Final Destination, due to its simple design and lack of disruptive features, has always been considered to be one of the fairest stages, and is usually a starter stage.
Final Destination's flat layout favors characters with projectiles such as Falco and Pit, since the opponent doesn't have any platforms they can use to jump on. The stage's large size makes KOing more difficult than on smaller stages such as Smashville, especially vertically. The large size also allows King Dedede to chain throw opponents more than he can on smaller stages. The stage lips are notorious for causing some characters' recoveries to be "caught" in them, which can cause them to miss the ledge sweetspot. The stage lips also allow stage spikes, such as Donkey Kong's forward throw, that send the opponent vertically downward if they don't tech.
Trivia
- Brawl's Final Destination was the first one whose surface isn't in the shape of an octagon (especially if one ignores the thin panels on either side of the stage).
- This is also the only non-Melee stage to have only one starting track in My Music.
External links
- Final Destination on the DOJO!!!.
- Multiple characters performing the Final Destination jump
- Another video of characters doing the jump
- Marth performing the jump