| Welcome to SmashWiki! Log in or create an account and join the community, and don't forget to read this first! |
| Notices |
|---|
| The Skill parameter has been removed from Smasher infoboxes, and in its place are the new "Best historical ranking" and "Best tournament result" parameters. SmashWiki needs help adding these new parameters to Smasher infoboxes, refer to the guidelines here for what should be included in these new parameters. |
| When adding results to Smasher pages, include each tournament's entrant number in addition to the player's placement, and use the {{Trn}} template with the matching game specified. Please also fix old results on Smasher pages that do not abide to this standard. Refer to our Smasher article guidelines to see how results tables should be formatted. |
| Check out our project page for ongoing projects that SmashWiki needs help with. |
Zelda (SSBU)/Down smash: Difference between revisions
No edit summary |
(→Overview: The semi-spike part wasn't false lol there are few launching hits with lower angles) |
||
| (2 intermediate revisions by 2 users not shown) | |||
| Line 2: | Line 2: | ||
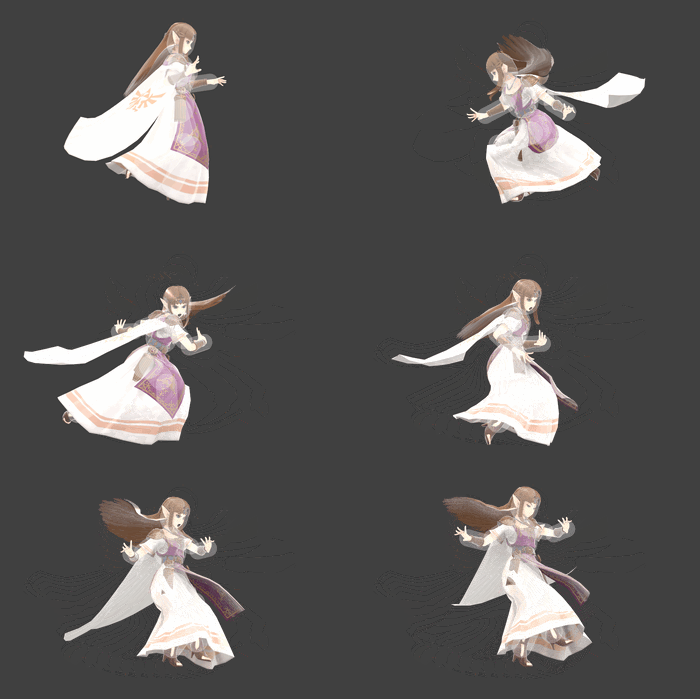
[[File:ZeldaDSmashSSBU.gif|thumb|350px|Hitbox visualization showing Zelda's down smash.]] | [[File:ZeldaDSmashSSBU.gif|thumb|350px|Hitbox visualization showing Zelda's down smash.]] | ||
==Overview== | ==Overview== | ||
A simple spinning kick that hits on both sides with decent horizontal range. The back hit does less damage, but its higher knockback scaling makes it only | A simple spinning kick that hits on both sides with decent horizontal range. The back hit does less damage, but its higher knockback scaling makes it only slightly weaker. While one of the weaker down smashes in the game, it still has respectable power, especially for a frame 5 move; it is similar in KO power to Cloud's back aerial. Compared to her other fastest moves, it reaches significantly farther than down tilt (also frame 5), and while marginally slower than jab (frame 4), it also reaches farther and is better at hitting ground level. | ||
Notably, down smash's sweetspot is medium-sized with high priority, making it reliable and easy to land compared to the precise sweetspots of forward tilt and Lightning Kick. Down smash cannot steal stocks like her strongest moves can, but it is very fast and one of her most consistent finishers at high percents. | |||
Both foot sweetspots launch at among the lowest semi-spike angles in the game. At high percents, even if it doesn't outright KO, it is especially brutal on characters with poor recoveries due to severely limiting their recovery path and making Din's Fire very hard or impossible to avoid, among other options like Nayru's Love or down aerial. The sourspots are unremarkable due to not semi-spiking, but will rarely land due to having low priority. On grounded opponents, the sweetspot will almost always land over the sourspot. | |||
With a FAF of 38, it's | The foot hitboxes reach below ledge, but the short duration makes it difficult to land two-frames. It is a good option for punishing ledge re-grabs, though. | ||
With a FAF of 38, it's one of the fastest interruptible smash attacks in the game and can be hard to punish on whiff. It is punishable on hit at very low percents however, with rapid jab or down tilt being safer options. | |||
==Update History== | ==Update History== | ||
Latest revision as of 22:59, December 11, 2024
Overview[edit]
A simple spinning kick that hits on both sides with decent horizontal range. The back hit does less damage, but its higher knockback scaling makes it only slightly weaker. While one of the weaker down smashes in the game, it still has respectable power, especially for a frame 5 move; it is similar in KO power to Cloud's back aerial. Compared to her other fastest moves, it reaches significantly farther than down tilt (also frame 5), and while marginally slower than jab (frame 4), it also reaches farther and is better at hitting ground level.
Notably, down smash's sweetspot is medium-sized with high priority, making it reliable and easy to land compared to the precise sweetspots of forward tilt and Lightning Kick. Down smash cannot steal stocks like her strongest moves can, but it is very fast and one of her most consistent finishers at high percents.
Both foot sweetspots launch at among the lowest semi-spike angles in the game. At high percents, even if it doesn't outright KO, it is especially brutal on characters with poor recoveries due to severely limiting their recovery path and making Din's Fire very hard or impossible to avoid, among other options like Nayru's Love or down aerial. The sourspots are unremarkable due to not semi-spiking, but will rarely land due to having low priority. On grounded opponents, the sweetspot will almost always land over the sourspot.
The foot hitboxes reach below ledge, but the short duration makes it difficult to land two-frames. It is a good option for punishing ledge re-grabs, though.
With a FAF of 38, it's one of the fastest interruptible smash attacks in the game and can be hard to punish on whiff. It is punishable on hit at very low percents however, with rapid jab or down tilt being safer options.
Update History[edit]
 Down smash has more knockback scaling (86 (front)/96 (back) → 89/100).
Hitboxes[edit]
Timing[edit]
| Charges between | 2-3 |
|---|---|
| Hit 1 | 5-6 |
| Hit 2 | 13-14 |
| Interruptible | 38 |
| Animation length | 59 |
Lag time |
Charge interval |
Hitbox |
Interruptible |
Trivia[edit]
- This move has a 20% chance to trip. However, the ID 0 hitboxes can only cause it on slants due to their launch angle.
|
