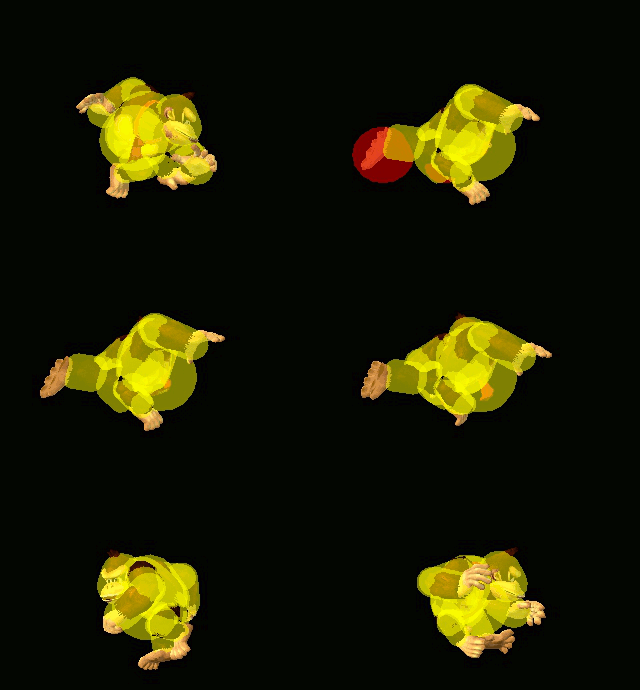
Donkey Kong (SSBM)/Back aerial
Overview[edit]
DK does a midair kick behind him, which has sex kick properties. One of DK's best moves, it has a lot of desirable traits, including good range, a slight disjoint past his foot, low landing lag, an exceptionally generous autocancel window (both at the start and end of the move), and average (or slightly above average) stats in all other attributes (knockback, active frames, end lag, damage, shield stun, etc...), which makes it an all around good aerial that's a staple of DK's play.
The move can be comboed into from Cargo up-throw or down aerial, but DK generally has better options (namely, his up aerial), although it can be used as a DI mixup. It can be used to start combos, and the move's weak hit is an occasionally useful combo extender which can allow him to followup with another aerial, including itself, which can send the opponent off-stage and set up for edgeguards. The move's edgeguarding potential is incredible, especially considering that DK can use it by letting go of ledge and double-jumping, then back airing the opponent, before regrabbing ledge, and can reasonably kill most opponents off-stage at +100%. He can even perform a pseudo-wall of pain by back jumping off-stage and double-jumping while still off-stage, hitting the opponent 2-to-3 times, before finishing the string with the strong hit of aerial up special and drifting back to the ledge.
Neutral[edit]
Arguably the most important use of back air in DK's kit is as a tool in neutral, similar to Jigglypuff's back aerial. Due to the fact that DK's forward-facing aerials are consistently a lot less useful when approaching (forward aerial is slow and leaves him open to a whiff punish, and neutral aerial has limited range and weak knockback), DK players will opt to turn around then back air at their opponents when approaching or walling; they can accomplish this from a dash-dance by jumping from a pivot or turn-around shield-stop, or by using his neutral special to turnaround before cancelling the first-windup with the shield button, a technique known as Reverse Charge Cancelling. With good timing, it is possible to do a reverse charge cancel and land a back aerial within a shorthop.
Adding to its utility as a neutral option, it's also quite safe on shield, both when SHFFLd (which makes it +/- 0 on block) and when spaced. In addition, it can be used to set up a frame trap with his up special, which, due to its low start-up and initial intangibility, will beat the majority of most character's out of shield options, even Fox's infamous OoS shine. When the DK player is the one shielding, it's generally regarded as the best out of shield aerial, especially when the opponent has crossed-up the DK and up special would whiff; up air is slightly faster and is generally better from a shield drop, but will whiff otherwise due to the hitbox being placed on DK's head.
The move is such a threatening and common option in neutral that DK players build strategies around the move. For example, a common 50/50 mixup against shields is to jump backwards towards the opponent, then either back air or tomahawk turnaround grab; the threat of back air alone is enough to get opponents to raise their shield. Yet another tool is to condition the opponent to back air's spacing, such that they dash-dance just outside of the move's range, then hit them with a fully-charged B-reversed Giant Punch, which has greater range and can lead to a tech chase, an edgeguard, or even a KO, depending upon their percent.
Hitboxes[edit]
Timing[edit]
| Initial autocancel | 1-6 |
|---|---|
| Clean hit | 7-8 |
| Late hit | 9-15 |
| Ending autocancel | 20- |
| Interruptible | 32 |
| Animation length | 39 |
Landing lag[edit]
| Animation length | 15 |
|---|---|
| L-cancelled animation length | 7 |
| Normal | |||||||||||||||
| L-cancelled |
Lag time |
Hitbox |
Hitbox change |
Autocancel |
Interruptible |
|

