Welcome to SmashWiki! Log in or create an account and join the community, and don't forget to read this first!
Notices
The Skill parameter has been removed from Smasher infoboxes, and in its place are the new "Best historical ranking" and "Best tournament result" parameters. SmashWiki needs help adding these new parameters to Smasher infoboxes, refer to the guidelines here for what should be included in these new parameters.
When adding results to Smasher pages, include each tournament's entrant number in addition to the player's placement, and use the {{Trn}} template with the matching game specified. Please also fix old results on Smasher pages that do not abide to this standard. Refer to our Smasher article guidelines to see how results tables should be formatted.
Check out our project page for ongoing projects that SmashWiki needs help with.
Super Smash Bros. Melee

Donkey Kong (SSBM)/Down special

From SmashWiki, the Super Smash Bros. wiki
< Donkey Kong (SSBM)
Revision as of 14:51, July 16, 2024 by Mariogeek2 (talk | contribs) (→‎Overview: Added a paragraph talking about the move's use against Luigi & IC's.)
(diff) ← Older revision | Latest revision (diff) | Newer revision → (diff)
Jump to navigationJump to search
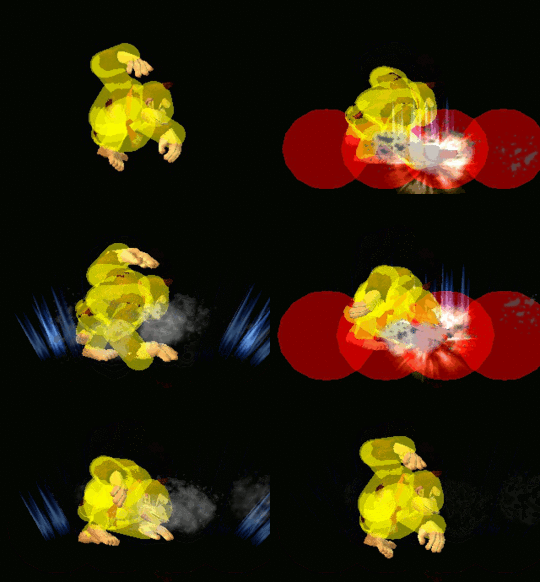
This article is about the hitbox visualization in Super Smash Bros. Melee. For the move itself, see Hand Slap.
Hitbox visualization showing Donkey Kong's Hand Slap.

Overview[edit]

DK, as the name implies, slaps his hands on the ground, shaking the screen and launching any opponent who's within range into the air.

Among DK's plethora of strong neutral tools and powerful kill moves, the Hand Slap sees minimal use in competitive play. The primary reason for this lack of use is the move's laggy start-up and recovery. The first hit doesn't come out until 1/3 of a second after the move is input (which is within humans' reaction time), and the entire move (assuming the loop isn't restarted) takes an entire second before DK can input any other move. This leaves DK open to a punish. In addition, the move is completely worthless against opponents aerialing into DK, since it can only hit grounded opponents.

Despite this, the move does see niche use. The move deals bonus damage to shields and lots of shield stun and pushback, potentially leading to a shield break. In addition, the move's high fixed knockback beats crouch cancelling, since it causes even crouching opponents (Peach or lighter) to tumble. When tech-chasing, DK can use this move instead of attempting to guess where the opponent will go, since the move's range is so large it'll cover nearly all their tech options. If it hits, it can potentially combo into grab, which can kickstart DK's massive combo game.

Two particular matchups where Hand Slap sees much more use are against Ice Climbers and Luigi, both of whom have absolutely horrid air speed and bad air acceleration, crippling their aerial approaches. These characters prefer to approach using their wavedashes, which this move is incredibly effective against, assuming the DK isn't too close so as to be punished during start-up. Against the Ice Climbers specifically, there's a decent chance it'll separate Nana from Popo.

Hitboxes[edit]

ID Part Damage SD Angle BK KS FKV Radius Bone Offset Clang Rebound Effect G A Sound
Hit 1
0 0 11% 1 AngleIcon84.png 20 100 110 8.999424 0 0.0 0.0 0.0 HitboxTableIcon(NoClang).png HitboxTableIcon(NoRebound).png Normal (effect) HitboxTableIcon(GroundedTrue).png HitboxTableIcon(AerialFalse).png L Kick
1 0 11% 1 AngleIcon84.png 20 100 110 8.999424 0 0.0 0.0 0.0 HitboxTableIcon(NoClang).png HitboxTableIcon(NoRebound).png Normal (effect) HitboxTableIcon(GroundedTrue).png HitboxTableIcon(AerialFalse).png L Kick
2 0 11% 1 AngleIcon84.png 20 100 110 8.999424 0 0.0 0.0 0.0 HitboxTableIcon(NoClang).png HitboxTableIcon(NoRebound).png Normal (effect) HitboxTableIcon(GroundedTrue).png HitboxTableIcon(AerialFalse).png L Kick
3 0 11% 1 AngleIcon84.png 20 100 110 8.999424 0 0.0 0.0 0.0 HitboxTableIcon(NoClang).png HitboxTableIcon(NoRebound).png Normal (effect) HitboxTableIcon(GroundedTrue).png HitboxTableIcon(AerialFalse).png L Kick
Hit 2
0 0 11% 1 AngleIcon84.png 30 100 110 9.99936 0 0.0 0.0 0.0 HitboxTableIcon(NoClang).png HitboxTableIcon(NoRebound).png Normal (effect) HitboxTableIcon(GroundedTrue).png HitboxTableIcon(AerialFalse).png L Kick
1 0 11% 1 AngleIcon84.png 30 100 110 9.99936 0 0.0 0.0 0.0 HitboxTableIcon(NoClang).png HitboxTableIcon(NoRebound).png Normal (effect) HitboxTableIcon(GroundedTrue).png HitboxTableIcon(AerialFalse).png L Kick
2 0 11% 1 AngleIcon84.png 30 100 110 9.99936 0 0.0 0.0 0.0 HitboxTableIcon(NoClang).png HitboxTableIcon(NoRebound).png Normal (effect) HitboxTableIcon(GroundedTrue).png HitboxTableIcon(AerialFalse).png L Kick
3 0 11% 1 AngleIcon84.png 30 100 110 9.99936 0 0.0 0.0 0.0 HitboxTableIcon(NoClang).png HitboxTableIcon(NoRebound).png Normal (effect) HitboxTableIcon(GroundedTrue).png HitboxTableIcon(AerialFalse).png L Kick

Timing[edit]

Input loop 14-40
Hit 1 19-20
Hit 2 30-31
Animation length 60
FrameIcon(Lag).png FrameIcon(Lag).png FrameIcon(Lag).png FrameIcon(Lag).png FrameIcon(Lag).png FrameIcon(Lag).png FrameIcon(Lag).png FrameIcon(Lag).png FrameIcon(Lag).png FrameIcon(Lag).png FrameIcon(Lag).png FrameIcon(Lag).png FrameIcon(LagLoopS).png FrameIcon(LagLoopE).png FrameIcon(Lag).png FrameIcon(Lag).png FrameIcon(Lag).png FrameIcon(Lag).png FrameIcon(Hitbox).png FrameIcon(Hitbox).png FrameIcon(Lag).png FrameIcon(Lag).png FrameIcon(Lag).png FrameIcon(Lag).png FrameIcon(Lag).png FrameIcon(Lag).png FrameIcon(Lag).png FrameIcon(Lag).png FrameIcon(Lag).png FrameIcon(Hitbox).png FrameIcon(Hitbox).png FrameIcon(Lag).png FrameIcon(Lag).png FrameIcon(Lag).png FrameIcon(Lag).png FrameIcon(Lag).png FrameIcon(Lag).png FrameIcon(Lag).png FrameIcon(Lag).png FrameIcon(LagLoopS).png FrameIcon(LagLoopE).png FrameIcon(Lag).png FrameIcon(Lag).png FrameIcon(Lag).png FrameIcon(Lag).png FrameIcon(Lag).png FrameIcon(Lag).png FrameIcon(Lag).png FrameIcon(Lag).png FrameIcon(Lag).png FrameIcon(Lag).png FrameIcon(Lag).png FrameIcon(Lag).png FrameIcon(Lag).png FrameIcon(Lag).png FrameIcon(Lag).png FrameIcon(Lag).png FrameIcon(Lag).png FrameIcon(Lag).png FrameIcon(Lag).png
Legend (1 square = 1 frame)
Lag
Lag time
Hitbox
Hitbox
FrameIcon(HitboxChangeS).pngFrameIcon(HitboxChangeE).png
Hitbox change
FrameIcon(BlankLoopS).pngFrameIcon(BlankLoopE).png
Loop point