Super Smash Bros. Ultimate

Snake (SSBU)/Neutral aerial: Difference between revisions

From SmashWiki, the Super Smash Bros. wiki
Jump to navigationJump to search
mNo edit summary
Tag: Mobile edit
Tag: Mobile edit
Line 2: Line 2:
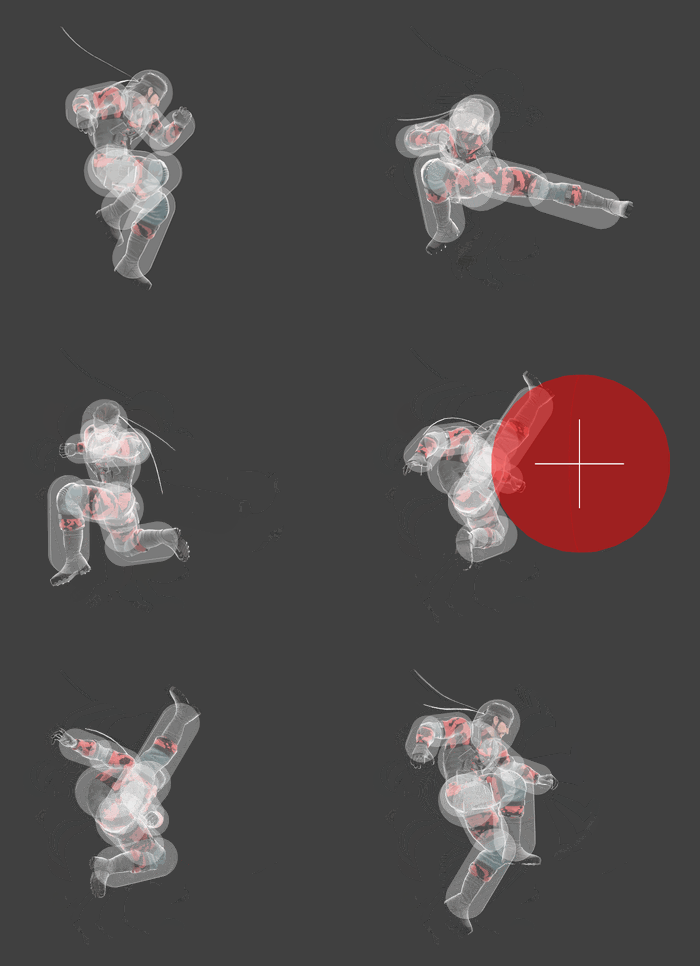
[[File:SnakeNAirSSBU.gif|thumb|350px|Hitbox visualization showing Snake's neutral aerial.]]
[[File:SnakeNAirSSBU.gif|thumb|350px|Hitbox visualization showing Snake's neutral aerial.]]
==Overview==
==Overview==
Snake's performs a rapid flurry of four kicks. It deals very high damage if all hit connect, dealing 17.8% if done in a short hop or 21% if done in a full hop and is a useful tool for edgeguarding. It is an excellent confirm out of grenade explosions, being able to dish out absurd damage with a single opening and the fourth hit has powerful knockback, enabling it KO at high percentages. However, an interesting property that the fourth hit has is that it is weight independent, meaning it KO's all characters around the same percentage.  
Snake's performs a rapid flurry of four kicks. It deals very high damage if all hit connect, dealing 17.8% if done in a short hop or 21% if done in a full hop and is a useful tool for edgeguarding. It is an excellent confirm out of grenade explosions, being able to dish out absurd damage with a single opening and the fourth hit has powerful knockback, enabling it to KO at high percentages. However, an interesting property that the fourth hit has is that it is weight independent, meaning it KO's all characters around the same percentage.  


The move also has potent combo potential. It can combo into a dash attack at low percents, and against heavyweights or fast fallers, can combo into jab or forward tilt at lower percent as well. In particular, on certain characters depending on their weight and fastest escape option (it generally works better on lighter characters), the first hit can combo into jab, forward tilt, or even up tilt for a potential KO setup if done in a short hop fast fall.  
Line 8: Line 8:
However, like the the rest of Snake's aerials, it is rather unsafe on shield and on whiff due to its decently high landing lag, and unlike many of Snake's other moves, it lacks a sizeable disjointed hitbox (aside from the last hit) which make it difficult to land, especially combined with Snake's low jumps.  


Altogether, it is a move with potent strengths but should not be thrown out recklessly to avoid punishment. Nonetheless, it has good utility when used properly.  
Altogether, it is a move with potent strengths but should not be thrown out recklessly to avoid punishment. Nonetheless, it has good utility when used properly.
 
==Hitboxes==
==Hitboxes==
{{UltimateHitboxTableHeader}}

Revision as of 17:22, April 12, 2022

Hitbox visualization showing Snake's neutral aerial.

Overview

Snake's performs a rapid flurry of four kicks. It deals very high damage if all hit connect, dealing 17.8% if done in a short hop or 21% if done in a full hop and is a useful tool for edgeguarding. It is an excellent confirm out of grenade explosions, being able to dish out absurd damage with a single opening and the fourth hit has powerful knockback, enabling it to KO at high percentages. However, an interesting property that the fourth hit has is that it is weight independent, meaning it KO's all characters around the same percentage.

The move also has potent combo potential. It can combo into a dash attack at low percents, and against heavyweights or fast fallers, can combo into jab or forward tilt at lower percent as well. In particular, on certain characters depending on their weight and fastest escape option (it generally works better on lighter characters), the first hit can combo into jab, forward tilt, or even up tilt for a potential KO setup if done in a short hop fast fall.

However, like the the rest of Snake's aerials, it is rather unsafe on shield and on whiff due to its decently high landing lag, and unlike many of Snake's other moves, it lacks a sizeable disjointed hitbox (aside from the last hit) which make it difficult to land, especially combined with Snake's low jumps.

Altogether, it is a move with potent strengths but should not be thrown out recklessly to avoid punishment. Nonetheless, it has good utility when used properly.

Hitboxes

ID Part Rehit rate Damage SD Angle Angle type BK KS FKV Set weight Radius Bone Offset SDI× T% Clang Rebound Effect Type G A Sound Direct Hit bits Hit part Blockable Reflectable Absorbable Flinchless No GFX Heedless
Hit 1
0 0 0 3.0% 0 Autolink angle (367) Standard 0 100 30 HitboxTableIcon(False).png 4.0 top 0.0 7.0 4.0 to 11.0 1.0× 1.0× 0% HitboxTableIcon(Clang).png HitboxTableIcon(Rebound).png Normal (effect) Foot (type) HitboxTableIcon(GroundedFalse).png HitboxTableIcon(AerialTrue).png S Kick SpecialsDirect.png All All HitboxTableIcon(Blockable).png HitboxTableIcon(Unreflectable).png HitboxTableIcon(Unabsorbable).png HitboxTableIcon(False).png HitboxTableIcon(False).png HitboxTableIcon(False).png
1 0 0 3.0% 0 AngleIcon90.png Standard 0 100 50 HitboxTableIcon(False).png 4.0 top 0.0 7.0 4.0 to 11.0 1.0× 1.0× 0% HitboxTableIcon(Clang).png HitboxTableIcon(Rebound).png Normal (effect) Foot (type) HitboxTableIcon(GroundedTrue).png HitboxTableIcon(AerialFalse).png S Kick SpecialsDirect.png All All HitboxTableIcon(Blockable).png HitboxTableIcon(Unreflectable).png HitboxTableIcon(Unabsorbable).png HitboxTableIcon(False).png HitboxTableIcon(False).png HitboxTableIcon(False).png
Hits 2-3
0 0 0 3.0% 0 Autolink angle (367) Standard 0 100 30 HitboxTableIcon(False).png 4.0 top 0.0 9.0 4.0 to 11.0 1.0× 1.0× 0% HitboxTableIcon(Clang).png HitboxTableIcon(Rebound).png Normal (effect) Foot (type) HitboxTableIcon(GroundedFalse).png HitboxTableIcon(AerialTrue).png M Kick SpecialsDirect.png All All HitboxTableIcon(Blockable).png HitboxTableIcon(Unreflectable).png HitboxTableIcon(Unabsorbable).png HitboxTableIcon(False).png HitboxTableIcon(False).png HitboxTableIcon(False).png
1 0 0 3.0% 0 AngleIcon90.png Standard 0 100 50 HitboxTableIcon(False).png 4.0 top 0.0 9.0 4.0 to 11.0 1.0× 1.0× 0% HitboxTableIcon(Clang).png HitboxTableIcon(Rebound).png Normal (effect) Foot (type) HitboxTableIcon(GroundedTrue).png HitboxTableIcon(AerialFalse).png M Kick SpecialsDirect.png All All HitboxTableIcon(Blockable).png HitboxTableIcon(Unreflectable).png HitboxTableIcon(Unabsorbable).png HitboxTableIcon(False).png HitboxTableIcon(False).png HitboxTableIcon(False).png
Hit 4
0 0 0 12.0% 0 Sakurai angle Forward 25 90 0 HitboxTableIcon(True).png 7.5 top 0.0 11.0 7.0 1.0× 1.0× 0% HitboxTableIcon(Clang).png HitboxTableIcon(Rebound).png Normal (effect) Foot (type) HitboxTableIcon(GroundedTrue).png HitboxTableIcon(AerialTrue).png L Kick SpecialsDirect.png All All HitboxTableIcon(Blockable).png HitboxTableIcon(Unreflectable).png HitboxTableIcon(Unabsorbable).png HitboxTableIcon(False).png HitboxTableIcon(False).png HitboxTableIcon(False).png

Timing

Attack

Initial autocancel 1-3
Hit 1 10-11
Hits 2-3 18-19, 26-27
Hit 4 36-38
Ending autocancel 50-
Interruptible 60
Animation length 66
FrameIcon(Lag).png FrameIcon(Lag).png FrameIcon(Lag).png FrameIcon(Lag).png FrameIcon(Lag).png FrameIcon(Lag).png FrameIcon(Lag).png FrameIcon(Lag).png FrameIcon(Lag).png FrameIcon(Hitbox).png FrameIcon(Hitbox).png FrameIcon(Lag).png FrameIcon(Lag).png FrameIcon(Lag).png FrameIcon(Lag).png FrameIcon(Lag).png FrameIcon(Lag).png FrameIcon(Hitbox).png FrameIcon(Hitbox).png FrameIcon(Lag).png FrameIcon(Lag).png FrameIcon(Lag).png FrameIcon(Lag).png FrameIcon(Lag).png FrameIcon(Lag).png FrameIcon(Hitbox).png FrameIcon(Hitbox).png FrameIcon(Lag).png FrameIcon(Lag).png FrameIcon(Lag).png FrameIcon(Lag).png FrameIcon(Lag).png FrameIcon(Lag).png FrameIcon(Lag).png FrameIcon(Lag).png FrameIcon(Hitbox).png FrameIcon(Hitbox).png FrameIcon(Hitbox).png FrameIcon(Lag).png FrameIcon(Lag).png FrameIcon(Lag).png FrameIcon(Lag).png FrameIcon(Lag).png FrameIcon(Lag).png FrameIcon(Lag).png FrameIcon(Lag).png FrameIcon(Lag).png FrameIcon(Lag).png FrameIcon(Lag).png FrameIcon(Lag).png FrameIcon(Lag).png FrameIcon(Lag).png FrameIcon(Lag).png FrameIcon(Lag).png FrameIcon(Lag).png FrameIcon(Lag).png FrameIcon(Lag).png FrameIcon(Lag).png FrameIcon(Lag).png FrameIcon(Interruptible).png FrameIcon(Interruptible).png FrameIcon(Interruptible).png FrameIcon(Interruptible).png FrameIcon(Interruptible).png FrameIcon(Interruptible).png FrameIcon(Interruptible).png
FrameIcon(Autocancel).png FrameIcon(Autocancel).png FrameIcon(Autocancel).png FrameIcon(Blank).png FrameIcon(Blank).png FrameIcon(Blank).png FrameIcon(Blank).png FrameIcon(Blank).png FrameIcon(Blank).png FrameIcon(Blank).png FrameIcon(Blank).png FrameIcon(Blank).png FrameIcon(Blank).png FrameIcon(Blank).png FrameIcon(Blank).png FrameIcon(Blank).png FrameIcon(Blank).png FrameIcon(Blank).png FrameIcon(Blank).png FrameIcon(Blank).png FrameIcon(Blank).png FrameIcon(Blank).png FrameIcon(Blank).png FrameIcon(Blank).png FrameIcon(Blank).png FrameIcon(Blank).png FrameIcon(Blank).png FrameIcon(Blank).png FrameIcon(Blank).png FrameIcon(Blank).png FrameIcon(Blank).png FrameIcon(Blank).png FrameIcon(Blank).png FrameIcon(Blank).png FrameIcon(Blank).png FrameIcon(Blank).png FrameIcon(Blank).png FrameIcon(Blank).png FrameIcon(Blank).png FrameIcon(Blank).png FrameIcon(Blank).png FrameIcon(Blank).png FrameIcon(Blank).png FrameIcon(Blank).png FrameIcon(Blank).png FrameIcon(Blank).png FrameIcon(Blank).png FrameIcon(Blank).png FrameIcon(Blank).png FrameIcon(Autocancel).png FrameIcon(Autocancel).png FrameIcon(Autocancel).png FrameIcon(Autocancel).png FrameIcon(Autocancel).png FrameIcon(Autocancel).png FrameIcon(Autocancel).png FrameIcon(Autocancel).png FrameIcon(Autocancel).png FrameIcon(Autocancel).png FrameIcon(Autocancel).png FrameIcon(Autocancel).png FrameIcon(Autocancel).png FrameIcon(Autocancel).png FrameIcon(Autocancel).png FrameIcon(Autocancel).png FrameIcon(Autocancel).png

Landing lag

Interruptible 17
Animation length 39
FrameIcon(Lag).png FrameIcon(Lag).png FrameIcon(Lag).png FrameIcon(Lag).png FrameIcon(Lag).png FrameIcon(Lag).png FrameIcon(Lag).png FrameIcon(Lag).png FrameIcon(Lag).png FrameIcon(Lag).png FrameIcon(Lag).png FrameIcon(Lag).png FrameIcon(Lag).png FrameIcon(Lag).png FrameIcon(Lag).png FrameIcon(Lag).png FrameIcon(Interruptible).png FrameIcon(Interruptible).png FrameIcon(Interruptible).png FrameIcon(Interruptible).png FrameIcon(Interruptible).png FrameIcon(Interruptible).png FrameIcon(Interruptible).png FrameIcon(Interruptible).png FrameIcon(Interruptible).png FrameIcon(Interruptible).png FrameIcon(Interruptible).png FrameIcon(Interruptible).png FrameIcon(Interruptible).png FrameIcon(Interruptible).png FrameIcon(Interruptible).png FrameIcon(Interruptible).png FrameIcon(Interruptible).png FrameIcon(Interruptible).png FrameIcon(Interruptible).png FrameIcon(Interruptible).png FrameIcon(Interruptible).png FrameIcon(Interruptible).png FrameIcon(Interruptible).png
Legend (1 square = 1 frame)
Lag
Lag time
Hitbox
Hitbox
Auto-canceling
Autocancel
Interruptibility
Interruptible