Bowser (SSBU)/Neutral attack/Hit 2: Difference between revisions
From SmashWiki, the Super Smash Bros. wiki
Jump to navigationJump to search
MacForever (talk | contribs) (New Page: {{ArticleIcons|ssbu=y}} {{technical data|timing}} thumb|270px|Hitbox visualization showing Bowser's second jab. ==Overview== Bowser punches with his right h...) |
No edit summary |
||
| Line 1: | Line 1: | ||
{{ArticleIcons|ssbu=y}} | {{ArticleIcons|ssbu=y}} | ||
{{ | {{competitive expertise}} | ||
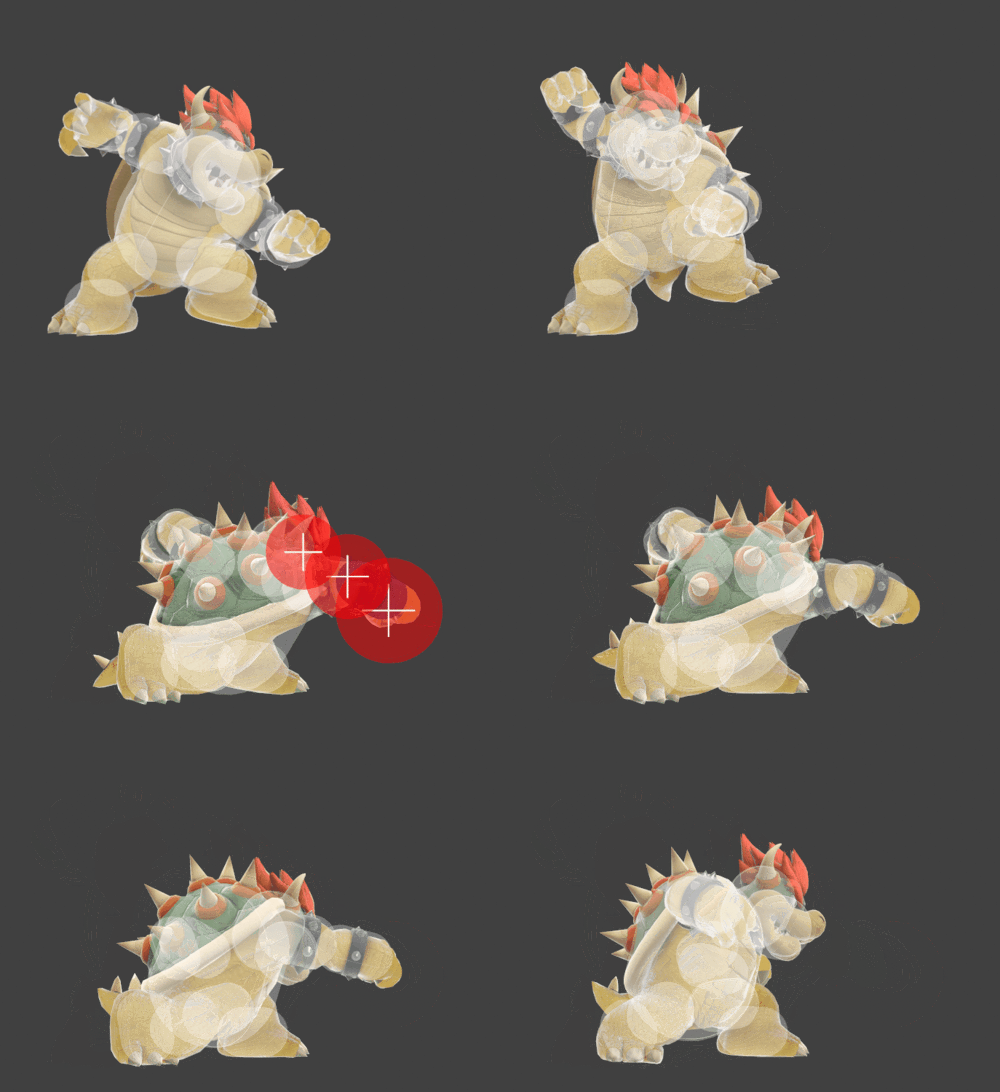
[[File:BowserJab2SSBU.gif|thumb| | [[File:BowserJab2SSBU.gif|thumb|500px|Hitbox visualization showing Bowser's second jab.]] | ||
==Overview== | ==Overview== | ||
Bowser punches | Bowser punches forward. With it's low ending lag, it can be safe on shield if spaced. The angle at which it sends is good for tech chase setups and can kill near the ledge at higher percents. Just like his Jab 1, Bowser has intangibility on his arm while the hitboxes are out. | ||
==Hitboxes== | ==Hitboxes== | ||
{{UltimateHitboxTableHeader}} | {{UltimateHitboxTableHeader}} | ||
| Line 12: | Line 11: | ||
|damage=7.0% | |damage=7.0% | ||
|angle=361 | |angle=361 | ||
|bk= | |bk=50 | ||
|ks= | |ks=100 | ||
|fkv= | |fkv=0 | ||
|r=5.0 | |r=5.0 | ||
|bn=armr | |bn=armr | ||
| Line 24: | Line 23: | ||
|effect=Normal | |effect=Normal | ||
|sfx=Punch | |sfx=Punch | ||
|slvl= | |slvl=L | ||
}} | }} | ||
{{UltimateHitboxTableRow | {{UltimateHitboxTableRow | ||
| Line 30: | Line 29: | ||
|damage=7.0% | |damage=7.0% | ||
|angle=361 | |angle=361 | ||
|bk= | |bk=50 | ||
|ks= | |ks=100 | ||
|fkv= | |fkv=0 | ||
|r=4.0 | |r=4.0 | ||
|bn=armr | |bn=armr | ||
| Line 42: | Line 41: | ||
|effect=Normal | |effect=Normal | ||
|sfx=Punch | |sfx=Punch | ||
|slvl= | |slvl=L | ||
}} | }} | ||
{{UltimateHitboxTableRow | {{UltimateHitboxTableRow | ||
| Line 48: | Line 47: | ||
|damage=7.0% | |damage=7.0% | ||
|angle=361 | |angle=361 | ||
|bk= | |bk=50 | ||
|ks= | |ks=100 | ||
|fkv= | |fkv=0 | ||
|r=3.5 | |r=3.5 | ||
|bn=armr | |bn=armr | ||
| Line 60: | Line 59: | ||
|effect=Normal | |effect=Normal | ||
|sfx=Punch | |sfx=Punch | ||
|slvl= | |slvl=L | ||
}} | }} | ||
|} | |} | ||
==Timing== | |||
{|class="wikitable" | |||
!Arm intangible | |||
|9-11 | |||
|- | |||
!Hitboxes | |||
|9-11 | |||
|- | |||
!Interruptible | |||
|26 | |||
|- | |||
!Animation length | |||
|32 | |||
|} | |||
{{FrameStripStart}} | |||
{{FrameStrip|t=Lag|c=8}}{{FrameStrip|t=Hitbox|c=3}}{{FrameStrip|t=Lag|c=14}}{{FrameStrip|t=Interruptible|c=7}} | |||
|- | |||
{{FrameStrip|t=Vulnerable|c=8}}{{FrameStrip|t=Intangible|c=3}}{{FrameStrip|t=Vulnerable|c=21}} | |||
{{FrameStripEnd}} | |||
{{FrameIconLegend|lag=y|hitbox=y|intangible=y|vulnerable=y|interruptible=y}} | |||
{{MvSubNavBowser|g=SSBU}} | {{MvSubNavBowser|g=SSBU}} | ||
[[Category:Bowser (SSBU)]] | [[Category:Bowser (SSBU)]] | ||
[[Category:Neutral attacks (SSBU)]] | |||
Revision as of 22:05, January 17, 2020
Overview
Bowser punches forward. With it's low ending lag, it can be safe on shield if spaced. The angle at which it sends is good for tech chase setups and can kill near the ledge at higher percents. Just like his Jab 1, Bowser has intangibility on his arm while the hitboxes are out.
Hitboxes
Timing
| Arm intangible | 9-11 |
|---|---|
| Hitboxes | 9-11 |
| Interruptible | 26 |
| Animation length | 32 |
Lag time |
Hitbox |
Vulnerable |
Intangible |
Interruptible |
|

