Super Smash Bros. Ultimate

Kirby (SSBU)/Forward aerial: Difference between revisions

From SmashWiki, the Super Smash Bros. wiki
Jump to navigationJump to search
(→‎Overview: the part I removed was just confusing and meant nothing.)
Line 2: Line 2:
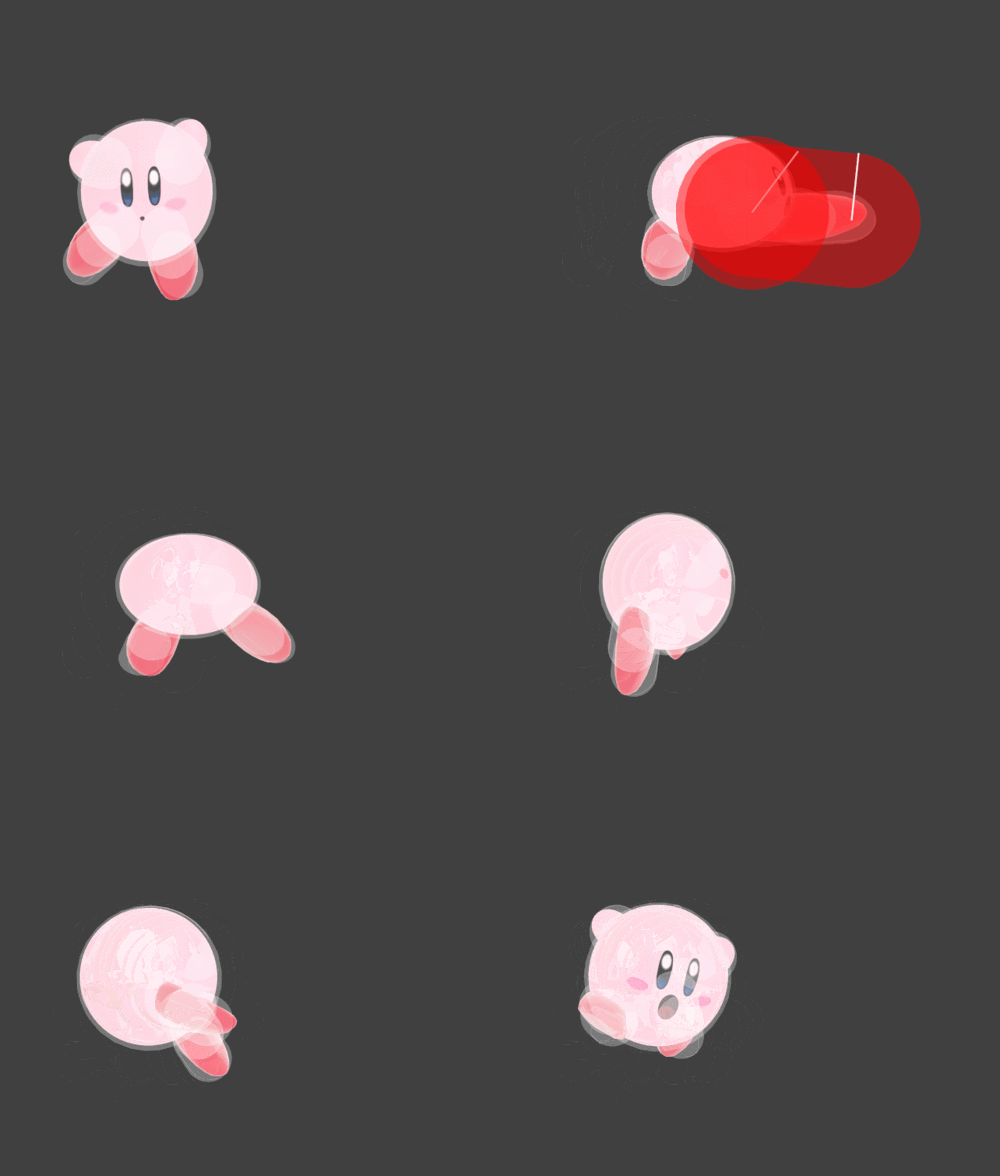
[[File:KirbyFAirSSBU.gif|thumb|500px|Hitbox visualization showing Kirby's forward aerial.]]
[[File:KirbyFAirSSBU.gif|thumb|500px|Hitbox visualization showing Kirby's forward aerial.]]
==Overview==
==Overview==
A series of three kicks in front of Kirby. It has the second slowest startup of his aerials due to it coming out on frame 10 and only autocancels one frame after he reaches the peak of his short hop. Due to this, it cannot autocancel in a short hop, but can do so in a full hop fast fall. It has good versatility: it can be used as an approach option, is good for extending combos, can combo into itself at low and mid percentages for a Wall of Pain, has minimal landing lag (8 frames), giving it some setups, and it's good for edgeguarding or rackup damage: it deals 12% damage, with the final hit dealing 5% and having average knockback that allows it to KO middleweights on the edge of Final Destination at around 140% without rage. It's also a good out-of shield option due to these traits, especially if Kirby gets pushed too far to hit the opponent with a neutral or up aerial.
A series of three kicks in front of Kirby. It has the second slowest startup of his aerials due to it coming out on frame 10. It cannot autocancel in a short hop, but can do so in a full hop fast fall. It has good versatility: it can be used as an approach option, is good for extending combos, can combo into itself at low and mid percentages for a Wall of Pain, has minimal landing lag (8 frames), giving it some setups, and it's good for edgeguarding or rackup damage: it deals 12% damage, with the final hit dealing 5% and having average knockback that allows it to KO middleweights on the edge of Final Destination at around 140% without rage. It's also a good out-of shield option due to these traits, especially if Kirby gets pushed too far to hit the opponent with a neutral or up aerial.


==Hitboxes==
==Hitboxes==

Revision as of 22:46, June 25, 2020

Hitbox visualization showing Kirby's forward aerial.

Overview

A series of three kicks in front of Kirby. It has the second slowest startup of his aerials due to it coming out on frame 10. It cannot autocancel in a short hop, but can do so in a full hop fast fall. It has good versatility: it can be used as an approach option, is good for extending combos, can combo into itself at low and mid percentages for a Wall of Pain, has minimal landing lag (8 frames), giving it some setups, and it's good for edgeguarding or rackup damage: it deals 12% damage, with the final hit dealing 5% and having average knockback that allows it to KO middleweights on the edge of Final Destination at around 140% without rage. It's also a good out-of shield option due to these traits, especially if Kirby gets pushed too far to hit the opponent with a neutral or up aerial.

Hitboxes

ID Part Rehit rate Damage SD Angle Angle type BK KS FKV Set weight Radius Bone Offset SDI× T% Clang Rebound Effect Type G A Sound Direct Hit bits Hit part Blockable Reflectable Absorbable Flinchless No GFX Heedless
Hit 1
0 0 0 4.0% 0 AngleIcon53.png Standard 43 39 0 HitboxTableIcon(False).png 5.0 top 0.0 4.0 6.5 0.8× 0.5× 0% HitboxTableIcon(Clang).png HitboxTableIcon(Rebound).png Normal (effect) Foot (type) HitboxTableIcon(GroundedTrue).png HitboxTableIcon(AerialTrue).png M Kick SpecialsDirect.png All All HitboxTableIcon(Blockable).png HitboxTableIcon(Unreflectable).png HitboxTableIcon(Unabsorbable).png HitboxTableIcon(False).png HitboxTableIcon(False).png HitboxTableIcon(False).png
1 0 0 4.0% 0 AngleIcon84.png Standard 35 38 0 HitboxTableIcon(False).png 4.4 top 0.0 3.5 to 4.2 13.0 to 6.5 0.8× 0.5× 0% HitboxTableIcon(Clang).png HitboxTableIcon(Rebound).png Normal (effect) Foot (type) HitboxTableIcon(GroundedTrue).png HitboxTableIcon(AerialTrue).png M Kick SpecialsDirect.png All All HitboxTableIcon(Blockable).png HitboxTableIcon(Unreflectable).png HitboxTableIcon(Unabsorbable).png HitboxTableIcon(False).png HitboxTableIcon(False).png HitboxTableIcon(False).png
Hit 2
0 0 0 3.0% 0 Autolink angle (367) Standard 28 30 0 HitboxTableIcon(False).png 4.5 top 0.0 2.8 to 4.1 13.0 to 7.0 0.8× 0.5× 0% HitboxTableIcon(Clang).png HitboxTableIcon(Rebound).png Normal (effect) Foot (type) HitboxTableIcon(GroundedTrue).png HitboxTableIcon(AerialTrue).png M Kick SpecialsDirect.png All All HitboxTableIcon(Blockable).png HitboxTableIcon(Unreflectable).png HitboxTableIcon(Unabsorbable).png HitboxTableIcon(False).png HitboxTableIcon(False).png HitboxTableIcon(False).png
Hit 3
0 0 0 5.0% 0 Sakurai angle Standard 30 148 0 HitboxTableIcon(False).png 5.1 top 0.0 3.0 to 4.2 13.0 to 7.0 1.0× 1.0× 0% HitboxTableIcon(Clang).png HitboxTableIcon(Rebound).png Normal (effect) Foot (type) HitboxTableIcon(GroundedTrue).png HitboxTableIcon(AerialTrue).png L Kick SpecialsDirect.png All All HitboxTableIcon(Blockable).png HitboxTableIcon(Unreflectable).png HitboxTableIcon(Unabsorbable).png HitboxTableIcon(False).png HitboxTableIcon(False).png HitboxTableIcon(False).png

Timing

Attack

Initital autocancel 1-9
Hit 1 10-11
Hit 2 17-18
Hit 3 25-27
Ending autocancel 41-
Interruptible 48
Animation length 68
FrameIcon(Lag).png FrameIcon(Lag).png FrameIcon(Lag).png FrameIcon(Lag).png FrameIcon(Lag).png FrameIcon(Lag).png FrameIcon(Lag).png FrameIcon(Lag).png FrameIcon(Lag).png FrameIcon(Hitbox).png FrameIcon(Hitbox).png FrameIcon(Lag).png FrameIcon(Lag).png FrameIcon(Lag).png FrameIcon(Lag).png FrameIcon(Lag).png FrameIcon(Hitbox).png FrameIcon(Hitbox).png FrameIcon(Lag).png FrameIcon(Lag).png FrameIcon(Lag).png FrameIcon(Lag).png FrameIcon(Lag).png FrameIcon(Lag).png FrameIcon(Hitbox).png FrameIcon(Hitbox).png FrameIcon(Hitbox).png FrameIcon(Lag).png FrameIcon(Lag).png FrameIcon(Lag).png FrameIcon(Lag).png FrameIcon(Lag).png FrameIcon(Lag).png FrameIcon(Lag).png FrameIcon(Lag).png FrameIcon(Lag).png FrameIcon(Lag).png FrameIcon(Lag).png FrameIcon(Lag).png FrameIcon(Lag).png FrameIcon(Lag).png FrameIcon(Lag).png FrameIcon(Lag).png FrameIcon(Lag).png FrameIcon(Lag).png FrameIcon(Lag).png FrameIcon(Lag).png FrameIcon(Interruptible).png FrameIcon(Interruptible).png FrameIcon(Interruptible).png FrameIcon(Interruptible).png FrameIcon(Interruptible).png FrameIcon(Interruptible).png FrameIcon(Interruptible).png FrameIcon(Interruptible).png FrameIcon(Interruptible).png FrameIcon(Interruptible).png FrameIcon(Interruptible).png FrameIcon(Interruptible).png FrameIcon(Interruptible).png FrameIcon(Interruptible).png FrameIcon(Interruptible).png FrameIcon(Interruptible).png FrameIcon(Interruptible).png FrameIcon(Interruptible).png FrameIcon(Interruptible).png FrameIcon(Interruptible).png FrameIcon(Interruptible).png
FrameIcon(Autocancel).png FrameIcon(Autocancel).png FrameIcon(Autocancel).png FrameIcon(Autocancel).png FrameIcon(Autocancel).png FrameIcon(Autocancel).png FrameIcon(Autocancel).png FrameIcon(Autocancel).png FrameIcon(Autocancel).png FrameIcon(Blank).png FrameIcon(Blank).png FrameIcon(Blank).png FrameIcon(Blank).png FrameIcon(Blank).png FrameIcon(Blank).png FrameIcon(Blank).png FrameIcon(Blank).png FrameIcon(Blank).png FrameIcon(Blank).png FrameIcon(Blank).png FrameIcon(Blank).png FrameIcon(Blank).png FrameIcon(Blank).png FrameIcon(Blank).png FrameIcon(Blank).png FrameIcon(Blank).png FrameIcon(Blank).png FrameIcon(Blank).png FrameIcon(Blank).png FrameIcon(Blank).png FrameIcon(Blank).png FrameIcon(Blank).png FrameIcon(Blank).png FrameIcon(Blank).png FrameIcon(Blank).png FrameIcon(Blank).png FrameIcon(Blank).png FrameIcon(Blank).png FrameIcon(Blank).png FrameIcon(Blank).png FrameIcon(Autocancel).png FrameIcon(Autocancel).png FrameIcon(Autocancel).png FrameIcon(Autocancel).png FrameIcon(Autocancel).png FrameIcon(Autocancel).png FrameIcon(Autocancel).png FrameIcon(Autocancel).png FrameIcon(Autocancel).png FrameIcon(Autocancel).png FrameIcon(Autocancel).png FrameIcon(Autocancel).png FrameIcon(Autocancel).png FrameIcon(Autocancel).png FrameIcon(Autocancel).png FrameIcon(Autocancel).png FrameIcon(Autocancel).png FrameIcon(Autocancel).png FrameIcon(Autocancel).png FrameIcon(Autocancel).png FrameIcon(Autocancel).png FrameIcon(Autocancel).png FrameIcon(Autocancel).png FrameIcon(Autocancel).png FrameIcon(Autocancel).png FrameIcon(Autocancel).png FrameIcon(Autocancel).png FrameIcon(Autocancel).png

Landing lag

Animation length 8
FrameIcon(Lag).png FrameIcon(Lag).png FrameIcon(Lag).png FrameIcon(Lag).png FrameIcon(Lag).png FrameIcon(Lag).png FrameIcon(Lag).png FrameIcon(Lag).png
Legend (1 square = 1 frame)
Lag
Lag time
Hitbox
Hitbox
FrameIcon(HitboxChangeS).pngFrameIcon(HitboxChangeE).png
Hitbox change
Auto-canceling
Autocancel
Interruptibility
Interruptible