Kirby (SSB4)/Down throw: Difference between revisions
From SmashWiki, the Super Smash Bros. wiki
Jump to navigationJump to search
Smash Master (talk | contribs) (New Page: {{ArticleIcons|ssb4=y}} ==Overview== The Fury Stomp from the Suplex ability in Kirby Super Star. Kirby throws the opponent onto the ground, then rapidly stomps on them several times, an...) |
SuperSqank (talk | contribs) m (→Throw) |
||
| (9 intermediate revisions by 6 users not shown) | |||
| Line 1: | Line 1: | ||
{{ArticleIcons|ssb4=y}} | {{ArticleIcons|ssb4=y}} | ||
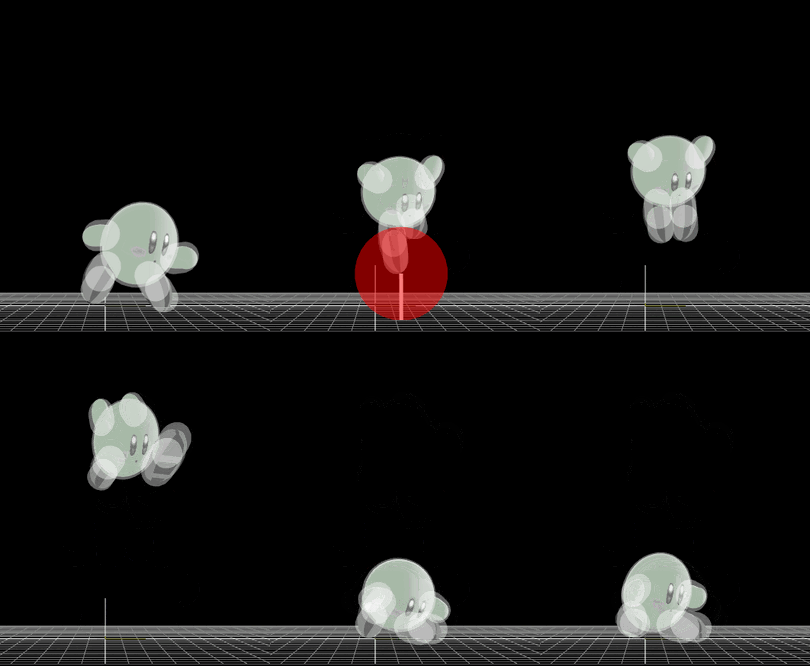
[[File:KirbyThrowDown.gif|thumb|270px|Hitbox visualization showing Kirby's down throw.]] | |||
==Overview== | ==Overview== | ||
The Fury Stomp from the Suplex ability in Kirby Super Star. Kirby throws the opponent onto the ground, then rapidly stomps on them several times, and then finishes with a jumping double foot stomp. The stomps also damage nearby opponents. Good for racking up damage when no other throw will do and is Kirby's most damaging throw. | The Fury Stomp from the Suplex ability in ''[[Kirby Super Star]]''. Kirby throws the opponent onto the ground, then rapidly stomps on them several times, and then finishes with a jumping double foot stomp. The stomps also damage nearby opponents. Good for racking up damage when no other throw will do and is Kirby's most damaging throw. Unlike most down throws, it has enough knockback to KO middleweights at around 200%. | ||
==Update history== | ==Update history== | ||
'''{{GameIcon|ssb4}} [[1.0.6]]''' | '''{{GameIcon|ssb4}} [[1.0.6]]''' | ||
*{{buff| | *{{buff|Damage (0.4% (hits 1-9)/6.6% (total) → 0.8%/10.2%).}} | ||
==Hitboxes== | ==Throw and Hitbox Data== | ||
{|class="wikitable | ===Hitboxes=== | ||
{{SSB4HitboxTableHeader|special=y}} | |||
{{HitboxTableTitle|Hits 1-9|38}} | |||
{{SSB4SpecialHitboxTableRow | |||
|id=0 | |||
|damage=0.8% | |||
|angle=270 | |||
|af=3 | |||
|bk=0 | |||
|ks=100 | |||
|fkv=10 | |||
|r=5.76 | |||
|bn=0 | |||
|ypos=4.0 | |||
|zpos=3.2 | |||
|trip=0 | |||
|type=Foot | |||
|effect=Normal | |||
|sfx=Kick | |||
|slvl=M | |||
|clang=f | |||
|rebound=f | |||
}} | |||
{{HitboxTableTitle|Hit 10|38}} | |||
{{SSB4SpecialHitboxTableRow | |||
|id=0 | |||
|damage=1% | |||
|angle=270 | |||
|af=3 | |||
|bk=0 | |||
|ks=100 | |||
|fkv=10 | |||
|r=5.76 | |||
|bn=0 | |||
|ypos=4.0 | |||
|zpos=2.4 | |||
|trip=0 | |||
|type=Foot | |||
|effect=Normal | |||
|sfx=Kick | |||
|slvl=M | |||
|clang=f | |||
|rebound=f | |||
}} | |||
|} | |||
===Throw=== | |||
{{SSB4ThrowTableHeader}} | |||
{{SSB4ThrowTableRow | |||
|id=0 | |||
|damage=2% | |||
|af=3 | |||
|angle=63 | |||
|bk=60 | |||
|ks=180 | |||
|fkv=0 | |||
|bn=0 | |||
|noff=false | |||
|trip=0 | |||
|type=Throwing | |||
|effect=Normal | |||
|slvl=S | |||
|sfx=None | |||
}} | |||
{{SSB4ThrowTableRow | |||
|id=1 | |||
|damage=3% | |||
|af=3 | |||
|angle=361 | |||
|bk=60 | |||
|ks=100 | |||
|fkv=0 | |||
|bn=0 | |||
|noff=true | |||
|trip=0 | |||
|type=Throwing | |||
|effect=Normal | |||
|slvl=S | |||
|sfx=None | |||
}} | |||
|} | |||
==Timing== | |||
{|class="wikitable" | |||
!Invincibility | |||
|1-18 | |||
|- | |||
!Hits 1-9 | |||
|9-10, 13-14, 17-18, 21-22, 25-26, 29-30, 33-34, 37-38, 41-42 | |||
|- | |||
!Hit 10 | |||
|56-57 | |||
|- | |- | ||
! | !Throw Release | ||
| | |58 | ||
| | |- | ||
!Interruptible | |||
|88 | |||
|- | |||
!Animation length | |||
|94 | |||
|} | |} | ||
{{FrameStripStart}} | |||
{{FrameStrip|t=Lag|c=8}}{{FrameStrip|t=Hitbox|c=2}}{{FrameStrip|t=Lag|c=2}}{{FrameStrip|t=Hitbox|c=2}}{{FrameStrip|t=Lag|c=2}}{{FrameStrip|t=Hitbox|c=2}}{{FrameStrip|t=Lag|c=2}}{{FrameStrip|t=Hitbox|c=2}}{{FrameStrip|t=Lag|c=2}}{{FrameStrip|t=Hitbox|c=2}}{{FrameStrip|t=Lag|c=2}}{{FrameStrip|t=Hitbox|c=2}}{{FrameStrip|t=Lag|c=2}}{{FrameStrip|t=Hitbox|c=2}}{{FrameStrip|t=Lag|c=2}}{{FrameStrip|t=Hitbox|c=2}}{{FrameStrip|t=Lag|c=2}}{{FrameStrip|t=Hitbox|c=2}}{{FrameStrip|t=Lag|c=13}}{{FrameStrip|t=Hitbox|c=2|e=HitboxThrowS}}{{FrameStrip|t=Lag|c=30|s=LagThrowE}}{{FrameStrip|t=Interruptible|c=7}} | |||
|- | |||
{{FrameStrip|t=Invincible|c=18}}{{FrameStrip|t=Vulnerable|c=76}} | |||
{{FrameStripEnd}} | |||
{{FrameIconLegend|lag=y|hitbox=y|throw=y|vulnerable=y|invincible=y|interruptible=y}} | |||
{{MvSubNavKirby|g=SSB4}} | |||
{{MvSubNavKirby}} | |||
[[Category:Kirby (SSB4)]] | [[Category:Kirby (SSB4)]] | ||
[[Category:Down throws (SSB4)]] | [[Category:Down throws (SSB4)]] | ||
Latest revision as of 05:57, June 11, 2021
Overview[edit]
The Fury Stomp from the Suplex ability in Kirby Super Star. Kirby throws the opponent onto the ground, then rapidly stomps on them several times, and then finishes with a jumping double foot stomp. The stomps also damage nearby opponents. Good for racking up damage when no other throw will do and is Kirby's most damaging throw. Unlike most down throws, it has enough knockback to KO middleweights at around 200%.
Update history[edit]
 Damage (0.4% (hits 1-9)/6.6% (total) → 0.8%/10.2%).
Throw and Hitbox Data[edit]
Hitboxes[edit]
Throw[edit]
| ID | Damage | Angle | BK | KS | FKV | Bone | FFx | Type | Effect | Sound | |
|---|---|---|---|---|---|---|---|---|---|---|---|
| 0 | 2% | Forwards | 60 | 180 | 0 | 0 | 1.0x | ||||
| 1 | 3% | Forwards | 60 | 100 | 0 | 0 | None | ||||
Timing[edit]
| Invincibility | 1-18 |
|---|---|
| Hits 1-9 | 9-10, 13-14, 17-18, 21-22, 25-26, 29-30, 33-34, 37-38, 41-42 |
| Hit 10 | 56-57 |
| Throw Release | 58 |
| Interruptible | 88 |
| Animation length | 94 |
Lag time |
Hitbox |
Vulnerable |
Invincible |
Throw point |
Interruptible |
|
