Pikachu (SSB)/Down tilt: Difference between revisions
m (Dots, do this when you make one of these articles) |
Ghhhooossst (talk | contribs) mNo edit summary |
||
| (8 intermediate revisions by 6 users not shown) | |||
| Line 3: | Line 3: | ||
==Overview== | ==Overview== | ||
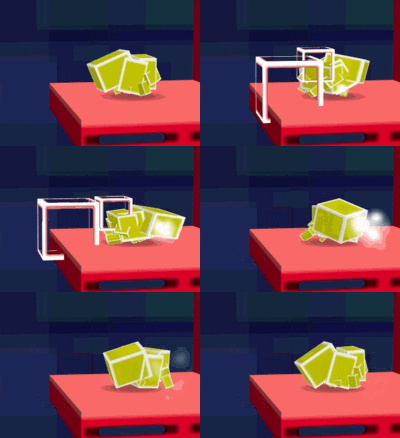
[[File:Pikachu Down Tilt Hitbox Smash 64.gif|thumb|The hitbox of Pikachu's d-tilt.]] | [[File:Pikachu Down Tilt Hitbox Smash 64.gif|thumb|The hitbox of Pikachu's d-tilt.]] | ||
Pikachu does a tail sweep in front if itself, doing 12% and powerful semi-spike knockback. The move, like many of Pikachu's others moves, has disjointed range | Pikachu does a tail sweep in front if itself, doing 12% and powerful semi-spike knockback. The move, like many of Pikachu's others moves, has [[disjointed]] [[range]], though it does not [[combo]] as well as most of Pikachu's moves due to its angle and knockback limiting followup options. However, the knockback and angle of the move is useful for [[gimp]]ing other characters recoveries, especially the ones whose recoveries gives poor horizontal distances such as {{SSB|Captain Falcon}} and {{SSB|Samus}}. It can also chain into itself against a wall on [[Hyrule Castle]]. Additionally, at high percentages, it can be used while standing just above the "tent" portion of Hyrule Castle on an opponent to knock them into the greenhouse, then back to Pikachu, allowing an {{mvsub|Pikachu|SSB|up smash}} to be used as a followup. | ||
{{ | ==Hitboxes== | ||
{{SSB64HitboxTableHeader}} | |||
{{SSB64HitboxTableRow | |||
|id=0 | |||
|part=0 | |||
|damage=12% | |||
|angle=35 | |||
|bk=12 | |||
|ks=100 | |||
|fkv=0 | |||
|r=80 | |||
|bn=29 | |||
|type=Tail | |||
|sfx=Kick | |||
|slvl=L | |||
}} | |||
{{SSB64HitboxTableRow | |||
|id=1 | |||
|part=0 | |||
|damage=12% | |||
|angle=35 | |||
|bk=12 | |||
|ks=100 | |||
|fkv=0 | |||
|r=140 | |||
|xpos=110 | |||
|ypos=170 | |||
|zpos=-65 | |||
|bn=29 | |||
|type=Tail | |||
|sfx=Kick | |||
|slvl=L | |||
}} | |||
|} | |||
==Timing== | |||
{|class="wikitable" | |||
!Hitboxes | |||
|6-13 | |||
|- | |||
!Animation length | |||
|25 | |||
|} | |||
{{FrameStripStart}} | |||
{{FrameStrip|t=Lag|c=5}}{{FrameStrip|t=Hitbox|c=8}}{{FrameStrip|t=Lag|c=12}} | |||
{{FrameStripEnd}} | |||
{{FrameIconLegend|lag=y|hitbox=y}} | |||
{{MvSubNavPikachu|g=SSB}} | |||
[[Category:Pikachu (SSB)]] | [[Category:Pikachu (SSB)]] | ||
[[Category:Down tilts]] | [[Category:Down tilts (SSB)]] | ||
[[Category:Normal attacks (SSB)]] | |||
Latest revision as of 22:01, April 10, 2020
Overview[edit]
Pikachu does a tail sweep in front if itself, doing 12% and powerful semi-spike knockback. The move, like many of Pikachu's others moves, has disjointed range, though it does not combo as well as most of Pikachu's moves due to its angle and knockback limiting followup options. However, the knockback and angle of the move is useful for gimping other characters recoveries, especially the ones whose recoveries gives poor horizontal distances such as Captain Falcon and Samus. It can also chain into itself against a wall on Hyrule Castle. Additionally, at high percentages, it can be used while standing just above the "tent" portion of Hyrule Castle on an opponent to knock them into the greenhouse, then back to Pikachu, allowing an up smash to be used as a followup.
Hitboxes[edit]
| ID | Part | Damage | SD | Angle | BK | KS | FKV | Radius | Bone | Offset | Clang | Effect | G | A | Sound | ||
|---|---|---|---|---|---|---|---|---|---|---|---|---|---|---|---|---|---|
| 0 | 0 | 12% | 0 | 12 | 100 | 0 | 80 | 29 | 0 | 0 | 0 | ||||||
| 1 | 0 | 12% | 0 | 12 | 100 | 0 | 140 | 29 | 110 | 170 | -65 | ||||||
Timing[edit]
| Hitboxes | 6-13 |
|---|---|
| Animation length | 25 |
Lag time |
Hitbox |
