Meta Knight (SSB4)/Down throw: Difference between revisions
SuperSqank (talk | contribs) m (→Throw) |
|||
| (4 intermediate revisions by the same user not shown) | |||
| Line 1: | Line 1: | ||
{{ArticleIcons|ssb4=y}} | {{ArticleIcons|ssb4=y}} | ||
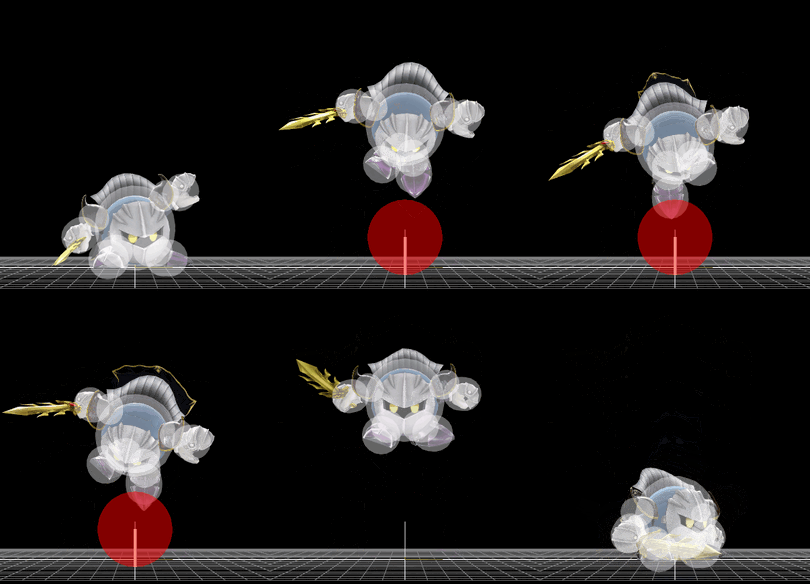
[[File:MetaKnightThrowDown.gif|thumb|270px|Hitbox visualization showing Meta Knight's down throw.]] | [[File:MetaKnightThrowDown.gif|thumb|270px|Hitbox visualization showing Meta Knight's down throw.]] | ||
==Overview== | ==Overview== | ||
| Line 8: | Line 7: | ||
However, down throw has very high knockback growth, preventing Meta Knight from following up reliably past mid-percents outside of Shuttle Loop, but even Shuttle Loop can be escaped with proper DI at [[KO]] percents, all while down throw is too weak to KO realistically. As such, his dash attack and forward throw are generally more effective for combos at higher percents. | However, down throw has very high knockback growth, preventing Meta Knight from following up reliably past mid-percents outside of Shuttle Loop, but even Shuttle Loop can be escaped with proper DI at [[KO]] percents, all while down throw is too weak to KO realistically. As such, his dash attack and forward throw are generally more effective for combos at higher percents. | ||
==Throw | ==Throw and Hitbox Data== | ||
===Hitboxes=== | |||
{{SSB4HitboxTableHeader|special=y}} | |||
{{HitboxTableTitle|Hits 1-9|38}} | |||
{{SSB4SpecialHitboxTableRow | |||
|id=0 | |||
|damage=0.5% | |||
|angle=270 | |||
|af=3 | |||
|bk=0 | |||
|ks=100 | |||
|fkv=10 | |||
|r=5.0 | |||
|bn=0 | |||
|ypos=4.0 | |||
|trip=0 | |||
|sdi=0 | |||
|type=Foot | |||
|effect=Normal | |||
|sfx=Kick | |||
|slvl=M | |||
|clang=f | |||
|rebound=f | |||
|noff=t | |||
}} | |||
{{HitboxTableTitle|Hit 10|38}} | |||
{{SSB4SpecialHitboxTableRow | |||
|id=0 | |||
|damage=1% | |||
|angle=70 | |||
|af=3 | |||
|bk=60 | |||
|ks=200 | |||
|fkv=0 | |||
|r=7.0 | |||
|bn=0 | |||
|ypos=4.0 | |||
|trip=0 | |||
|type=Foot | |||
|effect=Normal | |||
|sfx=Kick | |||
|slvl=M | |||
|clang=f | |||
|rebound=f | |||
}} | |||
|} | |||
===Throw=== | |||
{{SSB4ThrowTableHeader}} | |||
{{SSB4ThrowTableRow | |||
|id=0 | |||
|damage=2% | |||
|af=3 | |||
|angle=60 | |||
|bk=50 | |||
|ks=170 | |||
|fkv=0 | |||
|bn=0 | |||
|noff=t | |||
|trip=0 | |||
|type=Throwing | |||
|effect=Normal | |||
|slvl=S | |||
|sfx=None | |||
}} | |||
{{SSB4ThrowTableRow | |||
|id=1 | |||
|damage=3% | |||
|af=3 | |||
|angle=361 | |||
|bk=0 | |||
|ks=100 | |||
|fkv=100 | |||
|bn=0 | |||
|noff=true | |||
|trip=0 | |||
|type=Throwing | |||
|effect=Normal | |||
|slvl=S | |||
|sfx=None | |||
}} | |||
|} | |||
==Timing== | |||
{|class="wikitable" | {|class="wikitable" | ||
! | !Invincibility | ||
|1-18 | |||
|- | |- | ||
!Hits 1-9 | |||
|11-13, 17-19, 23-25, 29-31, 35-37, 41-43, 47-49, 53-55, 59-61 | |||
|- | |||
!Hit 10 | |||
|73-74 | |||
|- | |||
!Throw Release | |||
|75 | |||
|- | |||
!Animation length | |||
|87 | |||
|- | |||
!Interruptible | |||
|88 | |||
|} | |} | ||
{{FrameStripStart}} | |||
{{FrameStrip|t=Lag|c=10}}{{FrameStrip|t=Hitbox|c=3}}{{FrameStrip|t=Lag|c=3}}{{FrameStrip|t=Hitbox|c=3}}{{FrameStrip|t=Lag|c=3}}{{FrameStrip|t=Hitbox|c=3}}{{FrameStrip|t=Lag|c=3}}{{FrameStrip|t=Hitbox|c=3}}{{FrameStrip|t=Lag|c=3}}{{FrameStrip|t=Hitbox|c=3}}{{FrameStrip|t=Lag|c=3}}{{FrameStrip|t=Hitbox|c=3}}{{FrameStrip|t=Lag|c=3}}{{FrameStrip|t=Hitbox|c=3}}{{FrameStrip|t=Lag|c=3}}{{FrameStrip|t=Hitbox|c=3}}{{FrameStrip|t=Lag|c=3}}{{FrameStrip|t=Hitbox|c=3}}{{FrameStrip|t=Lag|c=11}}{{FrameStrip|t=Hitbox|c=2|e=HitboxThrowS}}{{FrameStrip|t=Lag|c=13|s=LagThrowE}} | |||
|- | |||
{{FrameStrip|t=Invincible|c=18}}{{FrameStrip|t=Vulnerable|c=69}} | |||
{{FrameStripEnd}} | |||
{{FrameIconLegend|lag=y|hitbox=y|throw=y|vulnerable=y|invincible=y}} | |||
{{MvSubNavMetaKnight|g=SSB4}} | {{MvSubNavMetaKnight|g=SSB4}} | ||
[[Category:Meta Knight (SSB4)]] | [[Category:Meta Knight (SSB4)]] | ||
[[Category:Down throws (SSB4)]] | [[Category:Down throws (SSB4)]] | ||
Latest revision as of 05:54, June 21, 2021
Overview[edit]
Meta Knight stomps on his opponents multiple times, ending with a more powerful stomp that sends them into the air, all in a manner similar to, but slower than Kirby's down throw. It has almost identical follow-up potential to his dash attack. At low percents, it combos reliably into an up smash, and depending on DI, Mach Tornado and dash attack, the latter of which can lead into further follow-ups. Until mid-percents, down throw can also combo reliably into Shuttle Loop and all of Meta Knight's aerials; the most notable being his up aerial, which can combo into itself, other aerials, Shuttle Loop, and back aerial, which can be used to floor the opponent and jab reset them.
However, down throw has very high knockback growth, preventing Meta Knight from following up reliably past mid-percents outside of Shuttle Loop, but even Shuttle Loop can be escaped with proper DI at KO percents, all while down throw is too weak to KO realistically. As such, his dash attack and forward throw are generally more effective for combos at higher percents.
Throw and Hitbox Data[edit]
Hitboxes[edit]
Throw[edit]
| ID | Damage | Angle | BK | KS | FKV | Bone | FFx | Type | Effect | Sound | |
|---|---|---|---|---|---|---|---|---|---|---|---|
| 0 | 2% | Forwards | 50 | 170 | 0 | 0 | None | ||||
| 1 | 3% | Forwards | 0 | 100 | 100 | 0 | None | ||||
Timing[edit]
| Invincibility | 1-18 |
|---|---|
| Hits 1-9 | 11-13, 17-19, 23-25, 29-31, 35-37, 41-43, 47-49, 53-55, 59-61 |
| Hit 10 | 73-74 |
| Throw Release | 75 |
| Animation length | 87 |
| Interruptible | 88 |
Lag time |
Hitbox |
Vulnerable |
Invincible |
Throw point |
|
