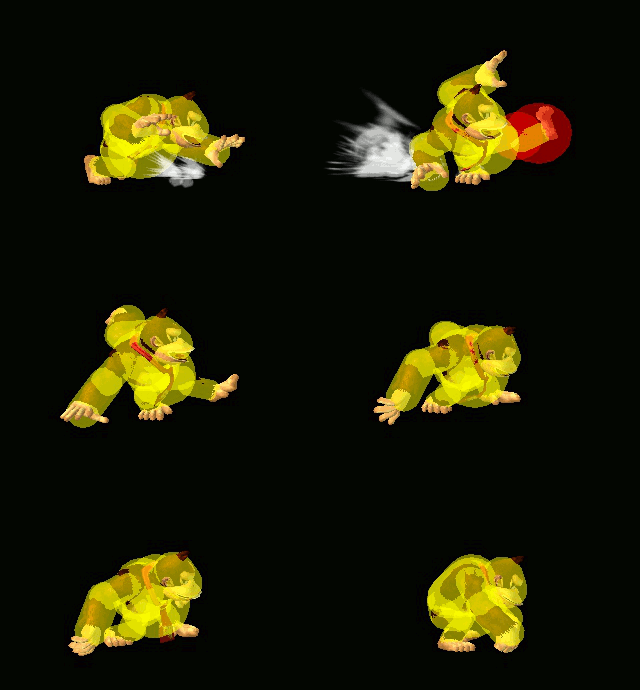
Donkey Kong (SSBM)/Dash attack: Difference between revisions
From SmashWiki, the Super Smash Bros. wiki
Jump to navigationJump to search
SuperSqank (talk | contribs) m (→Timing) |
Mariogeek2 (talk | contribs) m (→Timing: Added boost grab window) |
||
| (3 intermediate revisions by 3 users not shown) | |||
| Line 3: | Line 3: | ||
{{competitive expertise}} | {{competitive expertise}} | ||
==Overview== | ==Overview== | ||
Donkey Kong rushes forward before skidding to a halt, hands astray and delivering a somewhat clumsy kick. The move’s middling frame data, horrendous hitbox properties, and lack of comboing potential make dash attack barren in usage. While the move is disjointed and can catch an opposing character off guard, other options such as his [[Donkey Kong (SSBM)/Up throw|up throw]] and his [[Donkey Kong (SSBM)/Down tilt|down tilt]] are far more consistent in providing genuinely useful qualities throughout a game-to-game basis. This extends to being considered as his worst move overall, and by extension, one of the worst moves in all of ''Melee''. | |||
==Hitboxes== | ==Hitboxes== | ||
{{MeleeHitboxTableHeader}} | {{MeleeHitboxTableHeader}} | ||
| Line 73: | Line 75: | ||
!Late hit | !Late hit | ||
|13-20 | |13-20 | ||
|- | |||
!Boost grab window | |||
|2-4 | |||
|- | |- | ||
!Animation length | !Animation length | ||
| Line 79: | Line 84: | ||
{{FrameStripStart}} | {{FrameStripStart}} | ||
{{FrameStrip|t=Lag|c=8}}{{FrameStrip|t=Hitbox|c=4|e=HitboxChangeS}}{{FrameStrip|t=Hitbox|c=8|s=HitboxChangeE}}{{FrameStrip|t=Lag|c=34}} | !Hitboxes {{FrameStrip|t=Lag|c=8}}{{FrameStrip|t=Hitbox|c=4|e=HitboxChangeS}}{{FrameStrip|t=Hitbox|c=8|s=HitboxChangeE}}{{FrameStrip|t=Lag|c=34}} | ||
|- | |||
!Boost grab {{FrameStrip|t=Blank|c=1}}{{FrameStrip|t=Continuable|c=3}}{{FrameStrip|t=Blank|c=50}} | |||
{{FrameStripEnd}} | {{FrameStripEnd}} | ||
Revision as of 10:50, December 18, 2024
Overview
Donkey Kong rushes forward before skidding to a halt, hands astray and delivering a somewhat clumsy kick. The move’s middling frame data, horrendous hitbox properties, and lack of comboing potential make dash attack barren in usage. While the move is disjointed and can catch an opposing character off guard, other options such as his up throw and his down tilt are far more consistent in providing genuinely useful qualities throughout a game-to-game basis. This extends to being considered as his worst move overall, and by extension, one of the worst moves in all of Melee.
Hitboxes
Timing
| Clean hit | 9-12 |
|---|---|
| Late hit | 13-20 |
| Boost grab window | 2-4 |
| Animation length | 54 |
| Hitboxes | ||||||||||||||||||||||||||||||||||||||||||||||||||||||
|---|---|---|---|---|---|---|---|---|---|---|---|---|---|---|---|---|---|---|---|---|---|---|---|---|---|---|---|---|---|---|---|---|---|---|---|---|---|---|---|---|---|---|---|---|---|---|---|---|---|---|---|---|---|---|
| Boost grab |
Lag time |
Hitbox |
Hitbox change |
|

