Super Smash Bros. Ultimate

Snake (SSBU)/Forward aerial: Difference between revisions

From SmashWiki, the Super Smash Bros. wiki
Jump to navigationJump to search
No edit summary
Line 26: Line 26:
|xpos=0.0
|xpos=0.0
|ypos=-1.3
|ypos=-1.3
|zpos=.0
|zpos=0.0
|ff=1.0
|ff=1.0
|type=Foot
|type=Foot
Line 72: Line 72:
}}
}}
|}
|}
==Timing==
==Timing==
The move adds upward momentum of 0.8 (in units per frame) to Snake on frame 23.
===Attack===
===Attack===
{|class="wikitable"
{|class="wikitable"

Revision as of 13:05, July 17, 2022

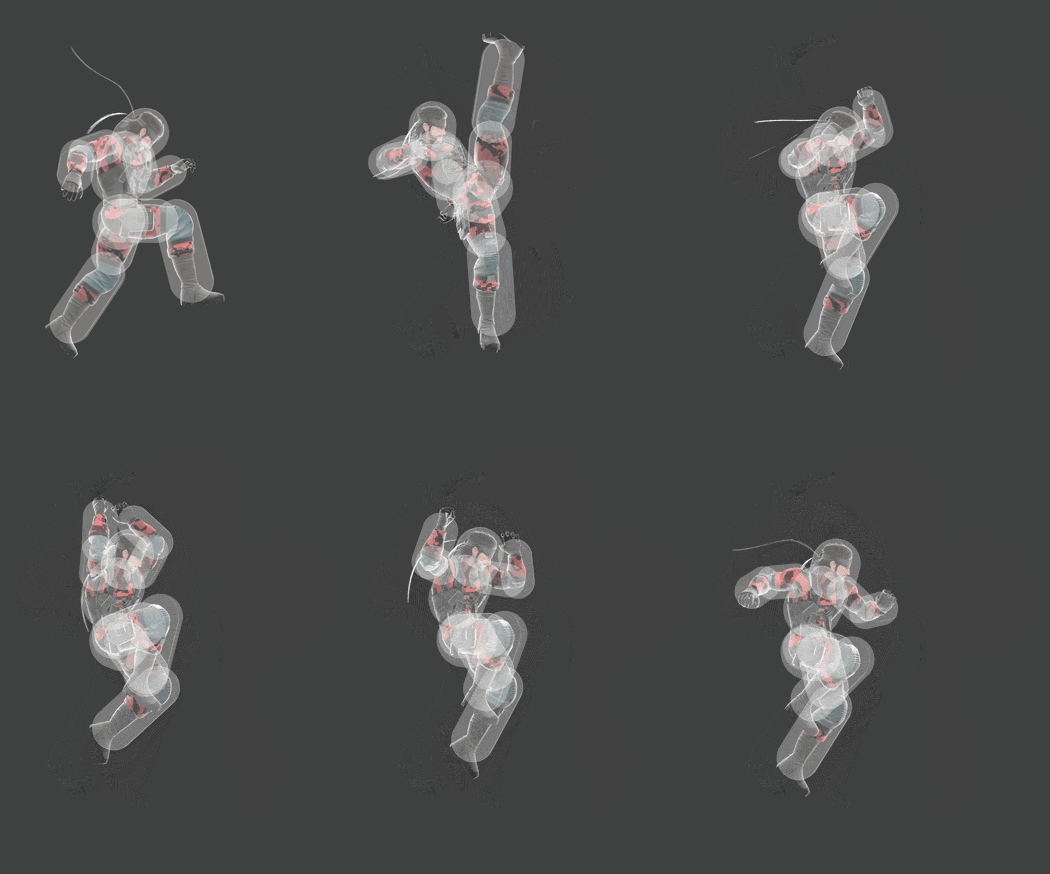
Hitbox visualization showing Snake's forward aerial.

Overview

Snake performs a powerful midair axe kick. The move's sweetspot is one of the strongest meteor smashes in the game, being able to KO opponents at extremely early percentages if they are offstage, and possesses excellent reach, both horizontally and vertically. Due to this, it is a useful option for hard reads as it allows a player to potentially take an opponent's stock with just a single read. Its sourspot sends the opponent upwards and also deals powerful knockback, allowing it to KO at very high percentages. Forward aerial can additionally be used in combination with grenades, as it can be confirmed into from the grenades, although doing so is situational.

The sweetspot also has some combo potential onstage at low to mid percentages. It can combo into an up tilt or neutral aerial on middleweights until around 50% if used in a short hop fast fall, and can even combo into an up aerial at higher percentages, making it useful as a way to dish out heavy damage if it connects.

The move has some glaring weaknesses, however. It is extremely laggy in all aspects, having high startup lag, ending lag, and landing lag. It doesn't come out until frame 23, making it the slowest aerial in the game, tied with Mega Man's down aerial. Its long cooldown and high landing lag also make it very unsafe on shield. Because of this, it is highly committal, as its slow startup makes it difficult to land, while its high ending lag and landing lag make it very easy to punish if it whiffs. Thus, it is a move that should be used sparingly in order to avoid being put into a disadvantageous situation.

Despite both the sweetspot and sourspot being quite powerful, the sourspot outprioritizes the sweetspot and doesn't KO until very high percentages. As a result, it requires proper spacing and positioning in order to land the sweetspot.

In the end, Snake's forward aerial is arguably his most "high-risk, high-reward" move, as its flaws can leave Snake in a very dangerous situation where he can take heavy damage or be KO'd outright, yet it will almost always result in a stock taken if it connects on an opponent offstage. It demands cautious use and should be used sporadically, but has immense payoff if successfully landed.

Hitboxes

ID Part Rehit rate Damage SD Angle Angle type BK KS FKV Set weight Radius Bone Offset SDI× T% Clang Rebound Effect Type G A Sound Direct Hit bits Hit part Blockable Reflectable Absorbable Flinchless No GFX Heedless
0 0 0 14.0% 0 AngleIcon80.png Forward 35 90 0 HitboxTableIcon(False).png 4.7 legl 0.0 -1.3 0.0 1.0× 1.0× 0% HitboxTableIcon(Clang).png HitboxTableIcon(Rebound).png Normal (effect) Foot (type) HitboxTableIcon(GroundedTrue).png HitboxTableIcon(AerialTrue).png L Kick SpecialsDirect.png All All HitboxTableIcon(Blockable).png HitboxTableIcon(Unreflectable).png HitboxTableIcon(Unabsorbable).png HitboxTableIcon(False).png HitboxTableIcon(False).png HitboxTableIcon(False).png
1 0 0 15.0% 0 AngleIcon269.png Forward 35 90 0 HitboxTableIcon(False).png 4.5 kneel 6.0 -0.3 0.0 1.0× 1.0× 0% HitboxTableIcon(Clang).png HitboxTableIcon(Rebound).png Normal (effect) Foot (type) HitboxTableIcon(GroundedTrue).png HitboxTableIcon(AerialTrue).png L Kick SpecialsDirect.png All All HitboxTableIcon(Blockable).png HitboxTableIcon(Unreflectable).png HitboxTableIcon(Unabsorbable).png HitboxTableIcon(False).png HitboxTableIcon(False).png HitboxTableIcon(False).png
2 0 0 15.0% 0 AngleIcon269.png Forward 35 90 0 HitboxTableIcon(False).png 5.5 kneel 0.0 0.0 0.0 1.0× 1.0× 0% HitboxTableIcon(Clang).png HitboxTableIcon(Rebound).png Normal (effect) Foot (type) HitboxTableIcon(GroundedTrue).png HitboxTableIcon(AerialTrue).png L Kick SpecialsDirect.png All All HitboxTableIcon(Blockable).png HitboxTableIcon(Unreflectable).png HitboxTableIcon(Unabsorbable).png HitboxTableIcon(False).png HitboxTableIcon(False).png HitboxTableIcon(False).png

Timing

The move adds upward momentum of 0.8 (in units per frame) to Snake on frame 23.

Attack

Initial autocancel 1-3
Hitboxes 23-26
Ending autocancel 63-
Interruptible 70
Animation length 73
FrameIcon(Lag).png FrameIcon(Lag).png FrameIcon(Lag).png FrameIcon(Lag).png FrameIcon(Lag).png FrameIcon(Lag).png FrameIcon(Lag).png FrameIcon(Lag).png FrameIcon(Lag).png FrameIcon(Lag).png FrameIcon(Lag).png FrameIcon(Lag).png FrameIcon(Lag).png FrameIcon(Lag).png FrameIcon(Lag).png FrameIcon(Lag).png FrameIcon(Lag).png FrameIcon(Lag).png FrameIcon(Lag).png FrameIcon(Lag).png FrameIcon(Lag).png FrameIcon(Lag).png FrameIcon(Hitbox).png FrameIcon(Hitbox).png FrameIcon(Hitbox).png FrameIcon(Hitbox).png FrameIcon(Lag).png FrameIcon(Lag).png FrameIcon(Lag).png FrameIcon(Lag).png FrameIcon(Lag).png FrameIcon(Lag).png FrameIcon(Lag).png FrameIcon(Lag).png FrameIcon(Lag).png FrameIcon(Lag).png FrameIcon(Lag).png FrameIcon(Lag).png FrameIcon(Lag).png FrameIcon(Lag).png FrameIcon(Lag).png FrameIcon(Lag).png FrameIcon(Lag).png FrameIcon(Lag).png FrameIcon(Lag).png FrameIcon(Lag).png FrameIcon(Lag).png FrameIcon(Lag).png FrameIcon(Lag).png FrameIcon(Lag).png FrameIcon(Lag).png FrameIcon(Lag).png FrameIcon(Lag).png FrameIcon(Lag).png FrameIcon(Lag).png FrameIcon(Lag).png FrameIcon(Lag).png FrameIcon(Lag).png FrameIcon(Lag).png FrameIcon(Lag).png FrameIcon(Lag).png FrameIcon(Lag).png FrameIcon(Lag).png FrameIcon(Lag).png FrameIcon(Lag).png FrameIcon(Lag).png FrameIcon(Lag).png FrameIcon(Lag).png FrameIcon(Lag).png FrameIcon(Interruptible).png FrameIcon(Interruptible).png FrameIcon(Interruptible).png FrameIcon(Interruptible).png
FrameIcon(Autocancel).png FrameIcon(Autocancel).png FrameIcon(Autocancel).png FrameIcon(Blank).png FrameIcon(Blank).png FrameIcon(Blank).png FrameIcon(Blank).png FrameIcon(Blank).png FrameIcon(Blank).png FrameIcon(Blank).png FrameIcon(Blank).png FrameIcon(Blank).png FrameIcon(Blank).png FrameIcon(Blank).png FrameIcon(Blank).png FrameIcon(Blank).png FrameIcon(Blank).png FrameIcon(Blank).png FrameIcon(Blank).png FrameIcon(Blank).png FrameIcon(Blank).png FrameIcon(Blank).png FrameIcon(Blank).png FrameIcon(Blank).png FrameIcon(Blank).png FrameIcon(Blank).png FrameIcon(Blank).png FrameIcon(Blank).png FrameIcon(Blank).png FrameIcon(Blank).png FrameIcon(Blank).png FrameIcon(Blank).png FrameIcon(Blank).png FrameIcon(Blank).png FrameIcon(Blank).png FrameIcon(Blank).png FrameIcon(Blank).png FrameIcon(Blank).png FrameIcon(Blank).png FrameIcon(Blank).png FrameIcon(Blank).png FrameIcon(Blank).png FrameIcon(Blank).png FrameIcon(Blank).png FrameIcon(Blank).png FrameIcon(Blank).png FrameIcon(Blank).png FrameIcon(Blank).png FrameIcon(Blank).png FrameIcon(Blank).png FrameIcon(Blank).png FrameIcon(Blank).png FrameIcon(Blank).png FrameIcon(Blank).png FrameIcon(Blank).png FrameIcon(Blank).png FrameIcon(Blank).png FrameIcon(Blank).png FrameIcon(Blank).png FrameIcon(Blank).png FrameIcon(Blank).png FrameIcon(Blank).png FrameIcon(Autocancel).png FrameIcon(Autocancel).png FrameIcon(Autocancel).png FrameIcon(Autocancel).png FrameIcon(Autocancel).png FrameIcon(Autocancel).png FrameIcon(Autocancel).png FrameIcon(Autocancel).png FrameIcon(Autocancel).png FrameIcon(Autocancel).png FrameIcon(Autocancel).png

Landing lag

Interruptible 20
Animation length 31
FrameIcon(Lag).png FrameIcon(Lag).png FrameIcon(Lag).png FrameIcon(Lag).png FrameIcon(Lag).png FrameIcon(Lag).png FrameIcon(Lag).png FrameIcon(Lag).png FrameIcon(Lag).png FrameIcon(Lag).png FrameIcon(Lag).png FrameIcon(Lag).png FrameIcon(Lag).png FrameIcon(Lag).png FrameIcon(Lag).png FrameIcon(Lag).png FrameIcon(Lag).png FrameIcon(Lag).png FrameIcon(Lag).png FrameIcon(Interruptible).png FrameIcon(Interruptible).png FrameIcon(Interruptible).png FrameIcon(Interruptible).png FrameIcon(Interruptible).png FrameIcon(Interruptible).png FrameIcon(Interruptible).png FrameIcon(Interruptible).png FrameIcon(Interruptible).png FrameIcon(Interruptible).png FrameIcon(Interruptible).png FrameIcon(Interruptible).png
Legend (1 square = 1 frame)
Lag
Lag time
Hitbox
Hitbox
Auto-canceling
Autocancel
Interruptibility
Interruptible