Super Smash Bros. 4

Ganondorf (SSB4)/Down smash: Difference between revisions

From SmashWiki, the Super Smash Bros. wiki
Jump to navigationJump to search
No edit summary
Line 1: Line 1:
{{ArticleIcons|ssb4=y}}
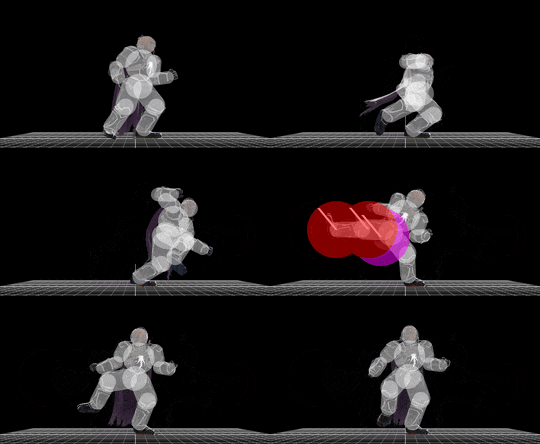
[[File:GanondorfDSmash.gif|thumb|270px|Hitbox visualization showing Ganondorf's down smash.]]
[[File:GanondorfDSmash.gif|thumb|270px|Hitbox visualization showing Ganondorf's down smash.]]
{{competitive expertise}}


==Overview==
==Overview==

Revision as of 17:00, March 30, 2020

Hitbox visualization showing Ganondorf's down smash.

Overview

Ganondorf performs a slow roundhouse kick, hitting to the front of him before hitting the back. While it is Ganondorf's fastest smash attack in terms of startup lag, it is also the the weakest, although it is still one of the most powerful smash attacks in the game, KOing as early as 115%. The first hit links into the second hit, although it is possible for opponents to escape due to hitbox placement. The move can be used to punish rolls or even stage spike if positioned properly. However, there is a hitbox on the first kick's thigh that causes opponents to be sent away from Ganondorf, and away from the second kick, which makes it difficult to link and can be punished if used when the opponent is too close.

Olimar is particularly vulnerable to this move. If he fails to tech out of Ganondorf's Flame Choke, Ganondorf can use this move on him, which can lead to a certain KO in some cases. Unusually, Olimar is the only character that can be followed up with Ganondorf's down smash after Flame Choke.

Update History

This move was buffed throughout the course of Smash 4's updates. In update 1.1.0, it became much easier to link, making it much safer and more effective to use. Its KOing and spacing abilities were also slightly improved.
Super Smash Bros. 4 1.1.0

  • Buff Down smash knockback growth increased: 75 → 94
  • Buff Down smash's second hit's hitbox size increased: 5.5u → 6.5u.

Super Smash Bros. 4 1.1.3

  • Buff Down smash's second kick now sends shielding opponents at a different angle, now pushing opponents away rather than towards him.
  • Change Down smash now flips opponents.

Hitboxes

ID Part Damage SD Angle BK KS FKV Radius Bone Offset SDIx T% Clang Rebound Type Effect G A Sound Direct
Hit 1
0 0 6% 0 AngleIcon160.png 0 100 70 4.6 8 7.0 0.0 0.0 0.0x 1.0x 0% HitboxTableIcon(Clang).png HitboxTableIcon(Rebound).png Foot (type) Normal (effect) HitboxTableIcon(GroundedFalse).png HitboxTableIcon(AerialTrue).png M Kick SpecialsDirect.png
1 0 6% 0 AngleIcon140.png 0 100 80 4.6 8 6.0 0.0 0.0 0.0x 1.0x 0% HitboxTableIcon(Clang).png HitboxTableIcon(Rebound).png Foot (type) Normal (effect) HitboxTableIcon(GroundedTrue).png HitboxTableIcon(AerialFalse).png M Kick SpecialsDirect.png
2 0 6% 0 AngleIcon154.png 0 100 108 4.6 9 7.0 0.0 0.0 0.0x 1.0x 0% HitboxTableIcon(Clang).png HitboxTableIcon(Rebound).png Foot (type) Normal (effect) HitboxTableIcon(GroundedTrue).png HitboxTableIcon(AerialTrue).png M Kick SpecialsDirect.png
3 0 6% 0 AngleIcon50.png 0 100 80 4.6 3 0.0 0.0 0.0 0.0x 1.0x 0% HitboxTableIcon(Clang).png HitboxTableIcon(Rebound).png Foot (type) Normal (effect) HitboxTableIcon(GroundedTrue).png HitboxTableIcon(AerialTrue).png M Kick SpecialsDirect.png
Hit 2
0 0 15% 0 AngleIcon130.png 60 94 0 6.5 8 3.5 0.0 0.0 1.0x 1.0x 0% HitboxTableIcon(Clang).png HitboxTableIcon(Rebound).png Foot (type) Normal (effect) HitboxTableIcon(GroundedTrue).png HitboxTableIcon(AerialTrue).png L Kick SpecialsDirect.png
1 0 15% 0 AngleIcon130.png 60 94 0 6.5 9 6.0 0.0 0.0 1.0x 1.0x 0% HitboxTableIcon(Clang).png HitboxTableIcon(Rebound).png Foot (type) Normal (effect) HitboxTableIcon(GroundedTrue).png HitboxTableIcon(AerialTrue).png L Kick SpecialsDirect.png
2 0 13% 0 AngleIcon130.png 60 94 0 6.5 0 0.0 11.0 -5.5 1.0x 1.0x 0% HitboxTableIcon(Clang).png HitboxTableIcon(Rebound).png Foot (type) Normal (effect) HitboxTableIcon(GroundedTrue).png HitboxTableIcon(AerialTrue).png L Kick SpecialsDirect.png

Timing

Charges between 4-5
Hit 1 15-18
Hit 2 35-38
Interruptible 64
Animation length 74
FrameIcon(Lag).png FrameIcon(Lag).png FrameIcon(Lag).png FrameIcon(LagChargeS).png FrameIcon(LagChargeE).png FrameIcon(Lag).png FrameIcon(Lag).png FrameIcon(Lag).png FrameIcon(Lag).png FrameIcon(Lag).png FrameIcon(Lag).png FrameIcon(Lag).png FrameIcon(Lag).png FrameIcon(Lag).png FrameIcon(Hitbox).png FrameIcon(Hitbox).png FrameIcon(Hitbox).png FrameIcon(Hitbox).png FrameIcon(Lag).png FrameIcon(Lag).png FrameIcon(Lag).png FrameIcon(Lag).png FrameIcon(Lag).png FrameIcon(Lag).png FrameIcon(Lag).png FrameIcon(Lag).png FrameIcon(Lag).png FrameIcon(Lag).png FrameIcon(Lag).png FrameIcon(Lag).png FrameIcon(Lag).png FrameIcon(Lag).png FrameIcon(Lag).png FrameIcon(Lag).png FrameIcon(Hitbox).png FrameIcon(Hitbox).png FrameIcon(Hitbox).png FrameIcon(Hitbox).png FrameIcon(Lag).png FrameIcon(Lag).png FrameIcon(Lag).png FrameIcon(Lag).png FrameIcon(Lag).png FrameIcon(Lag).png FrameIcon(Lag).png FrameIcon(Lag).png FrameIcon(Lag).png FrameIcon(Lag).png FrameIcon(Lag).png FrameIcon(Lag).png FrameIcon(Lag).png FrameIcon(Lag).png FrameIcon(Lag).png FrameIcon(Lag).png FrameIcon(Lag).png FrameIcon(Lag).png FrameIcon(Lag).png FrameIcon(Lag).png FrameIcon(Lag).png FrameIcon(Lag).png FrameIcon(Lag).png FrameIcon(Lag).png FrameIcon(Lag).png FrameIcon(Interruptible).png FrameIcon(Interruptible).png FrameIcon(Interruptible).png FrameIcon(Interruptible).png FrameIcon(Interruptible).png FrameIcon(Interruptible).png FrameIcon(Interruptible).png
Legend (1 square = 1 frame)
Lag
Lag time
ChargeCharge
Charge interval
Hitbox
Hitbox
Interruptibility
Interruptible