Welcome to SmashWiki! Log in or create an account and join the community, and don't forget to read this first!
Notices
The Skill parameter has been removed from Smasher infoboxes, and in its place are the new "Best historical ranking" and "Best tournament result" parameters. SmashWiki needs help adding these new parameters to Smasher infoboxes, refer to the guidelines here for what should be included in these new parameters.
When adding results to Smasher pages, include each tournament's entrant number in addition to the player's placement, and use the {{Trn}} template with the matching game specified. Please also fix old results on Smasher pages that do not abide to this standard. Refer to our Smasher article guidelines to see how results tables should be formatted.
Check out our project page for ongoing projects that SmashWiki needs help with.
Super Smash Bros. 4

Ganondorf (SSB4)/Up smash

From SmashWiki, the Super Smash Bros. wiki
Jump to navigationJump to search
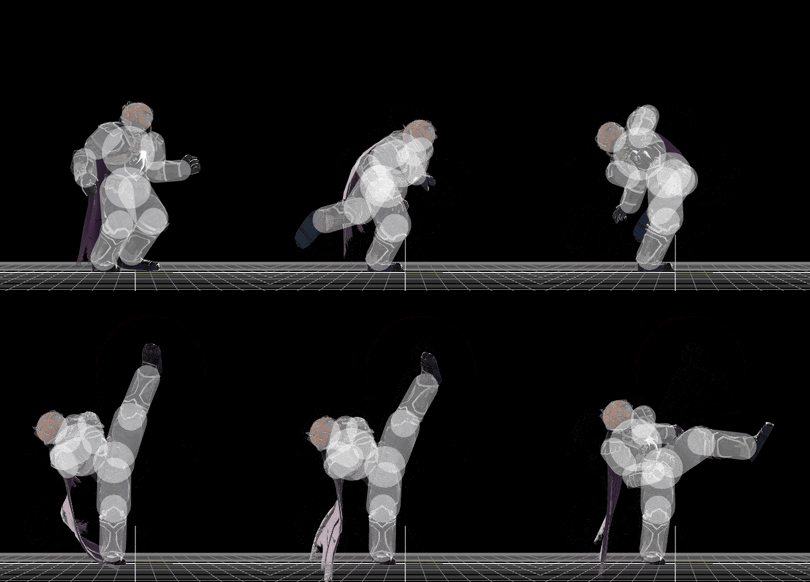
Hitbox visualization showing Ganondorf's up smash.

Overview[edit]

Ganondorf does a forceful upwards kick. The move deals 21% in front of him and 24% on Ganondorf's leg and it has very high knockback, with the front hitbox KOing Mario at 91% on Final Destination and the leg hitbox KOing him 15% earlier. The move has very high startup lag at 21 frames however, its ending lag is deceptively low (only having 41 total frames), making it difficult to punish, easy to fake out opponents and use another attack. When sweetspotted, his up smash is the strongest in the game, only being surpassed by Wii Fit Trainer's up smash under the influence of Deep Breathing. The move also has a good amount of vertical range, with the move being noticeably disjointed, which makes it effective as an anti-air or as an option to hit opponents on platforms, especially due to its incredible strength.

The move is also highly effective against shields. Because of its high damage, the move deals more than half damage to shields (even when uncharged) and it pushes opponents back very far. The move's high damage and low ending lag also makes the move very safe on shield. The sourspot is only -6 on shield which along with its pushback, makes it impossible for other characters to punish unless both characters are at the edge. Even in this situation, some grabs can still miss Ganondorf due to the position of his leg. The leg hitbox is even safer on shield (only being -4) and if it hits an opponent on a higher platform, the move is completely unpunishable. Charging the move naturally makes the move even safer to the point where the sweetspot becomes + on shield if charged for long enough. The move does become more punishable on power shield although many characters still cannot get a very strong punish.

The only notable downside with the move is that it has high startup lag which does make it quite punishable during its startup and limits its use as an Out of Shield option although the sheer strength of the move makes it risky to challenge. The move is also incapable of hitting opponents behind Ganondorf and against smaller characters, the sweetspot cannot connect if the opponent is on the ground (unless they are on a platform above Ganondorf).

Overall, Ganondorf's up smash is considered to be one of the best in the game as despite its high startup lag, it has excellent damage and KO power as well as having a good amount of range and very low ending lag, making it a risky and difficult move to challenge or punish.

Hitboxes[edit]

ID Part Damage SD Angle BK KS FKV Radius Bone Offset SDIx T% Clang Rebound Type Effect G A Sound Direct
0 0 24% 0 AngleIcon85.png 40 71 0 7.2 5 6.0 0.0 0.0 1.0x 1.0x 0% HitboxTableIcon(Clang).png HitboxTableIcon(Rebound).png Foot (type) Normal (effect) HitboxTableIcon(GroundedTrue).png HitboxTableIcon(AerialTrue).png L Kick SpecialsDirect.png
1 0 24% 0 AngleIcon78.png 40 71 0 4.8 4 3.2 0.0 0.0 1.0x 1.0x 0% HitboxTableIcon(Clang).png HitboxTableIcon(Rebound).png Foot (type) Normal (effect) HitboxTableIcon(GroundedTrue).png HitboxTableIcon(AerialTrue).png L Kick SpecialsDirect.png
2 0 21% 0 AngleIcon75.png 40 75 0 6.0 0 0.0 8.0 6.0 1.0x 1.0x 0% HitboxTableIcon(Clang).png HitboxTableIcon(Rebound).png Foot (type) Normal (effect) HitboxTableIcon(GroundedTrue).png HitboxTableIcon(AerialTrue).png L Kick SpecialsDirect.png

Timing[edit]

Charges between 9-10
Hitboxes 21-23
Interruptible 42
Animation length 54
FrameIcon(Lag).png FrameIcon(Lag).png FrameIcon(Lag).png FrameIcon(Lag).png FrameIcon(Lag).png FrameIcon(Lag).png FrameIcon(Lag).png FrameIcon(Lag).png FrameIcon(LagChargeS).png FrameIcon(LagChargeE).png FrameIcon(Lag).png FrameIcon(Lag).png FrameIcon(Lag).png FrameIcon(Lag).png FrameIcon(Lag).png FrameIcon(Lag).png FrameIcon(Lag).png FrameIcon(Lag).png FrameIcon(Lag).png FrameIcon(Lag).png FrameIcon(Hitbox).png FrameIcon(Hitbox).png FrameIcon(Hitbox).png FrameIcon(Lag).png FrameIcon(Lag).png FrameIcon(Lag).png FrameIcon(Lag).png FrameIcon(Lag).png FrameIcon(Lag).png FrameIcon(Lag).png FrameIcon(Lag).png FrameIcon(Lag).png FrameIcon(Lag).png FrameIcon(Lag).png FrameIcon(Lag).png FrameIcon(Lag).png FrameIcon(Lag).png FrameIcon(Lag).png FrameIcon(Lag).png FrameIcon(Lag).png FrameIcon(Lag).png FrameIcon(Interruptible).png FrameIcon(Interruptible).png FrameIcon(Interruptible).png FrameIcon(Interruptible).png FrameIcon(Interruptible).png FrameIcon(Interruptible).png FrameIcon(Interruptible).png FrameIcon(Interruptible).png FrameIcon(Interruptible).png FrameIcon(Interruptible).png FrameIcon(Interruptible).png FrameIcon(Interruptible).png FrameIcon(Interruptible).png
Legend (1 square = 1 frame)
Lag
Lag time
ChargeCharge
Charge interval
Hitbox
Hitbox
Interruptibility
Interruptible