Super Smash Bros. 4

Ganondorf (SSB4)/Neutral aerial

From SmashWiki, the Super Smash Bros. wiki
< Ganondorf (SSB4)
Revision as of 21:23, December 5, 2024 by Zeckemyro (talk | contribs) (→‎Update history)
(diff) ← Older revision | Latest revision (diff) | Newer revision → (diff)
Jump to navigationJump to search
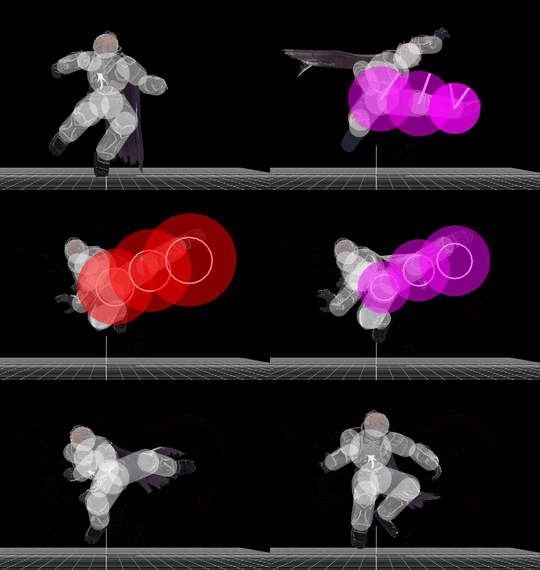
Hitbox visualization showing Ganondorf's neutral aerial.
Competitive.png This article or section may require competitive expertise.
You can discuss this issue on the talk page or edit this page to improve it.

Overview[edit]

Ganondorf performs two kicks in succession. The first kick has low knockback so that it can easily link into the second, more powerful kick. The move is useful for spacing and as a formidable edgeguarding move. It is capable of KO'ing Mario at the center of Final Destination at 133%. Particularly useful when used in a short hop, giving Ganondorf a fast attack he can use against a grounded opponent.

Update history[edit]

When Smash 4 was released, this move was relatively unchanged: the first kick had no combo or KO potential and the second kick was still relatively weak. Over the course of the game's updates, Ganondorf's neutral aerial was massively buffed and became more similar to Captain Falcon's.

Super Smash Bros. for Nintendo 3DS 1.0.4/Super Smash Bros. for Wii U 1.0.0

  • Buff Landing lag (22 frames → 18).

Super Smash Bros. 4 1.1.1

  • Buff Neutral aerial deals more damage: 7% (hit 1 late) /9% (hit 2 clean)/5% (hit 2 late) → 8%/10%/7%, its knockback has altered: 20 (base)/100 (growth) → 0/130/90 (hit 1), 100 → 120 (growth, hit 2), its first hit's hitbox sizes increased: 4.3u/5.7u/6.2u → 4.5u/5.7u/7.4u and its angles altered: 55°/60°/65° → 55°/70°/100°. This makes its hits connect together better at low percentages while retaining its KO power.
  • Nerf Neutral aerial's first hit's decreased base knockback makes it less safe on hit and on landing at low percentages.

Super Smash Bros. 4 1.1.3

  • Buff Neutral aerial's first kick has drastically reduced knockback that allows it combo into the second hit more effectively similar to Captain Falcon's, has a new hitbox on his foot that deals high knockback for spacing properties, transitions three frames faster, has 3 frames less ending lag, and deals more damage on the both the clean and late hitboxes on the second kick.
  • Nerf The drastically reduced knockback on neutral aerial's first hit makes the move less safe on hit and on landing and less effective as a spacer unless hitting with the foot, while completely removing its KOing capabilities. It also deals less damage on the clean and late hitbox, and less total damage.
  • Buff Neutral aerial has 1 frame less landing lag.

Technical changelist 1.1.3

Change Old value New value
Neutral aerial first kick knockback 0 (base)/130/90 (growth) 20 (base)/30 (growth)
Neutral aerial first kick new hitbox N/A 30 (base)/110 (growth)
Neutral aerial first kick damage 12% (clean)/8% (late) 7%/5.25%
Neutral aerial second kick frame 20 frame 17
Neutral aerial second kick damage 10% (clean)/7% (late) 12%/9%
Neutral aerial total damage 22% (clean)/15% (late) 19%/14.25%
Neutral aerial ending lag 45 frames 42 frames
Neutral aerial landing lag 18 frames 17 frames

Hitboxes[edit]

ID Part Damage SD Angle BK KS FKV Radius Bone Offset SDIx T% Clang Rebound Type Effect G A Sound Direct
Hit 1 (clean)
0 0 7% 0 AngleIcon55.png 20 30 0 7.4 3 0.0 0.0 0.0 1.0x 1.0x 0% HitboxTableIcon(Clang).png HitboxTableIcon(Rebound).png Foot (type) Normal (effect) HitboxTableIcon(GroundedTrue).png HitboxTableIcon(AerialTrue).png L Kick SpecialsDirect.png
1 0 7% 0 AngleIcon70.png 20 30 0 5.7 9 0.0 0.0 0.0 1.0x 1.0x 0% HitboxTableIcon(Clang).png HitboxTableIcon(Rebound).png Foot (type) Normal (effect) HitboxTableIcon(GroundedTrue).png HitboxTableIcon(AerialTrue).png L Kick SpecialsDirect.png
2 0 7% 0 AngleIcon55.png 50 110 0 4.5 9 6.0 0.0 0.0 1.0x 1.0x 0% HitboxTableIcon(Clang).png HitboxTableIcon(Rebound).png Foot (type) Normal (effect) HitboxTableIcon(GroundedTrue).png HitboxTableIcon(AerialFalse).png M Kick SpecialsDirect.png
3 0 7% 0 AngleIcon100.png 20 30 0 4.5 9 6.0 0.0 0.0 1.0x 1.0x 0% HitboxTableIcon(Clang).png HitboxTableIcon(Rebound).png Foot (type) Normal (effect) HitboxTableIcon(GroundedFalse).png HitboxTableIcon(AerialTrue).png M Kick SpecialsDirect.png
Hit 1 (late)
0 0 5.25% 0 AngleIcon55.png 20 30 0 7.4 3 0.0 0.0 0.0 1.0x 1.0x 0% HitboxTableIcon(Clang).png HitboxTableIcon(Rebound).png Foot (type) Normal (effect) HitboxTableIcon(GroundedTrue).png HitboxTableIcon(AerialTrue).png M Kick SpecialsDirect.png
1 0 5.25% 0 AngleIcon70.png 20 30 0 5.7 9 0.0 0.0 0.0 1.0x 1.0x 0% HitboxTableIcon(Clang).png HitboxTableIcon(Rebound).png Foot (type) Normal (effect) HitboxTableIcon(GroundedTrue).png HitboxTableIcon(AerialTrue).png M Kick SpecialsDirect.png
2 0 5.25% 0 AngleIcon55.png 50 110 0 4.5 9 6.0 0.0 0.0 1.0x 1.0x 0% HitboxTableIcon(Clang).png HitboxTableIcon(Rebound).png Foot (type) Normal (effect) HitboxTableIcon(GroundedTrue).png HitboxTableIcon(AerialFalse).png M Kick SpecialsDirect.png
3 0 5.25% 0 AngleIcon100.png 20 30 0 4.5 9 6.0 0.0 0.0 1.0x 1.0x 0% HitboxTableIcon(Clang).png HitboxTableIcon(Rebound).png Foot (type) Normal (effect) HitboxTableIcon(GroundedFalse).png HitboxTableIcon(AerialTrue).png S Kick SpecialsDirect.png
Hit 2 (clean)
0 0 12% 0 Sakurai angle 25 106 0 7.8 5 6.5 0.0 -3.0 1.0x 1.2x 0% HitboxTableIcon(Clang).png HitboxTableIcon(Rebound).png Foot (type) Normal (effect) HitboxTableIcon(GroundedTrue).png HitboxTableIcon(AerialTrue).png L Kick SpecialsDirect.png
1 0 12% 0 Sakurai angle 25 106 0 7.0 5 0.0 0.0 -1.0 1.0x 1.2x 0% HitboxTableIcon(Clang).png HitboxTableIcon(Rebound).png Foot (type) Normal (effect) HitboxTableIcon(GroundedTrue).png HitboxTableIcon(AerialTrue).png L Kick SpecialsDirect.png
2 0 12% 0 Sakurai angle 25 106 0 6.5 3 0.0 0.0 0.0 1.0x 1.2x 0% HitboxTableIcon(Clang).png HitboxTableIcon(Rebound).png Foot (type) Normal (effect) HitboxTableIcon(GroundedTrue).png HitboxTableIcon(AerialTrue).png L Kick SpecialsDirect.png
Hit 2 (late)
0 0 9% 0 Sakurai angle 25 106 0 6.0 5 6.0 0.0 -3.0 1.0x 1.0x 0% HitboxTableIcon(Clang).png HitboxTableIcon(Rebound).png Foot (type) Normal (effect) HitboxTableIcon(GroundedTrue).png HitboxTableIcon(AerialTrue).png M Kick SpecialsDirect.png
1 0 9% 0 Sakurai angle 25 106 0 5.3 5 0.0 0.0 -1.0 1.0x 1.0x 0% HitboxTableIcon(Clang).png HitboxTableIcon(Rebound).png Foot (type) Normal (effect) HitboxTableIcon(GroundedTrue).png HitboxTableIcon(AerialTrue).png M Kick SpecialsDirect.png
2 0 9% 0 Sakurai angle 25 106 0 4.5 3 0.0 0.0 0.0 1.0x 1.0x 0% HitboxTableIcon(Clang).png HitboxTableIcon(Rebound).png Foot (type) Normal (effect) HitboxTableIcon(GroundedTrue).png HitboxTableIcon(AerialTrue).png M Kick SpecialsDirect.png

Note: Hitbox ID value 2 is weight-independent for frames 7-8.

Timing[edit]

Attack[edit]

Initial autocancel 1-3
Clean hit 1 7-8
Late hit 1 9-13
Clean hit 2 17-18
Late hit 2 19-29
Ending autocancel 38-
Interruptible 42
Animation length 56
FrameIcon(Lag).png FrameIcon(Lag).png FrameIcon(Lag).png FrameIcon(Lag).png FrameIcon(Lag).png FrameIcon(Lag).png FrameIcon(Hitbox).png FrameIcon(HitboxChangeS).png FrameIcon(HitboxChangeE).png FrameIcon(Hitbox).png FrameIcon(Hitbox).png FrameIcon(Hitbox).png FrameIcon(Hitbox).png FrameIcon(Lag).png FrameIcon(Lag).png FrameIcon(Lag).png FrameIcon(Hitbox).png FrameIcon(HitboxChangeS).png FrameIcon(HitboxChangeE).png FrameIcon(Hitbox).png FrameIcon(Hitbox).png FrameIcon(Hitbox).png FrameIcon(Hitbox).png FrameIcon(Hitbox).png FrameIcon(Hitbox).png FrameIcon(Hitbox).png FrameIcon(Hitbox).png FrameIcon(Hitbox).png FrameIcon(Hitbox).png FrameIcon(Lag).png FrameIcon(Lag).png FrameIcon(Lag).png FrameIcon(Lag).png FrameIcon(Lag).png FrameIcon(Lag).png FrameIcon(Lag).png FrameIcon(Lag).png FrameIcon(Lag).png FrameIcon(Lag).png FrameIcon(Lag).png FrameIcon(Lag).png FrameIcon(Interruptible).png FrameIcon(Interruptible).png FrameIcon(Interruptible).png FrameIcon(Interruptible).png FrameIcon(Interruptible).png FrameIcon(Interruptible).png FrameIcon(Interruptible).png FrameIcon(Interruptible).png FrameIcon(Interruptible).png FrameIcon(Interruptible).png FrameIcon(Interruptible).png FrameIcon(Interruptible).png FrameIcon(Interruptible).png FrameIcon(Interruptible).png FrameIcon(Interruptible).png
FrameIcon(Autocancel).png FrameIcon(Autocancel).png FrameIcon(Autocancel).png FrameIcon(Blank).png FrameIcon(Blank).png FrameIcon(Blank).png FrameIcon(Blank).png FrameIcon(Blank).png FrameIcon(Blank).png FrameIcon(Blank).png FrameIcon(Blank).png FrameIcon(Blank).png FrameIcon(Blank).png FrameIcon(Blank).png FrameIcon(Blank).png FrameIcon(Blank).png FrameIcon(Blank).png FrameIcon(Blank).png FrameIcon(Blank).png FrameIcon(Blank).png FrameIcon(Blank).png FrameIcon(Blank).png FrameIcon(Blank).png FrameIcon(Blank).png FrameIcon(Blank).png FrameIcon(Blank).png FrameIcon(Blank).png FrameIcon(Blank).png FrameIcon(Blank).png FrameIcon(Blank).png FrameIcon(Blank).png FrameIcon(Blank).png FrameIcon(Blank).png FrameIcon(Blank).png FrameIcon(Blank).png FrameIcon(Blank).png FrameIcon(Blank).png FrameIcon(Autocancel).png FrameIcon(Autocancel).png FrameIcon(Autocancel).png FrameIcon(Autocancel).png FrameIcon(Autocancel).png FrameIcon(Autocancel).png FrameIcon(Autocancel).png FrameIcon(Autocancel).png FrameIcon(Autocancel).png FrameIcon(Autocancel).png FrameIcon(Autocancel).png FrameIcon(Autocancel).png FrameIcon(Autocancel).png FrameIcon(Autocancel).png FrameIcon(Autocancel).png FrameIcon(Autocancel).png FrameIcon(Autocancel).png FrameIcon(Autocancel).png FrameIcon(Autocancel).png

Landing lag[edit]

Animation length 17
FrameIcon(Lag).png FrameIcon(Lag).png FrameIcon(Lag).png FrameIcon(Lag).png FrameIcon(Lag).png FrameIcon(Lag).png FrameIcon(Lag).png FrameIcon(Lag).png FrameIcon(Lag).png FrameIcon(Lag).png FrameIcon(Lag).png FrameIcon(Lag).png FrameIcon(Lag).png FrameIcon(Lag).png FrameIcon(Lag).png FrameIcon(Lag).png FrameIcon(Lag).png
Legend (1 square = 1 frame)
Lag
Lag time
Hitbox
Hitbox
FrameIcon(HitboxChangeS).pngFrameIcon(HitboxChangeE).png
Hitbox change
Auto-canceling
Autocancel
Interruptibility
Interruptible