From SmashWiki, the Super Smash Bros. wiki
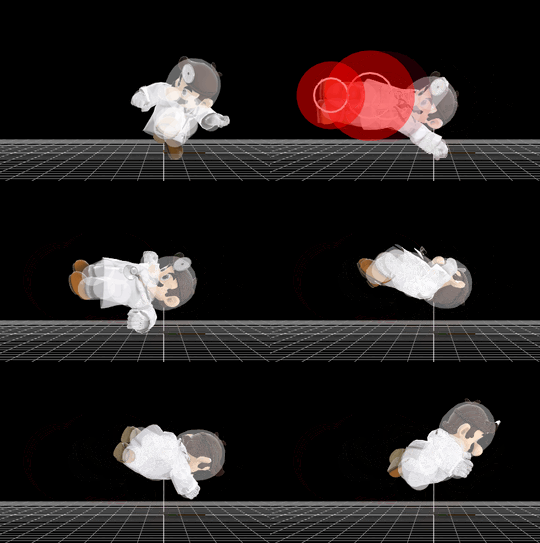
Hitbox visualization showing Dr. Mario's back aerial. Dr. Mario's coat and stethoscope don't have physics like in gameplay, but the hitboxes are accurate.
Overview
Dr. Mario performs a backwards dropkick. It has minimal startup, ending and landing lag, as well as a very short amount of time before the move is able to autocancel, making it possible to short hop fast fall the move and autocancel with it. Combined with its decent range, lasting hitbox, and respectable power in both damage and knockback, it is seen as one of the best back aerials in the game. It is able to combo into itself at low percents or slightly higher with the late hit, can kill reasonably well and also is very effective at edgeguarding due to the power and long lasting hitbox. Some of his other moves can combo into back aerial as well, such as the reverse hit of up aerial or down throw. It should be noted that this move has longer lasting hitboxes on both the early and late hits of the move, compared to Mario's version.
Hitboxes
ID |
Part |
Damage |
SD |
Angle |
BK |
KS |
FKV |
Radius |
Bone |
Offset |
SDIx |
H× |
T% |
Clang |
Rebound |
Type |
Effect |
G |
A |
Sound |
Direct
|
Clean hit
|
0 |
0 |
13.44% |
0 |
![Sakurai angle](https://ssb.wiki.gallery/images/thumb/5/5a/AngleIcon361.png/16px-AngleIcon361.png) |
10 |
95 |
0 |
4.2 |
9 |
4.8 |
0.0 |
0.0 |
1.0x |
1.0x |
0% |
![HitboxTableIcon(Clang).png](https://ssb.wiki.gallery/images/thumb/0/0f/HitboxTableIcon%28Clang%29.png/16px-HitboxTableIcon%28Clang%29.png) |
![HitboxTableIcon(Rebound).png](https://ssb.wiki.gallery/images/thumb/7/79/HitboxTableIcon%28Rebound%29.png/16px-HitboxTableIcon%28Rebound%29.png) |
![Foot (type)](https://ssb.wiki.gallery/images/thumb/7/78/TypeIcon%28Foot%29.png/16px-TypeIcon%28Foot%29.png) |
![Normal (effect)](https://ssb.wiki.gallery/images/thumb/f/fe/EffectIcon%28Normal%29.png/16px-EffectIcon%28Normal%29.png) |
![HitboxTableIcon(GroundedTrue).png](https://ssb.wiki.gallery/images/thumb/0/0a/HitboxTableIcon%28GroundedTrue%29.png/16px-HitboxTableIcon%28GroundedTrue%29.png) |
![HitboxTableIcon(AerialTrue).png](https://ssb.wiki.gallery/images/thumb/0/0d/HitboxTableIcon%28AerialTrue%29.png/16px-HitboxTableIcon%28AerialTrue%29.png) |
Kick |
|
1 |
0 |
13.44% |
0 |
![Sakurai angle](https://ssb.wiki.gallery/images/thumb/5/5a/AngleIcon361.png/16px-AngleIcon361.png) |
10 |
95 |
0 |
5.4 |
0 |
1.6 |
0.0 |
0.0 |
1.0x |
1.0x |
0% |
![HitboxTableIcon(Clang).png](https://ssb.wiki.gallery/images/thumb/0/0f/HitboxTableIcon%28Clang%29.png/16px-HitboxTableIcon%28Clang%29.png) |
![HitboxTableIcon(Rebound).png](https://ssb.wiki.gallery/images/thumb/7/79/HitboxTableIcon%28Rebound%29.png/16px-HitboxTableIcon%28Rebound%29.png) |
![Foot (type)](https://ssb.wiki.gallery/images/thumb/7/78/TypeIcon%28Foot%29.png/16px-TypeIcon%28Foot%29.png) |
![Normal (effect)](https://ssb.wiki.gallery/images/thumb/f/fe/EffectIcon%28Normal%29.png/16px-EffectIcon%28Normal%29.png) |
![HitboxTableIcon(GroundedTrue).png](https://ssb.wiki.gallery/images/thumb/0/0a/HitboxTableIcon%28GroundedTrue%29.png/16px-HitboxTableIcon%28GroundedTrue%29.png) |
![HitboxTableIcon(AerialTrue).png](https://ssb.wiki.gallery/images/thumb/0/0d/HitboxTableIcon%28AerialTrue%29.png/16px-HitboxTableIcon%28AerialTrue%29.png) |
Kick |
|
Late hit
|
0 |
0 |
7.84% |
0 |
![Sakurai angle](https://ssb.wiki.gallery/images/thumb/5/5a/AngleIcon361.png/16px-AngleIcon361.png) |
7 |
90 |
0 |
4.5 |
9 |
4.8 |
0.0 |
0.0 |
1.0x |
1.0x |
0% |
![HitboxTableIcon(Clang).png](https://ssb.wiki.gallery/images/thumb/0/0f/HitboxTableIcon%28Clang%29.png/16px-HitboxTableIcon%28Clang%29.png) |
![HitboxTableIcon(Rebound).png](https://ssb.wiki.gallery/images/thumb/7/79/HitboxTableIcon%28Rebound%29.png/16px-HitboxTableIcon%28Rebound%29.png) |
![Foot (type)](https://ssb.wiki.gallery/images/thumb/7/78/TypeIcon%28Foot%29.png/16px-TypeIcon%28Foot%29.png) |
![Normal (effect)](https://ssb.wiki.gallery/images/thumb/f/fe/EffectIcon%28Normal%29.png/16px-EffectIcon%28Normal%29.png) |
![HitboxTableIcon(GroundedTrue).png](https://ssb.wiki.gallery/images/thumb/0/0a/HitboxTableIcon%28GroundedTrue%29.png/16px-HitboxTableIcon%28GroundedTrue%29.png) |
![HitboxTableIcon(AerialTrue).png](https://ssb.wiki.gallery/images/thumb/0/0d/HitboxTableIcon%28AerialTrue%29.png/16px-HitboxTableIcon%28AerialTrue%29.png) |
Kick |
|
1 |
0 |
7.84% |
0 |
![Sakurai angle](https://ssb.wiki.gallery/images/thumb/5/5a/AngleIcon361.png/16px-AngleIcon361.png) |
7 |
90 |
0 |
5.3 |
8 |
1.6 |
0.0 |
0.0 |
1.0x |
1.0x |
0% |
![HitboxTableIcon(Clang).png](https://ssb.wiki.gallery/images/thumb/0/0f/HitboxTableIcon%28Clang%29.png/16px-HitboxTableIcon%28Clang%29.png) |
![HitboxTableIcon(Rebound).png](https://ssb.wiki.gallery/images/thumb/7/79/HitboxTableIcon%28Rebound%29.png/16px-HitboxTableIcon%28Rebound%29.png) |
![Foot (type)](https://ssb.wiki.gallery/images/thumb/7/78/TypeIcon%28Foot%29.png/16px-TypeIcon%28Foot%29.png) |
![Normal (effect)](https://ssb.wiki.gallery/images/thumb/f/fe/EffectIcon%28Normal%29.png/16px-EffectIcon%28Normal%29.png) |
![HitboxTableIcon(GroundedTrue).png](https://ssb.wiki.gallery/images/thumb/0/0a/HitboxTableIcon%28GroundedTrue%29.png/16px-HitboxTableIcon%28GroundedTrue%29.png) |
![HitboxTableIcon(AerialTrue).png](https://ssb.wiki.gallery/images/thumb/0/0d/HitboxTableIcon%28AerialTrue%29.png/16px-HitboxTableIcon%28AerialTrue%29.png) |
Kick |
|