Welcome to SmashWiki! Log in or create an account and join the community, and don't forget to read this first!
Notices
The Skill parameter has been removed from Smasher infoboxes, and in its place are the new "Best historical ranking" and "Best tournament result" parameters. SmashWiki needs help adding these new parameters to Smasher infoboxes, refer to the guidelines here for what should be included in these new parameters.
When adding results to Smasher pages, include each tournament's entrant number in addition to the player's placement, and use the {{Trn}} template with the matching game specified. Please also fix old results on Smasher pages that do not abide to this standard. Refer to our Smasher article guidelines to see how results tables should be formatted.
Check out our project page for ongoing projects that SmashWiki needs help with.
Super Smash Bros. 4

Ganondorf (SSB4)/Forward tilt

From SmashWiki, the Super Smash Bros. wiki
Jump to navigationJump to search
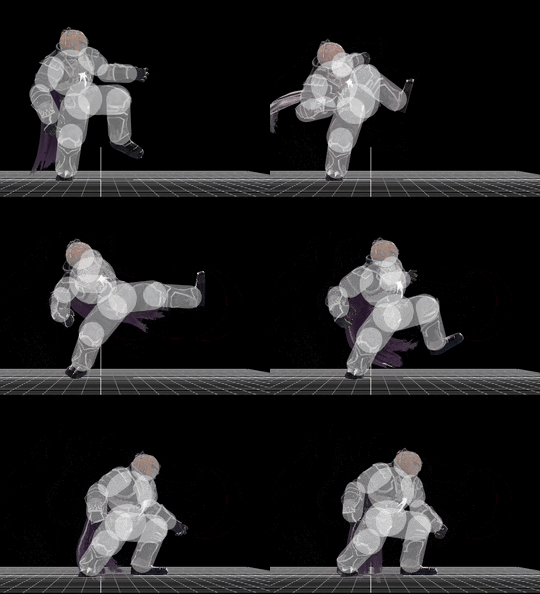
Hitbox visualization showing Ganondorf's forward tilt.

Overview

Commonly referred to as The Boot, Ganondorf leans back and delivers a forceful forward kick with his left leg.

It has good start-up, high knockback, and is a semi-spike, making it an excellent edge-guarding move against characters with little horizontal recovery options, such as Little Mac. It is one of the few tools Ganondorf has for spacing, even though it is not a great spacing move itself due to having the lowest reach of all of his ground moves. It also has a slight leanback during its start-up, allowing it to punish opponents who charge in recklessly, or be a safer read option against characters with no projectiles to aid their approach. Forward tilt is guaranteed on certain characters if they fail to tech Flame Choke, though down tilt is generally better as a combo starter.

The move is based on a kick Ganondorf and other large enemies use in The Legend of Zelda: Twilight Princess.

Hitboxes

Effect Damage Angle Base knockback Knockback scaling
Normal 13% (foot), 12% (leg) 22° 30 88

Timing

Hitbox 10-12
Interruptible 40
Animation length 54
FrameIcon(Lag).png FrameIcon(Lag).png FrameIcon(Lag).png FrameIcon(Lag).png FrameIcon(Lag).png FrameIcon(Lag).png FrameIcon(Lag).png FrameIcon(Lag).png FrameIcon(Lag).png FrameIcon(Hitbox).png FrameIcon(Hitbox).png FrameIcon(Hitbox).png FrameIcon(Lag).png FrameIcon(Lag).png FrameIcon(Lag).png FrameIcon(Lag).png FrameIcon(Lag).png FrameIcon(Lag).png FrameIcon(Lag).png FrameIcon(Lag).png FrameIcon(Lag).png FrameIcon(Lag).png FrameIcon(Lag).png FrameIcon(Lag).png FrameIcon(Lag).png FrameIcon(Lag).png FrameIcon(Lag).png FrameIcon(Lag).png FrameIcon(Lag).png FrameIcon(Lag).png FrameIcon(Lag).png FrameIcon(Lag).png FrameIcon(Lag).png FrameIcon(Lag).png FrameIcon(Lag).png FrameIcon(Lag).png FrameIcon(Lag).png FrameIcon(Lag).png FrameIcon(Lag).png FrameIcon(Interruptible).png FrameIcon(Interruptible).png FrameIcon(Interruptible).png FrameIcon(Interruptible).png FrameIcon(Interruptible).png FrameIcon(Interruptible).png FrameIcon(Interruptible).png FrameIcon(Interruptible).png FrameIcon(Interruptible).png FrameIcon(Interruptible).png FrameIcon(Interruptible).png FrameIcon(Interruptible).png FrameIcon(Interruptible).png FrameIcon(Interruptible).png FrameIcon(Interruptible).png
Legend (1 square = 1 frame)
Lag
Lag time
Hitbox
Hitbox
Interruptibility
Interruptible


Data.png This article or section may require additional technical data.
You can discuss this issue on the talk page or edit this page to improve it.