Super Smash Bros. Ultimate

Snake (SSBU)/Up tilt

From SmashWiki, the Super Smash Bros. wiki
< Snake (SSBU)
Revision as of 01:48, January 23, 2022 by Zeckemyro (talk | contribs)
Jump to navigationJump to search
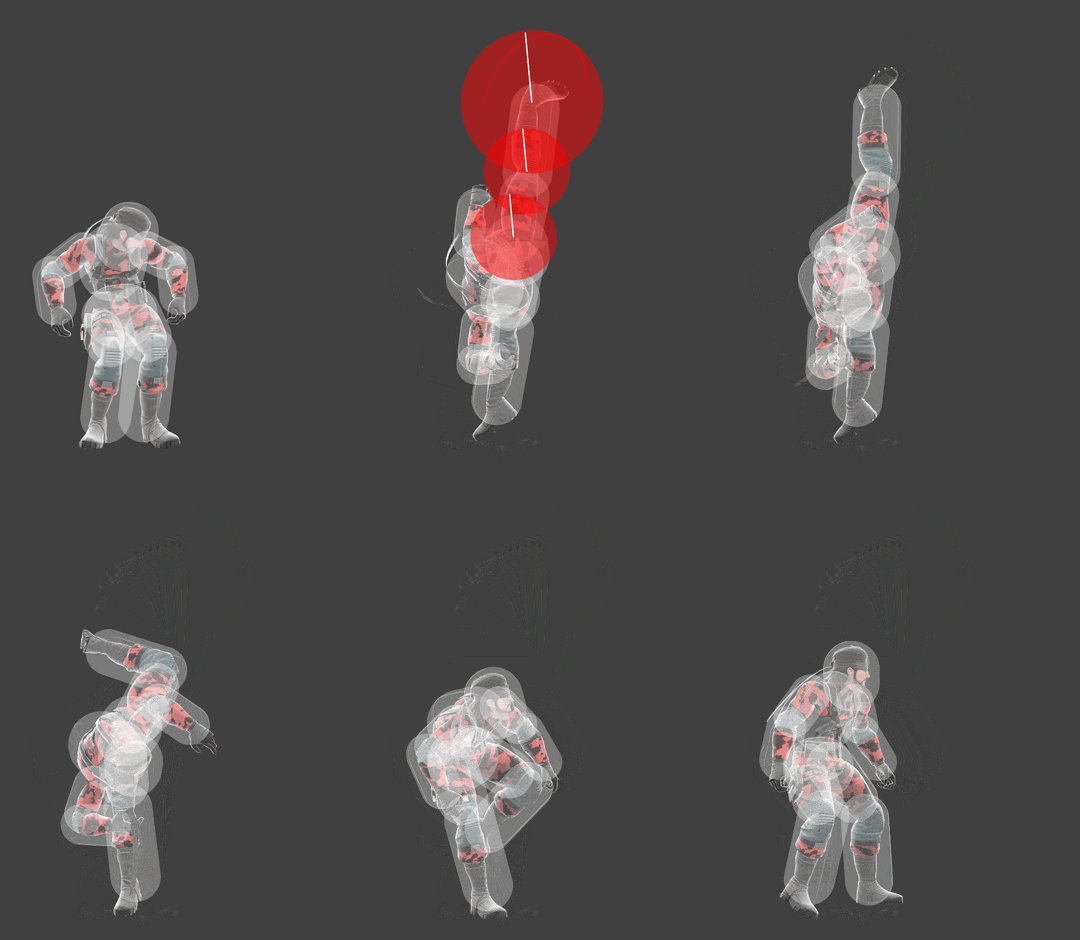
Hitbox visualization showing Snake's up tilt.

Overview

Snake performs a scorpion kick that launches the opponent directly upwards. The move has fast startup, coming out on frame 6, and is very powerful, allowing it to KO middleweights at around 106%. Despite its late hit having less power than its clean hit, it is still useful for KO's at very high percents. Additionally, it also possesses a decent amount of active frames (three for the clean hit and five for the late hit) and a disjointed hitbox, which gives the move good range for its speed and strength, as it can even hit opponents on the platforms of Lylat Cruise, Battlefield, Pokemon Stadium 2, and the top platform of Town and City.

The move also works very well with Snake's grab game, as well as the first part of his neutral aerial. At low percents, it can be combo'd into from his up throw, while it also has a true KO setup from his down throw at 160%, and can KO even earlier if the opponent's option is correctly read, making it one of Snake's best KO moves. Snake can also use the first part of his neutral aerial to setup into his up tilt, which can be a reliable KO setup at high percentages or simply a way to tack on damage at low percents, although the characters this works on depends on their weight and defensive options (it generally works better against lightweight characters).

The move is not flawless, however. It still has moderate ending lag, making it relatively unsafe on shield and easy to punish if it is whiffed (although it can still be difficult to punish at times). Furthermore, despite its fast startup, it often requires a read or setup in order for it to connect for a potential KO. Because of this, players must be patient when using it, as it will often leave Snake open for a punish if it is consistently spammed.

Overall, it is one of the best up tilts in the game and one of Snake's best moves in general due to its fast startup, strong KO power, and disjointed hitbox, making it a very useful move in Snake's kit, although it requires careful use in order to take advantage of its strengths.

Update History

Super Smash Bros. Ultimate 2.0.0

  • Buff Up tilt's clean hit has a slightly increased duration (2 frames → 3).

Hitboxes

ID Part Rehit rate Damage SD Angle Angle type BK KS FKV Set weight Radius Bone Offset SDI× T% Clang Rebound Effect Type G A Sound Direct Hit bits Hit part Blockable Reflectable Absorbable Flinchless No GFX Heedless
Clean hit (early)
0 0 0 14.5% 0 AngleIcon95.png Forward 65 82 0 HitboxTableIcon(False).png 3.5 top 0.0 6.0 7.0 1.0× 1.0× 0% HitboxTableIcon(Clang).png HitboxTableIcon(Rebound).png Normal (effect) Foot (type) HitboxTableIcon(GroundedTrue).png HitboxTableIcon(AerialTrue).png L Kick SpecialsDirect.png All All HitboxTableIcon(Blockable).png HitboxTableIcon(Unreflectable).png HitboxTableIcon(Unabsorbable).png HitboxTableIcon(False).png HitboxTableIcon(False).png HitboxTableIcon(False).png
1 0 0 14.5% 0 AngleIcon95.png Forward 65 82 0 HitboxTableIcon(False).png 2.5 top 0.0 4.0 4.0 1.0× 1.0× 0% HitboxTableIcon(Clang).png HitboxTableIcon(Rebound).png Normal (effect) Foot (type) HitboxTableIcon(GroundedTrue).png HitboxTableIcon(AerialTrue).png L Kick SpecialsDirect.png All All HitboxTableIcon(Blockable).png HitboxTableIcon(Unreflectable).png HitboxTableIcon(Unabsorbable).png HitboxTableIcon(False).png HitboxTableIcon(False).png HitboxTableIcon(False).png
2 0 0 14.5% 0 AngleIcon95.png Forward 65 82 0 HitboxTableIcon(False).png 2.5 top 0.0 6.0 2.5 1.0× 1.0× 0% HitboxTableIcon(Clang).png HitboxTableIcon(Rebound).png Normal (effect) Foot (type) HitboxTableIcon(GroundedTrue).png HitboxTableIcon(AerialTrue).png L Kick SpecialsDirect.png All All HitboxTableIcon(Blockable).png HitboxTableIcon(Unreflectable).png HitboxTableIcon(Unabsorbable).png HitboxTableIcon(False).png HitboxTableIcon(False).png HitboxTableIcon(False).png
Clean hit (mid)
0 0 0 14.5% 0 AngleIcon95.png Forward 65 82 0 HitboxTableIcon(False).png 3.5 top 0.0 14.0 10.0 1.0× 1.0× 0% HitboxTableIcon(Clang).png HitboxTableIcon(Rebound).png Normal (effect) Foot (type) HitboxTableIcon(GroundedTrue).png HitboxTableIcon(AerialTrue).png L Kick SpecialsDirect.png All All HitboxTableIcon(Blockable).png HitboxTableIcon(Unreflectable).png HitboxTableIcon(Unabsorbable).png HitboxTableIcon(False).png HitboxTableIcon(False).png HitboxTableIcon(False).png
1 0 0 14.5% 0 AngleIcon95.png Forward 65 82 0 HitboxTableIcon(False).png 2.5 top 0.0 11.0 5.0 1.0× 1.0× 0% HitboxTableIcon(Clang).png HitboxTableIcon(Rebound).png Normal (effect) Foot (type) HitboxTableIcon(GroundedTrue).png HitboxTableIcon(AerialTrue).png L Kick SpecialsDirect.png All All HitboxTableIcon(Blockable).png HitboxTableIcon(Unreflectable).png HitboxTableIcon(Unabsorbable).png HitboxTableIcon(False).png HitboxTableIcon(False).png HitboxTableIcon(False).png
2 0 0 14.5% 0 AngleIcon95.png Forward 65 82 0 HitboxTableIcon(False).png 2.5 top 0.0 12.0 2.5 1.0× 1.0× 0% HitboxTableIcon(Clang).png HitboxTableIcon(Rebound).png Normal (effect) Foot (type) HitboxTableIcon(GroundedTrue).png HitboxTableIcon(AerialTrue).png L Kick SpecialsDirect.png All All HitboxTableIcon(Blockable).png HitboxTableIcon(Unreflectable).png HitboxTableIcon(Unabsorbable).png HitboxTableIcon(False).png HitboxTableIcon(False).png HitboxTableIcon(False).png
Clean hit (late)
0 0 0 14.5% 0 AngleIcon95.png Forward 65 82 0 HitboxTableIcon(False).png 5.0 kneel 5.0 -0.2 0.0 1.0× 1.0× 0% HitboxTableIcon(Clang).png HitboxTableIcon(Rebound).png Normal (effect) Foot (type) HitboxTableIcon(GroundedTrue).png HitboxTableIcon(AerialTrue).png M Kick SpecialsDirect.png All All HitboxTableIcon(Blockable).png HitboxTableIcon(Unreflectable).png HitboxTableIcon(Unabsorbable).png HitboxTableIcon(False).png HitboxTableIcon(False).png HitboxTableIcon(False).png
1 0 0 14.5% 0 AngleIcon95.png Forward 65 82 0 HitboxTableIcon(False).png 3.0 kneel 0.0 0.0 0.0 1.0× 1.0× 0% HitboxTableIcon(Clang).png HitboxTableIcon(Rebound).png Normal (effect) Foot (type) HitboxTableIcon(GroundedTrue).png HitboxTableIcon(AerialTrue).png M Kick SpecialsDirect.png All All HitboxTableIcon(Blockable).png HitboxTableIcon(Unreflectable).png HitboxTableIcon(Unabsorbable).png HitboxTableIcon(False).png HitboxTableIcon(False).png HitboxTableIcon(False).png
2 0 0 14.5% 0 AngleIcon95.png Forward 65 82 0 HitboxTableIcon(False).png 3.0 legl 0.0 0.0 0.0 1.0× 1.0× 0% HitboxTableIcon(Clang).png HitboxTableIcon(Rebound).png Normal (effect) Foot (type) HitboxTableIcon(GroundedTrue).png HitboxTableIcon(AerialTrue).png M Kick SpecialsDirect.png All All HitboxTableIcon(Blockable).png HitboxTableIcon(Unreflectable).png HitboxTableIcon(Unabsorbable).png HitboxTableIcon(False).png HitboxTableIcon(False).png HitboxTableIcon(False).png
Late hit
0 0 0 13.5% 0 AngleIcon95.png Forward 50 88 0 HitboxTableIcon(False).png 5.0 kneel 5.0 -0.2 0.0 1.0× 1.0× 0% HitboxTableIcon(Clang).png HitboxTableIcon(Rebound).png Normal (effect) Foot (type) HitboxTableIcon(GroundedTrue).png HitboxTableIcon(AerialTrue).png M Kick SpecialsDirect.png All All HitboxTableIcon(Blockable).png HitboxTableIcon(Unreflectable).png HitboxTableIcon(Unabsorbable).png HitboxTableIcon(False).png HitboxTableIcon(False).png HitboxTableIcon(False).png
1 0 0 13.5% 0 AngleIcon95.png Forward 50 88 0 HitboxTableIcon(False).png 3.0 kneel 0.0 0.0 0.0 1.0× 1.0× 0% HitboxTableIcon(Clang).png HitboxTableIcon(Rebound).png Normal (effect) Foot (type) HitboxTableIcon(GroundedTrue).png HitboxTableIcon(AerialTrue).png M Kick SpecialsDirect.png All All HitboxTableIcon(Blockable).png HitboxTableIcon(Unreflectable).png HitboxTableIcon(Unabsorbable).png HitboxTableIcon(False).png HitboxTableIcon(False).png HitboxTableIcon(False).png
2 0 0 13.5% 0 AngleIcon95.png Forward 50 88 0 HitboxTableIcon(False).png 3.0 legl 0.0 0.0 0.0 1.0× 1.0× 0% HitboxTableIcon(Clang).png HitboxTableIcon(Rebound).png Normal (effect) Foot (type) HitboxTableIcon(GroundedTrue).png HitboxTableIcon(AerialTrue).png M Kick SpecialsDirect.png All All HitboxTableIcon(Blockable).png HitboxTableIcon(Unreflectable).png HitboxTableIcon(Unabsorbable).png HitboxTableIcon(False).png HitboxTableIcon(False).png HitboxTableIcon(False).png

Timing

Clean hit (early, mid, late) 6, 7, 8
Late hit 9-13
Interruptible 38
Animation length 47
FrameIcon(Lag).png FrameIcon(Lag).png FrameIcon(Lag).png FrameIcon(Lag).png FrameIcon(Lag).png FrameIcon(HitboxChangeS).png FrameIcon(HitboxChangeM).png FrameIcon(HitboxChangeM).png FrameIcon(HitboxChangeE).png FrameIcon(Hitbox).png FrameIcon(Hitbox).png FrameIcon(Hitbox).png FrameIcon(Hitbox).png FrameIcon(Lag).png FrameIcon(Lag).png FrameIcon(Lag).png FrameIcon(Lag).png FrameIcon(Lag).png FrameIcon(Lag).png FrameIcon(Lag).png FrameIcon(Lag).png FrameIcon(Lag).png FrameIcon(Lag).png FrameIcon(Lag).png FrameIcon(Lag).png FrameIcon(Lag).png FrameIcon(Lag).png FrameIcon(Lag).png FrameIcon(Lag).png FrameIcon(Lag).png FrameIcon(Lag).png FrameIcon(Lag).png FrameIcon(Lag).png FrameIcon(Lag).png FrameIcon(Lag).png FrameIcon(Lag).png FrameIcon(Lag).png FrameIcon(Interruptible).png FrameIcon(Interruptible).png FrameIcon(Interruptible).png FrameIcon(Interruptible).png FrameIcon(Interruptible).png FrameIcon(Interruptible).png FrameIcon(Interruptible).png FrameIcon(Interruptible).png FrameIcon(Interruptible).png FrameIcon(Interruptible).png
Legend (1 square = 1 frame)
Lag
Lag time
Hitbox
Hitbox
FrameIcon(HitboxChangeS).pngFrameIcon(HitboxChangeE).png
Hitbox change
Interruptibility
Interruptible