Super Smash Bros. Ultimate

Ridley (SSBU)/Down aerial: Difference between revisions

From SmashWiki, the Super Smash Bros. wiki
Jump to navigationJump to search
Tag: Mobile edit
m (→‎Overview: Fixed grammatical mistakes, removed personal statements, added links.)
 
Line 4: Line 4:
==Overview==
==Overview==


Ridley does a stomp, whit stall in fall proprieties, the move comes out relatevly quickly for a stall in fall (frame 11) having a spike hitbox that is pretty strong, actully having more base knockback than ganondorf's down air, the sourspot is not that weak either, still being able to take stocks at around 130%, and the move is a good option after a footstool out of shield.
Ridley does a stomp, with [[stall-then-fall]] proprieties; the move comes out relatively quickly for a stall-then-fall ([[frame]] 11), having a [[spike]] hitbox that is pretty strong, actually having more base knockback than {{mvsub|Ganondorf|SSBU|down aerial|poss=y}}. The [[sourspot]] is not that weak either, still being able to take stocks at around 130%, and the move is a good option after a [[footstool]] [[out of shield]].


However, this move has a lot of flaws that prevent it from being a useful move: first of all, the move is very risky; to give it some credit, it's not as risky as other stall-then-falls, because Ridley is one of the few characters that can still make it back after using it, but that doesn't make this move risk free. It has one of the saddest [[hitbox]]es because the [[sweet spot (hitbox)|sweetspot]] is so small compared to the sourspot, and the move has plenty of landing lag (32 frames), meaning that the move is very unsafe on shield (-27 on shield) leading into some pretty big [[punish]]es, and the high [[landing lag]] also means that the move has no combo potential against grounded opponents (unlike other spikes).


However, this move has a lot of flaws that prevent it from being a usefull move, first of all the move is very risky, to give it some credit, it's not as risky as other stall in falls, because ridley is one of the few characters that can still make it back after using it, but that dosen't make this move risk free, it has one of the sadest hitboxes iv'e seen in my life, because the sweetspot is so small compared to the sourspot, and the move has plenty of landing lag (32 frames) meaning that the move is very unsafe on shield (-27 on shield)leading into some pretty big punishes, and the high landing lag also means that the move has no combo potential against grounded opponents (unlike other spikes)
Overall, this move is considered quite bad, arguably one of the worst [[down aerial]]s in the game, and it's probably his worst move as well (competing with his {{mvsub|Ridley|SSBU|down special}}).
 
 
Overall, this move is considered quite bad, some pepole argue it's one of the worst down airs in the game, and it's probably his worst move as well (competing whit down special)


==Update History==
==Update History==

Latest revision as of 12:17, December 23, 2024

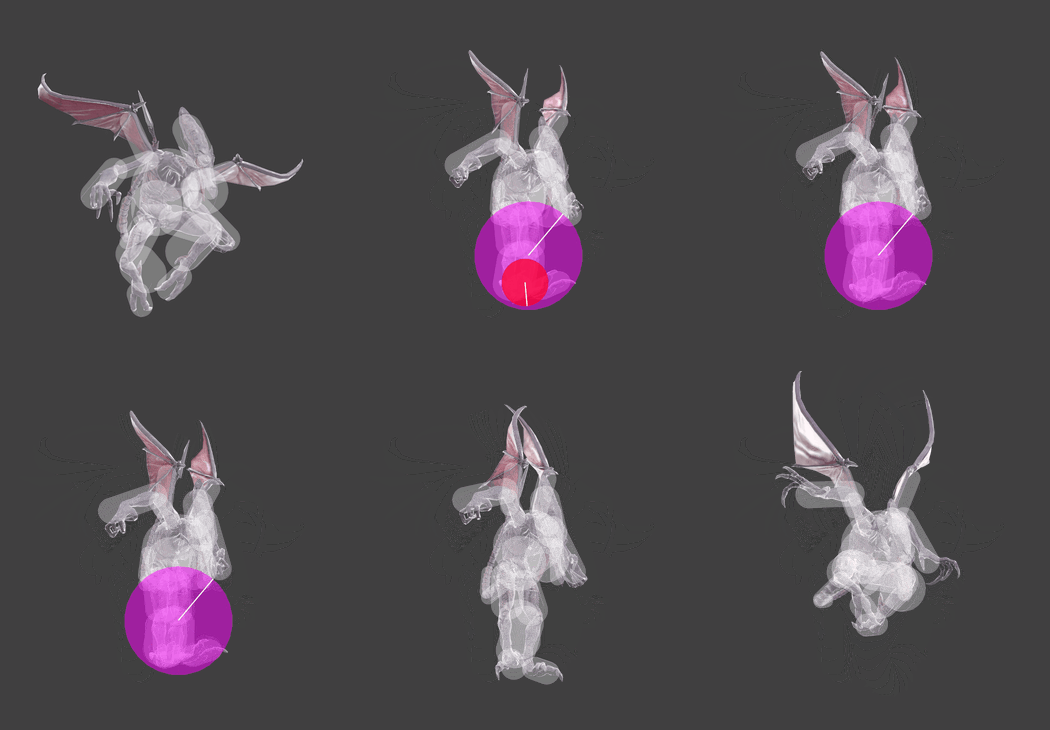
Hitbox visualization showing Ridley's down aerial.
Competitive.png This article or section may require competitive expertise.
You can discuss this issue on the talk page or edit this page to improve it.

Overview[edit]

Ridley does a stomp, with stall-then-fall proprieties; the move comes out relatively quickly for a stall-then-fall (frame 11), having a spike hitbox that is pretty strong, actually having more base knockback than Ganondorf's down aerial. The sourspot is not that weak either, still being able to take stocks at around 130%, and the move is a good option after a footstool out of shield.

However, this move has a lot of flaws that prevent it from being a useful move: first of all, the move is very risky; to give it some credit, it's not as risky as other stall-then-falls, because Ridley is one of the few characters that can still make it back after using it, but that doesn't make this move risk free. It has one of the saddest hitboxes because the sweetspot is so small compared to the sourspot, and the move has plenty of landing lag (32 frames), meaning that the move is very unsafe on shield (-27 on shield) leading into some pretty big punishes, and the high landing lag also means that the move has no combo potential against grounded opponents (unlike other spikes).

Overall, this move is considered quite bad, arguably one of the worst down aerials in the game, and it's probably his worst move as well (competing with his down special).

Update History[edit]

Super Smash Bros. Ultimate 2.0.0

  • Buff Ridley can grab the ledge earlier after using his down aerial.

Super Smash Bros. Ultimate 4.0.0

  • Change Down aerial no longer has its downward movement disabled when used out of hitstun.

Hitboxes[edit]

ID Part Rehit rate Damage SD Angle Angle type BK KS FKV Set weight Radius Bone Offset SDI× T% Clang Rebound Effect Type G A Sound Direct Hit bits Hit part Blockable Reflectable Absorbable Flinchless No GFX Heedless
Clean hit
0 0 0 14.0% 0 AngleIcon275.png Standard 55 75 0 HitboxTableIcon(False).png 3.5 top 0.0 -0.5 0.5 1.2× 1.0× 0% HitboxTableIcon(Clang).png HitboxTableIcon(Rebound).png Normal (effect) Foot (type) HitboxTableIcon(GroundedTrue).png HitboxTableIcon(AerialTrue).png L Kick SpecialsDirect.png All All HitboxTableIcon(Blockable).png HitboxTableIcon(Unreflectable).png HitboxTableIcon(Unabsorbable).png HitboxTableIcon(False).png HitboxTableIcon(False).png HitboxTableIcon(False).png
1 0 0 12.0% 0 AngleIcon50.png Standard 45 95 0 HitboxTableIcon(False).png 8.0 top 0.0 3.5 1.0 1.0× 1.0× 0% HitboxTableIcon(Clang).png HitboxTableIcon(Rebound).png Normal (effect) Foot (type) HitboxTableIcon(GroundedTrue).png HitboxTableIcon(AerialTrue).png M Kick SpecialsDirect.png All All HitboxTableIcon(Blockable).png HitboxTableIcon(Unreflectable).png HitboxTableIcon(Unabsorbable).png HitboxTableIcon(False).png HitboxTableIcon(False).png HitboxTableIcon(False).png
Late hit
1 0 0 12.0% 0 AngleIcon50.png Standard 45 95 0 HitboxTableIcon(False).png 8.5 top 0.0 3.5 1.0 1.0× 1.0× 0% HitboxTableIcon(Clang).png HitboxTableIcon(Rebound).png Normal (effect) Foot (type) HitboxTableIcon(GroundedTrue).png HitboxTableIcon(AerialTrue).png M Kick SpecialsDirect.png All All HitboxTableIcon(Blockable).png HitboxTableIcon(Unreflectable).png HitboxTableIcon(Unabsorbable).png HitboxTableIcon(False).png HitboxTableIcon(False).png HitboxTableIcon(False).png

Timing[edit]

Attack[edit]

The move resets Ridley's horizontal momentum and first sets his vertical speed to 1 on frames 1-10, then sets it to -3.8 from frame 11 onward. Manual horizontal movement is also disabled during frames 1-54. Jostling is disabled during frames 7-40, and ledge grabs are enabled from both sides starting on frame 80.

Initial autocancel 1-3
Clean hit 11-18
Late hit 19-40
Ending autocancel 50-
Interruptible 56
Animation length 79
FrameIcon(Lag).png FrameIcon(Lag).png FrameIcon(Lag).png FrameIcon(Lag).png FrameIcon(Lag).png FrameIcon(Lag).png FrameIcon(Lag).png FrameIcon(Lag).png FrameIcon(Lag).png FrameIcon(Lag).png FrameIcon(Hitbox).png FrameIcon(Hitbox).png FrameIcon(Hitbox).png FrameIcon(Hitbox).png FrameIcon(Hitbox).png FrameIcon(Hitbox).png FrameIcon(Hitbox).png FrameIcon(HitboxChangeS).png FrameIcon(HitboxChangeE).png FrameIcon(Hitbox).png FrameIcon(Hitbox).png FrameIcon(Hitbox).png FrameIcon(Hitbox).png FrameIcon(Hitbox).png FrameIcon(Hitbox).png FrameIcon(Hitbox).png FrameIcon(Hitbox).png FrameIcon(Hitbox).png FrameIcon(Hitbox).png FrameIcon(Hitbox).png FrameIcon(Hitbox).png FrameIcon(Hitbox).png FrameIcon(Hitbox).png FrameIcon(Hitbox).png FrameIcon(Hitbox).png FrameIcon(Hitbox).png FrameIcon(Hitbox).png FrameIcon(Hitbox).png FrameIcon(Hitbox).png FrameIcon(Hitbox).png FrameIcon(Lag).png FrameIcon(Lag).png FrameIcon(Lag).png FrameIcon(Lag).png FrameIcon(Lag).png FrameIcon(Lag).png FrameIcon(Lag).png FrameIcon(Lag).png FrameIcon(Lag).png FrameIcon(Lag).png FrameIcon(Lag).png FrameIcon(Lag).png FrameIcon(Lag).png FrameIcon(Lag).png FrameIcon(Lag).png FrameIcon(Interruptible).png FrameIcon(Interruptible).png FrameIcon(Interruptible).png FrameIcon(Interruptible).png FrameIcon(Interruptible).png FrameIcon(Interruptible).png FrameIcon(Interruptible).png FrameIcon(Interruptible).png FrameIcon(Interruptible).png FrameIcon(Interruptible).png FrameIcon(Interruptible).png FrameIcon(Interruptible).png FrameIcon(Interruptible).png FrameIcon(Interruptible).png FrameIcon(Interruptible).png FrameIcon(Interruptible).png FrameIcon(Interruptible).png FrameIcon(Interruptible).png FrameIcon(Interruptible).png FrameIcon(Interruptible).png FrameIcon(Interruptible).png FrameIcon(Interruptible).png FrameIcon(Interruptible).png FrameIcon(Interruptible).png
FrameIcon(Autocancel).png FrameIcon(Autocancel).png FrameIcon(Autocancel).png FrameIcon(Blank).png FrameIcon(Blank).png FrameIcon(Blank).png FrameIcon(Blank).png FrameIcon(Blank).png FrameIcon(Blank).png FrameIcon(Blank).png FrameIcon(Blank).png FrameIcon(Blank).png FrameIcon(Blank).png FrameIcon(Blank).png FrameIcon(Blank).png FrameIcon(Blank).png FrameIcon(Blank).png FrameIcon(Blank).png FrameIcon(Blank).png FrameIcon(Blank).png FrameIcon(Blank).png FrameIcon(Blank).png FrameIcon(Blank).png FrameIcon(Blank).png FrameIcon(Blank).png FrameIcon(Blank).png FrameIcon(Blank).png FrameIcon(Blank).png FrameIcon(Blank).png FrameIcon(Blank).png FrameIcon(Blank).png FrameIcon(Blank).png FrameIcon(Blank).png FrameIcon(Blank).png FrameIcon(Blank).png FrameIcon(Blank).png FrameIcon(Blank).png FrameIcon(Blank).png FrameIcon(Blank).png FrameIcon(Blank).png FrameIcon(Blank).png FrameIcon(Blank).png FrameIcon(Blank).png FrameIcon(Blank).png FrameIcon(Blank).png FrameIcon(Blank).png FrameIcon(Blank).png FrameIcon(Blank).png FrameIcon(Blank).png FrameIcon(Autocancel).png FrameIcon(Autocancel).png FrameIcon(Autocancel).png FrameIcon(Autocancel).png FrameIcon(Autocancel).png FrameIcon(Autocancel).png FrameIcon(Autocancel).png FrameIcon(Autocancel).png FrameIcon(Autocancel).png FrameIcon(Autocancel).png FrameIcon(Autocancel).png FrameIcon(Autocancel).png FrameIcon(Autocancel).png FrameIcon(Autocancel).png FrameIcon(Autocancel).png FrameIcon(Autocancel).png FrameIcon(Autocancel).png FrameIcon(Autocancel).png FrameIcon(Autocancel).png FrameIcon(Autocancel).png FrameIcon(Autocancel).png FrameIcon(Autocancel).png FrameIcon(Autocancel).png FrameIcon(Autocancel).png FrameIcon(Autocancel).png FrameIcon(Autocancel).png FrameIcon(Autocancel).png FrameIcon(Autocancel).png FrameIcon(Autocancel).png FrameIcon(Autocancel).png

Landing lag[edit]

Interruptible 33
Animation length 58
FrameIcon(Lag).png FrameIcon(Lag).png FrameIcon(Lag).png FrameIcon(Lag).png FrameIcon(Lag).png FrameIcon(Lag).png FrameIcon(Lag).png FrameIcon(Lag).png FrameIcon(Lag).png FrameIcon(Lag).png FrameIcon(Lag).png FrameIcon(Lag).png FrameIcon(Lag).png FrameIcon(Lag).png FrameIcon(Lag).png FrameIcon(Lag).png FrameIcon(Lag).png FrameIcon(Lag).png FrameIcon(Lag).png FrameIcon(Lag).png FrameIcon(Lag).png FrameIcon(Lag).png FrameIcon(Lag).png FrameIcon(Lag).png FrameIcon(Lag).png FrameIcon(Lag).png FrameIcon(Lag).png FrameIcon(Lag).png FrameIcon(Lag).png FrameIcon(Lag).png FrameIcon(Lag).png FrameIcon(Lag).png FrameIcon(Interruptible).png FrameIcon(Interruptible).png FrameIcon(Interruptible).png FrameIcon(Interruptible).png FrameIcon(Interruptible).png FrameIcon(Interruptible).png FrameIcon(Interruptible).png FrameIcon(Interruptible).png FrameIcon(Interruptible).png FrameIcon(Interruptible).png FrameIcon(Interruptible).png FrameIcon(Interruptible).png FrameIcon(Interruptible).png FrameIcon(Interruptible).png FrameIcon(Interruptible).png FrameIcon(Interruptible).png FrameIcon(Interruptible).png FrameIcon(Interruptible).png FrameIcon(Interruptible).png FrameIcon(Interruptible).png FrameIcon(Interruptible).png FrameIcon(Interruptible).png FrameIcon(Interruptible).png FrameIcon(Interruptible).png FrameIcon(Interruptible).png FrameIcon(Interruptible).png
Legend (1 square = 1 frame)
Lag
Lag time
Hitbox
Hitbox
FrameIcon(HitboxChangeS).pngFrameIcon(HitboxChangeE).png
Hitbox change
Auto-canceling
Autocancel
Interruptibility
Interruptible