| Welcome to SmashWiki! Log in or create an account and join the community, and don't forget to read this first! |
| Notices |
|---|
| The Skill parameter has been removed from Smasher infoboxes, and in its place are the new "Best historical ranking" and "Best tournament result" parameters. SmashWiki needs help adding these new parameters to Smasher infoboxes, refer to the guidelines here for what should be included in these new parameters. |
| When adding results to Smasher pages, include each tournament's entrant number in addition to the player's placement, and use the {{Trn}} template with the matching game specified. Please also fix old results on Smasher pages that do not abide to this standard. Refer to our Smasher article guidelines to see how results tables should be formatted. |
| Check out our project page for ongoing projects that SmashWiki needs help with. |
Ganondorf (SSBB)/Side special: Difference between revisions
John3637881 (talk | contribs) (I tested the followups against level 9 CPUs - they may not be accurate. I think the framestrips aren't quite accurate either. Someone needs to make a site and publish the values.) |
m (Length is okay, but this is what grab hitboxes use. Also, I wouldn't really consider this a stub.) |
||
| Line 1: | Line 1: | ||
{{ | {{ArticleIcons|ssbb=y}} | ||
==Overview== | ==Overview== | ||
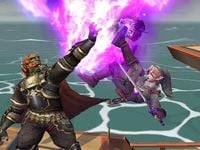
[[File:Ganon link flamechoke.jpg|thumb|right|{{SSBB|Ganondorf}} using [[Flame Choke]] against {{SSBB|Link}} in ''Brawl''.]] | [[File:Ganon link flamechoke.jpg|thumb|right|{{SSBB|Ganondorf}} using [[Flame Choke]] against {{SSBB|Link}} in ''Brawl''.]] | ||
| Line 18: | Line 18: | ||
{|class="wikitable" | {|class="wikitable" | ||
|- | |- | ||
! | !Grab | ||
|16-31 | |16-31 | ||
|- | |- | ||
| Line 26: | Line 26: | ||
{{FrameStripStart}} | {{FrameStripStart}} | ||
{{FrameStrip|t=Lag|c=15}}{{FrameStrip|t= | {{FrameStrip|t=Lag|c=15}}{{FrameStrip|t=Grab|c=16}}{{FrameStrip|t=Lag|c=29}} | ||
{{FrameStripEnd}} | {{FrameStripEnd}} | ||
{{FrameIconLegend|lag=y| | {{FrameIconLegend|lag=y|grab=y}} | ||
===Aerial=== | ===Aerial=== | ||
{|class="wikitable" | {|class="wikitable" | ||
|- | |- | ||
! | !Grab | ||
|19-31 | |19-31 | ||
|- | |- | ||
| Line 41: | Line 41: | ||
{{FrameStripStart}} | {{FrameStripStart}} | ||
{{FrameStrip|t=Lag|c=18}}{{FrameStrip|t= | {{FrameStrip|t=Lag|c=18}}{{FrameStrip|t=Grab|c=13}}{{FrameStrip|t=Lag|c=29}} | ||
{{FrameStripEnd}} | {{FrameStripEnd}} | ||
{{FrameIconLegend|lag=y| | {{FrameIconLegend|lag=y|grab=y}} | ||
==Flame Choke followup list== | ==Flame Choke followup list== | ||
Revision as of 21:02, March 5, 2017
Overview
Ganondorf's side special in Brawl is Flame Choke. Ganondorf boosts forward with one dark magic-infused hand outstretched and grabs an opponent by the neck before dropping them to the ground. As it is a command grab, Flame Choke cannot be shielded. It can potentially be used continuously to tech chase opponents; alternatively, Ganondorf can follow up with several of his moves, making Flame Choke a combo starter.
If used in the air, Ganondorf will forcefully slam the opponent down to the ground. If used offstage, this will result in an instant KO called Ganoncide. However, unlike in Smash 4, where this tactic will always result in victory for Ganondorf, in Brawl, using Ganoncide is unpredictable and can result in a win, a loss, or even Sudden Death.
Hitboxes
| Effect | Damage | Base knockback | Knockback scaling |
|---|---|---|---|
| Darkness | 9% (ground), 12% (air) | 60/60 | 100/100 |
Timing
Flame choke has super armor on frames 17-41.
Grounded
| Grab | 16-31 |
|---|---|
| Animation length | 60 |
Lag time |
Grab |
Aerial
| Grab | 19-31 |
|---|---|
| Animation length | 60 |
Lag time |
Grab |
Flame Choke followup list
| Able to follow up with: | Characters |
|---|---|
| Down tilt only | |
| Jab and down tilt | |
| Forward tilt and down tilt | |
| Jab, forward tilt and down tilt | |
| Jab, forward tilt, down tilt and down smash |
External links

