Kirby (SSB)/Neutral special: Difference between revisions
SuperSqank (talk | contribs) |
SuperSqank (talk | contribs) No edit summary |
||
| Line 14: | Line 14: | ||
Inhale has little to no use in competitive play, as it is laggy, short-ranged, and Kirby has better options outside of in teams with Fox/Mario/Falcon players as it allows Kirby to use lasers/fireballs/use Falcon Punch (for recovery). Kirby can also triple laser if he absorbs a Fox so certain Kirby mains will purposely not finish a combo vs. a fox and instead do an up tilt to swallow to gain this unique method of combat. | Inhale has little to no use in competitive play, as it is laggy, short-ranged, and Kirby has better options outside of in teams with Fox/Mario/Falcon players as it allows Kirby to use lasers/fireballs/use Falcon Punch (for recovery). Kirby can also triple laser if he absorbs a Fox so certain Kirby mains will purposely not finish a combo vs. a fox and instead do an up tilt to swallow to gain this unique method of combat. | ||
{{technical data}} | ==Throw and Hitbox Data== | ||
{{technical data|Star hitbox}} | |||
===Grab=== | ===Grab=== | ||
{{SSB64HitboxTableHeader}} | {{SSB64HitboxTableHeader}} | ||
Revision as of 14:05, July 12, 2020

Overview
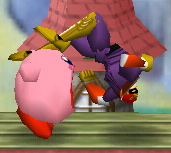
Kirby's neutral special is known as Vacuum (also known as Swallow in Melee and Inhale in later games), where Kirby opens his mouth wide open and then begins to vacuum, creating a vortex of wind. The move can be used for an infinite duration as long as the B button is held down and nothing interrupts Kirby. The move can be stopped by releasing the B button, or if Kirby flinches. Its main purpose is to suck up a nearby opponent. With an opponent inhaled and Kirby bloated by them, Kirby can't move around, and if he is in midair, his falling speed is increased. If Kirby does not do anything with the inhaled opponent, they will eventually escape in a few moments and Kirby will be knocked back. However he has various options that can be used.
The first option is that Kirby can copy an opponent's neutral special move while popping them out for 6% damage - performed by pressing the B button or by tilting the control stick down. This allows Kirby to use their said neutral special move in place of Inhale, and gains a hat resembling that character (for example, if Kirby copies Mario, he will be able to use Fireball, and gains a hat identical to his). However, Kirby can also lose the copied special move and hat by either being attacked enough so that a star resembling that ability drops out of him, being KO'd, or if he decides to discarding it by taunting. Note that if Kirby uses this option after inhaling another Kirby, he won't gain an ability or hat, unless the Kirby being inhaled has a copied ability; the inhaler would gain that ability while the inhaled Kirby would lose it. A list of copy abilities that Kirby can gain can be seen here.
The second option allows Kirby to simply shoot out the inhaled opponent, by pressing the A button. This deals 10% damage, and the opponent is sent in the direction Kirby is facing with decent range. This causes the spit-out opponent to become a projectile. Any bystanders hit by the spit-out opponent will be hit for 17% damage and decent to high knockback.
One infamous option that Kirby can perform is "Kirbycide", a Sacrificial KO. It involves Kirby inhaling the opponent offstage so they both fall down into the lower blast line, KOing the pair of them simultaneously. This technique can quickly remove a stock from both players as it forces Kirby to fall abnormally fast.
Inhale has little to no use in competitive play, as it is laggy, short-ranged, and Kirby has better options outside of in teams with Fox/Mario/Falcon players as it allows Kirby to use lasers/fireballs/use Falcon Punch (for recovery). Kirby can also triple laser if he absorbs a Fox so certain Kirby mains will purposely not finish a combo vs. a fox and instead do an up tilt to swallow to gain this unique method of combat.
Throw and Hitbox Data
Grab
| ID | Part | Damage | SD | Angle | BK | KS | FKV | Radius | Bone | Offset | Clang | Effect | G | A | Sound | ||
|---|---|---|---|---|---|---|---|---|---|---|---|---|---|---|---|---|---|
| 0 | 0 | 1% | 0 | 0 | 100 | 0 | 145 | 0 | 0 | 240 | 200 | ||||||
| 1 | 0 | 1% | 0 | 0 | 100 | 0 | 180 | 0 | 0 | 240 | 410 | ||||||
Inhale Throw
| Bone | Damage | Angle | BK | KS | FKV | Effect | |
|---|---|---|---|---|---|---|---|
| Throw | bn! | 6% | 0 | 100 | 0 |
Spit Throw
| Bone | Damage | Angle | BK | KS | FKV | Effect | |
|---|---|---|---|---|---|---|---|
| Throw | bn! | 10% | 0 | 100 | 0 |
Timing
Grab
| Grab startup | 20 |
|---|---|
| Grab loop | 21- |
| Animation length (from release) | 19 |
Swallow
| Damage dealt | 1 |
|---|---|
| Throw | 8 |
| Animation length | 29 |
Spit
| Damage dealt | 1 |
|---|---|
| Throw | 7 |
| Star hitbox | 7-40 |
| Animation length | 27 |
| Lag | ||||||||||||||||||||||||||||||||||||||||
| Star |
Lag time |
Hitbox |
Loop point |
Prop event |
Grab |
Throw point |
