Super Smash Bros. Ultimate

Luigi (SSBU)/Up tilt: Difference between revisions

From SmashWiki, the Super Smash Bros. wiki
Jump to navigationJump to search
No edit summary
Tag: Mobile edit
Line 3: Line 3:
{{competitive expertise}}
==Overview==
==Overview==
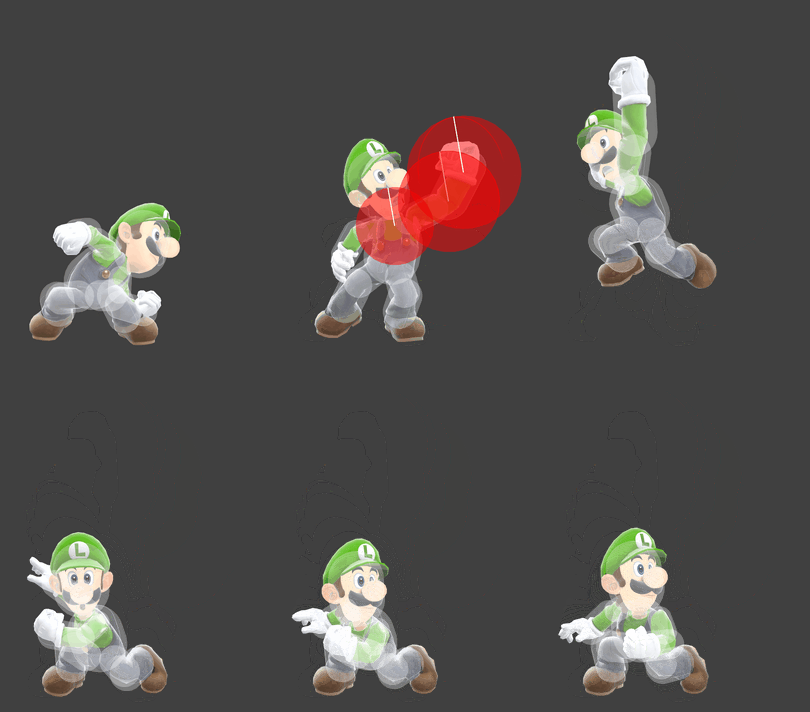
Luigi performs an uppercut while jumping. Compared to his old up tilt, it can't hit behind him, but has more range in front of him and above him, so it's a good anti-air tool, and it has less ending lag too, making it better for combos compared to the previous one. Very similar to Mario's up tilt, but Luigi's version deal slightly more damage, has more range in front of him and less ending lag, but it has less base knockback and more knockback growth, thus making less safe on hit at very low percents. A reliable combo starter that sends the opponents vertically and slightly behind Luigi, and can combo into itself or his aerials even at high percents.
==Hitboxes==
==Hitboxes==
{{UltimateHitboxTableHeader}}

Revision as of 03:31, December 14, 2019

Hitbox visualization showing Luigi's up tilt.
Competitive.png This article or section may require competitive expertise.
You can discuss this issue on the talk page or edit this page to improve it.

Overview

Luigi performs an uppercut while jumping. Compared to his old up tilt, it can't hit behind him, but has more range in front of him and above him, so it's a good anti-air tool, and it has less ending lag too, making it better for combos compared to the previous one. Very similar to Mario's up tilt, but Luigi's version deal slightly more damage, has more range in front of him and less ending lag, but it has less base knockback and more knockback growth, thus making less safe on hit at very low percents. A reliable combo starter that sends the opponents vertically and slightly behind Luigi, and can combo into itself or his aerials even at high percents.

Hitboxes

ID Part Rehit rate Damage SD Angle Angle type BK KS FKV Set weight Radius Bone Offset SDI× T% Clang Rebound Effect Type G A Sound Direct Hit bits Hit part Blockable Reflectable Absorbable Flinchless No GFX Heedless
0 0 0 6.0% 0 AngleIcon100.png Standard 8 150 0 HitboxTableIcon(False).png 3.3 neck 0.0 0.0 0.0 1.0× 1.0× 0% HitboxTableIcon(Clang).png HitboxTableIcon(Rebound).png Normal (effect) Hand (type) HitboxTableIcon(GroundedTrue).png HitboxTableIcon(AerialTrue).png M Kick SpecialsDirect.png All All HitboxTableIcon(Blockable).png HitboxTableIcon(Unreflectable).png HitboxTableIcon(Unabsorbable).png HitboxTableIcon(False).png HitboxTableIcon(False).png HitboxTableIcon(False).png
1 0 0 6.0% 0 AngleIcon100.png Standard 8 150 0 HitboxTableIcon(False).png 4.3 arml 0.0 0.0 0.0 1.0× 1.0× 0% HitboxTableIcon(Clang).png HitboxTableIcon(Rebound).png Normal (effect) Hand (type) HitboxTableIcon(GroundedTrue).png HitboxTableIcon(AerialTrue).png M Kick SpecialsDirect.png All All HitboxTableIcon(Blockable).png HitboxTableIcon(Unreflectable).png HitboxTableIcon(Unabsorbable).png HitboxTableIcon(False).png HitboxTableIcon(False).png HitboxTableIcon(False).png
2 0 0 6.0% 0 AngleIcon100.png Standard 8 150 0 HitboxTableIcon(False).png 4.8 handl 0.0 0.0 0.0 1.0× 1.0× 0% HitboxTableIcon(Clang).png HitboxTableIcon(Rebound).png Normal (effect) Hand (type) HitboxTableIcon(GroundedTrue).png HitboxTableIcon(AerialTrue).png M Kick SpecialsDirect.png All All HitboxTableIcon(Blockable).png HitboxTableIcon(Unreflectable).png HitboxTableIcon(Unabsorbable).png HitboxTableIcon(False).png HitboxTableIcon(False).png HitboxTableIcon(False).png

Timing

Hitboxes 5-10
Interruptible 28
Animation length 39
FrameIcon(Lag).png FrameIcon(Lag).png FrameIcon(Lag).png FrameIcon(Lag).png FrameIcon(Hitbox).png FrameIcon(Hitbox).png FrameIcon(Hitbox).png FrameIcon(Hitbox).png FrameIcon(Hitbox).png FrameIcon(Hitbox).png FrameIcon(Lag).png FrameIcon(Lag).png FrameIcon(Lag).png FrameIcon(Lag).png FrameIcon(Lag).png FrameIcon(Lag).png FrameIcon(Lag).png FrameIcon(Lag).png FrameIcon(Lag).png FrameIcon(Lag).png FrameIcon(Lag).png FrameIcon(Lag).png FrameIcon(Lag).png FrameIcon(Lag).png FrameIcon(Lag).png FrameIcon(Lag).png FrameIcon(Lag).png FrameIcon(Interruptible).png FrameIcon(Interruptible).png FrameIcon(Interruptible).png FrameIcon(Interruptible).png FrameIcon(Interruptible).png FrameIcon(Interruptible).png FrameIcon(Interruptible).png FrameIcon(Interruptible).png FrameIcon(Interruptible).png FrameIcon(Interruptible).png FrameIcon(Interruptible).png FrameIcon(Interruptible).png
Legend (1 square = 1 frame)
Lag
Lag time
Hitbox
Hitbox
Interruptibility
Interruptible