Captain Falcon (SSB4)/Up smash: Difference between revisions
From SmashWiki, the Super Smash Bros. wiki
Jump to navigationJump to search
No edit summary |
m (Description added.) Tag: Mobile edit |
||
| (8 intermediate revisions by 6 users not shown) | |||
| Line 1: | Line 1: | ||
{{ArticleIcons|ssb4=y}} | {{ArticleIcons|ssb4=y}} | ||
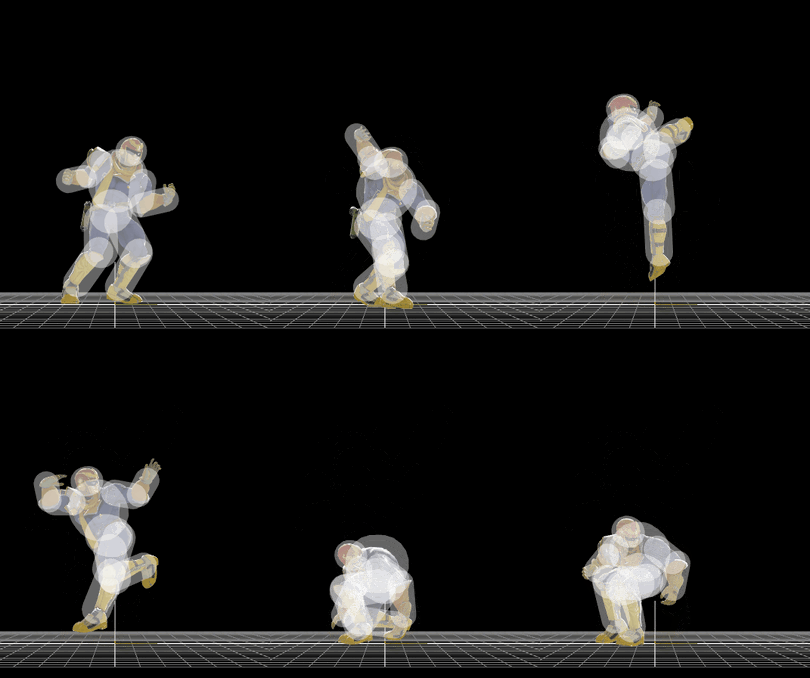
[[File:CaptainFalconUpSmash.gif|thumb|270px|Hitbox visualization showing Captain Falcon's up smash.]] | |||
==Overview== | |||
Performs a spinning double hop-kick. A potent move that despite its slow start-up [[lag]], has low ending lag and deceptively far horizontal [[range]]. It be used for surprising as well as catching opponent out of a [[spot dodge]]. Using it out of a [[dash]] to [[punish]] [[airdodge]]s is also a common use for the move, as it can be very effective from underneath a [[platform]]. The highest [[damage]] possible for one input is 13% in the second hit. | |||
==Hitboxes== | ==Hitboxes== | ||
{{SSB4HitboxTableHeader}} | {{SSB4HitboxTableHeader}} | ||
{{HitboxTableTitle|Hit 1|42}} | {{HitboxTableTitle|Hit 1|42}} | ||
| Line 9: | Line 10: | ||
|id=0 | |id=0 | ||
|part=0 | |part=0 | ||
|damage=6 | |damage={{ChargedSmashDmgSSB4|6}} | ||
|angle=95 | |angle=95 | ||
|bk=0 | |bk=0 | ||
| Line 28: | Line 29: | ||
|id=1 | |id=1 | ||
|part=0 | |part=0 | ||
|damage=6 | |damage={{ChargedSmashDmgSSB4|6}} | ||
|angle=110 | |angle=110 | ||
|bk=0 | |bk=0 | ||
| Line 47: | Line 48: | ||
|id=2 | |id=2 | ||
|part=0 | |part=0 | ||
|damage=11 | |damage={{ChargedSmashDmgSSB4|11}} | ||
|angle=80 | |angle=80 | ||
|bk=30 | |bk=30 | ||
| Line 66: | Line 67: | ||
|id=3 | |id=3 | ||
|part=0 | |part=0 | ||
|damage=11 | |damage={{ChargedSmashDmgSSB4|11}} | ||
|angle=90 | |angle=90 | ||
|bk=30 | |bk=30 | ||
| Line 86: | Line 87: | ||
|id=0 | |id=0 | ||
|part=0 | |part=0 | ||
|damage=13 | |damage={{ChargedSmashDmgSSB4|13}} | ||
|angle=83 | |angle=83 | ||
|bk=30 | |bk=30 | ||
| Line 105: | Line 106: | ||
|id=1 | |id=1 | ||
|part=0 | |part=0 | ||
|damage=13 | |damage={{ChargedSmashDmgSSB4|13}} | ||
|angle=85 | |angle=85 | ||
|bk=30 | |bk=30 | ||
| Line 124: | Line 125: | ||
|id=2 | |id=2 | ||
|part=0 | |part=0 | ||
|damage=12 | |damage={{ChargedSmashDmgSSB4|12}} | ||
|angle=70 | |angle=70 | ||
|bk=30 | |bk=30 | ||
| Line 141: | Line 142: | ||
}} | }} | ||
|} | |} | ||
==Timing== | ==Timing== | ||
{|class="wikitable" | {|class="wikitable" | ||
|- | |- | ||
! | !Charges between | ||
| | |8-9 | ||
|- | |- | ||
! | !Hit 1 | ||
|22 | |22 | ||
|- | |- | ||
! | !Hit 2 | ||
|28 | |28 | ||
|- | |- | ||
! | !Interruptible | ||
| | |52 | ||
|- | |- | ||
! | !Animation length | ||
| | |61 | ||
|} | |} | ||
{{FrameStripStart}} | {{FrameStripStart}} | ||
{{FrameStrip|t=Lag|c= | {{FrameStrip|t=Lag|c=8|e=LagChargeS}}{{FrameStrip|t=Lag|c=13|s=LagChargeE}}{{FrameStrip|t=Hitbox|c=1}}{{FrameStrip|t=Lag|c=5}}{{FrameStrip|t=Hitbox|c=1}}{{FrameStrip|t=Lag|c=23}}{{FrameStrip|t=Interruptible|c=10}} | ||
{{FrameStripEnd}}{{FrameIconLegend|lag=y|hitbox=y}} | {{FrameStripEnd}} | ||
{{FrameIconLegend|lag=y|charge=y|hitbox=y|interruptible=y}} | |||
{{MvSubNavCaptainFalcon|g=SSB4}} | {{MvSubNavCaptainFalcon|g=SSB4}} | ||
[[Category:Captain Falcon (SSB4)]] | [[Category:Captain Falcon (SSB4)]] | ||
[[Category:Up smashes (SSB4)]] | [[Category:Up smashes (SSB4)]] | ||
Latest revision as of 23:24, February 17, 2021
Overview[edit]
Performs a spinning double hop-kick. A potent move that despite its slow start-up lag, has low ending lag and deceptively far horizontal range. It be used for surprising as well as catching opponent out of a spot dodge. Using it out of a dash to punish airdodges is also a common use for the move, as it can be very effective from underneath a platform. The highest damage possible for one input is 13% in the second hit.
Hitboxes[edit]
Timing[edit]
| Charges between | 8-9 |
|---|---|
| Hit 1 | 22 |
| Hit 2 | 28 |
| Interruptible | 52 |
| Animation length | 61 |
Lag time |
Charge interval |
Hitbox |
Interruptible |
|
