Super Smash Bros. 4

Palutena (SSB4)/Back aerial: Difference between revisions

From SmashWiki, the Super Smash Bros. wiki
Jump to navigationJump to search
 
(3 intermediate revisions by 2 users not shown)
Line 8: Line 8:


==Hitboxes==
==Hitboxes==
{{SSB4HitboxTableHeader}}
{{SSB4HitboxTableHeader|special=y}}
{{SSB4HitboxTableRow
{{SSB4SpecialHitboxTableRow
|id=0
|id=0
|damage=12%
|damage=12%
|sd=3
|sd=3
|angle=361
|angle=361
|af=4
|bk=30
|bk=30
|ks=92
|ks=92
Line 30: Line 31:
|sfx=Kick
|sfx=Kick
}}
}}
{{SSB4HitboxTableRow
{{SSB4SpecialHitboxTableRow
|id=1
|id=1
|damage=9%
|damage=9%
|sd=3
|sd=3
|angle=361
|angle=361
|af=4
|bk=30
|bk=30
|ks=92
|ks=92
Line 43: Line 45:
|ypos=10.2
|ypos=10.2
|zpos=-11.0
|zpos=-11.0
|ystretch=10.2
|zstretch=-9.0
|trip=0
|trip=0
|type=Typeless
|type=Typeless
Line 54: Line 58:


==Timing==
==Timing==
{{technical data}}
===Attack===
===Attack===
{|class="wikitable"
{|class="wikitable"
|-
!Initial autocancel
!Initial autocancel
|1-2
|1-2
|-
|-
!Invincible
!Partial Invincibility
|3-10
|3-10
|-
|-
Line 68: Line 70:
|-
|-
!Ending autocancel
!Ending autocancel
|35
|35-
|-
|-
!Interruptible
!Interruptible
Line 74: Line 76:
|-
|-
!Animation length
!Animation length
|?
|53
|}
|}


{{FrameStripStart}}
{{FrameStripStart}}
{{FrameStrip|t=Lag|c=7}}{{FrameStrip|t=Hitbox|c=3}}{{FrameStrip|t=Lag|c=39}}{{FrameStrip|t=Interruptible|c=1}}
{{FrameStrip|t=Lag|c=7}}{{FrameStrip|t=Hitbox|c=3}}{{FrameStrip|t=Lag|c=39}}{{FrameStrip|t=Interruptible|c=4}}
|-
{{FrameStrip|t=Vulnerable|c=2}}{{FrameStrip|t=Invincible|c=8}}{{FrameStrip|t=Vulnerable|c=43}}
|-
|-
{{FrameStrip|t=Autocancel|c=2}}{{FrameStrip|t=Invincible|c=8}}{{FrameStrip|t=Blank|c=24}}{{FrameStrip|t=Autocancel|c=16}}
{{FrameStrip|t=Autocancel|c=2}}{{FrameStrip|t=Blank|c=32}}{{FrameStrip|t=Autocancel|c=19}}
{{FrameStripEnd}}
{{FrameStripEnd}}


===Landing lag===
===Landing lag===
{|class="wikitable"
{|class="wikitable"
|-
!Animation length
!Animation length
|16
|16
Line 93: Line 96:
{{FrameStrip|t=Lag|c=16}}
{{FrameStripEnd}}
{{FrameStripEnd}}
{{FrameIconLegend|lag=y|hitbox=y|invincible=y|autocancel=y|interruptible=y}}


{{MvSubNavPalutena}}
{{FrameIconLegend|lag=y|hitbox=y|interruptible=y|invincible=y|vulnerable=y|autocancel=y}}
 
{{MvSubNavPalutena|g=SSB4}}
[[Category:Palutena (SSB4)]]
[[Category:Palutena (SSB4)]]
[[Category:Back aerials (SSB4)]]
[[Category:Back aerials (SSB4)]]

Latest revision as of 03:22, June 2, 2021

Hitbox visualization showing Palutena's back aerial.

Overview[edit]

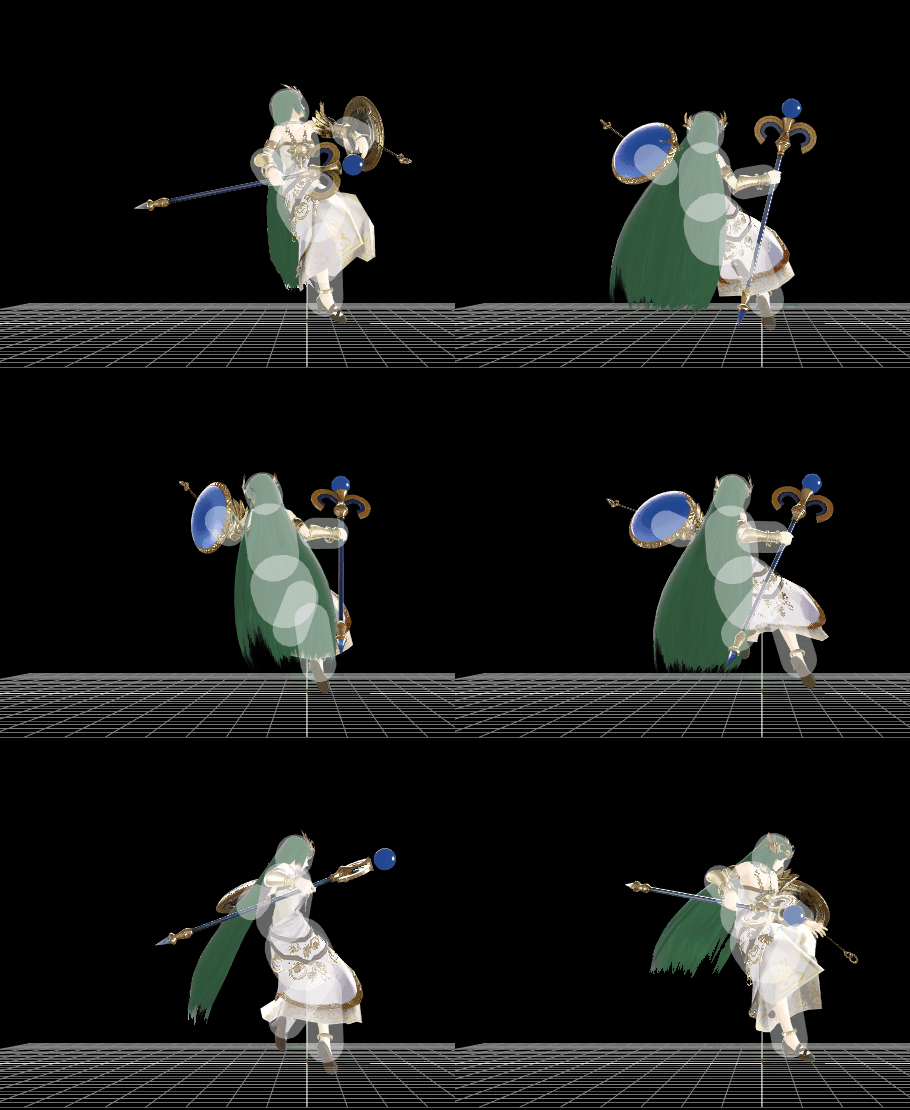
Palutena attacks behind her using her shield. It is her strongest aerial in terms of damage, which makes it great at edgeguarding. Her shield also renders her upper body's back invincible for 8 frames, which lets it beat any attack or projectile that comes in contact with her back. However, it is easy to miss if the opponents is too close to her since it does not have a hitbox around her, and its high ending lag sometimes makes it punishable if it misses (though doing so is quite hard), which makes it necessary to cancel this move from a short hop, or by SHFFing if the opponent does not have a move fast enough. It also has a small sourspot on her shoulder deals 3% less damage, but makes the same sound. While the hitbox is small and is both overlapped and outprioritized by the sweetspot, the sound it makes renders it almost unperceptible if the move is hitting with the sourspot.

This move can also be comboed from a down throw, then SHFFd to avoid taking the move's ending lag. Its landing lag, however, while relatively low, makes it more viable as a possible, albeit hard to land, KO setup at high percents, while using her neutral or forward aerials at low percents to avoid getting punished due to either their lower ending or landing lag, respectively.

Hitboxes[edit]

ID Part Rehit rate Damage SD Angle BK KS FKV Radius Bone Offset SDIx T% Clang Rebound Type Effect G A Sound Direct Hit bits Blockable Reflectable Absorbable Piercing Heedless No GFX Flinchless Stretch
0 0 0 12% 3 Sakurai angle Backwards 30 92 0 7.0 0 0.0 10.2 -14.0 1.0x 1.2x 0% HitboxTableIcon(Clang).png HitboxTableIcon(Rebound).png Typeless (type) Normal (effect) HitboxTableIcon(GroundedTrue).png HitboxTableIcon(AerialTrue).png L Kick SpecialsDirect.png 63 HitboxTableIcon(Blockable).png HitboxTableIcon(Unreflectable).png HitboxTableIcon(Unabsorbable).png HitboxTableIcon(False).png HitboxTableIcon(False).png HitboxTableIcon(False).png HitboxTableIcon(False).png
1 0 0 9% 3 Sakurai angle Backwards 30 92 0 3.0 0 0.0 10.2 -11.0 1.0x 1.0x 0% HitboxTableIcon(Clang).png HitboxTableIcon(Rebound).png Typeless (type) Normal (effect) HitboxTableIcon(GroundedTrue).png HitboxTableIcon(AerialTrue).png L Kick SpecialsDirect.png 63 HitboxTableIcon(Blockable).png HitboxTableIcon(Unreflectable).png HitboxTableIcon(Unabsorbable).png HitboxTableIcon(False).png HitboxTableIcon(False).png HitboxTableIcon(False).png HitboxTableIcon(False).png 0.0 10.2 -9.0

Timing[edit]

Attack[edit]

Initial autocancel 1-2
Partial Invincibility 3-10
Hitboxes 8-10
Ending autocancel 35-
Interruptible 50
Animation length 53
FrameIcon(Lag).png FrameIcon(Lag).png FrameIcon(Lag).png FrameIcon(Lag).png FrameIcon(Lag).png FrameIcon(Lag).png FrameIcon(Lag).png FrameIcon(Hitbox).png FrameIcon(Hitbox).png FrameIcon(Hitbox).png FrameIcon(Lag).png FrameIcon(Lag).png FrameIcon(Lag).png FrameIcon(Lag).png FrameIcon(Lag).png FrameIcon(Lag).png FrameIcon(Lag).png FrameIcon(Lag).png FrameIcon(Lag).png FrameIcon(Lag).png FrameIcon(Lag).png FrameIcon(Lag).png FrameIcon(Lag).png FrameIcon(Lag).png FrameIcon(Lag).png FrameIcon(Lag).png FrameIcon(Lag).png FrameIcon(Lag).png FrameIcon(Lag).png FrameIcon(Lag).png FrameIcon(Lag).png FrameIcon(Lag).png FrameIcon(Lag).png FrameIcon(Lag).png FrameIcon(Lag).png FrameIcon(Lag).png FrameIcon(Lag).png FrameIcon(Lag).png FrameIcon(Lag).png FrameIcon(Lag).png FrameIcon(Lag).png FrameIcon(Lag).png FrameIcon(Lag).png FrameIcon(Lag).png FrameIcon(Lag).png FrameIcon(Lag).png FrameIcon(Lag).png FrameIcon(Lag).png FrameIcon(Lag).png FrameIcon(Interruptible).png FrameIcon(Interruptible).png FrameIcon(Interruptible).png FrameIcon(Interruptible).png
FrameIcon(Vulnerable).png FrameIcon(Vulnerable).png FrameIcon(Invincible).png FrameIcon(Invincible).png FrameIcon(Invincible).png FrameIcon(Invincible).png FrameIcon(Invincible).png FrameIcon(Invincible).png FrameIcon(Invincible).png FrameIcon(Invincible).png FrameIcon(Vulnerable).png FrameIcon(Vulnerable).png FrameIcon(Vulnerable).png FrameIcon(Vulnerable).png FrameIcon(Vulnerable).png FrameIcon(Vulnerable).png FrameIcon(Vulnerable).png FrameIcon(Vulnerable).png FrameIcon(Vulnerable).png FrameIcon(Vulnerable).png FrameIcon(Vulnerable).png FrameIcon(Vulnerable).png FrameIcon(Vulnerable).png FrameIcon(Vulnerable).png FrameIcon(Vulnerable).png FrameIcon(Vulnerable).png FrameIcon(Vulnerable).png FrameIcon(Vulnerable).png FrameIcon(Vulnerable).png FrameIcon(Vulnerable).png FrameIcon(Vulnerable).png FrameIcon(Vulnerable).png FrameIcon(Vulnerable).png FrameIcon(Vulnerable).png FrameIcon(Vulnerable).png FrameIcon(Vulnerable).png FrameIcon(Vulnerable).png FrameIcon(Vulnerable).png FrameIcon(Vulnerable).png FrameIcon(Vulnerable).png FrameIcon(Vulnerable).png FrameIcon(Vulnerable).png FrameIcon(Vulnerable).png FrameIcon(Vulnerable).png FrameIcon(Vulnerable).png FrameIcon(Vulnerable).png FrameIcon(Vulnerable).png FrameIcon(Vulnerable).png FrameIcon(Vulnerable).png FrameIcon(Vulnerable).png FrameIcon(Vulnerable).png FrameIcon(Vulnerable).png FrameIcon(Vulnerable).png
FrameIcon(Autocancel).png FrameIcon(Autocancel).png FrameIcon(Blank).png FrameIcon(Blank).png FrameIcon(Blank).png FrameIcon(Blank).png FrameIcon(Blank).png FrameIcon(Blank).png FrameIcon(Blank).png FrameIcon(Blank).png FrameIcon(Blank).png FrameIcon(Blank).png FrameIcon(Blank).png FrameIcon(Blank).png FrameIcon(Blank).png FrameIcon(Blank).png FrameIcon(Blank).png FrameIcon(Blank).png FrameIcon(Blank).png FrameIcon(Blank).png FrameIcon(Blank).png FrameIcon(Blank).png FrameIcon(Blank).png FrameIcon(Blank).png FrameIcon(Blank).png FrameIcon(Blank).png FrameIcon(Blank).png FrameIcon(Blank).png FrameIcon(Blank).png FrameIcon(Blank).png FrameIcon(Blank).png FrameIcon(Blank).png FrameIcon(Blank).png FrameIcon(Blank).png FrameIcon(Autocancel).png FrameIcon(Autocancel).png FrameIcon(Autocancel).png FrameIcon(Autocancel).png FrameIcon(Autocancel).png FrameIcon(Autocancel).png FrameIcon(Autocancel).png FrameIcon(Autocancel).png FrameIcon(Autocancel).png FrameIcon(Autocancel).png FrameIcon(Autocancel).png FrameIcon(Autocancel).png FrameIcon(Autocancel).png FrameIcon(Autocancel).png FrameIcon(Autocancel).png FrameIcon(Autocancel).png FrameIcon(Autocancel).png FrameIcon(Autocancel).png FrameIcon(Autocancel).png

Landing lag[edit]

Animation length 16
FrameIcon(Lag).png FrameIcon(Lag).png FrameIcon(Lag).png FrameIcon(Lag).png FrameIcon(Lag).png FrameIcon(Lag).png FrameIcon(Lag).png FrameIcon(Lag).png FrameIcon(Lag).png FrameIcon(Lag).png FrameIcon(Lag).png FrameIcon(Lag).png FrameIcon(Lag).png FrameIcon(Lag).png FrameIcon(Lag).png FrameIcon(Lag).png
Legend (1 square = 1 frame)
Lag
Lag time
Hitbox
Hitbox
FrameIcon(Vulnerable).png
Vulnerable
Invincibility
Invincible
Auto-canceling
Autocancel
Interruptibility
Interruptible