Dr. Mario (SSB4)/Down smash: Difference between revisions
From SmashWiki, the Super Smash Bros. wiki
Jump to navigationJump to search
Iron Warrior (talk | contribs) No edit summary |
m (Text replacement - "== ([^=])" to "== $1") |
||
| (4 intermediate revisions by 2 users not shown) | |||
| Line 1: | Line 1: | ||
{{ArticleIcons|ssb4=y}} | {{ArticleIcons|ssb4=y}} | ||
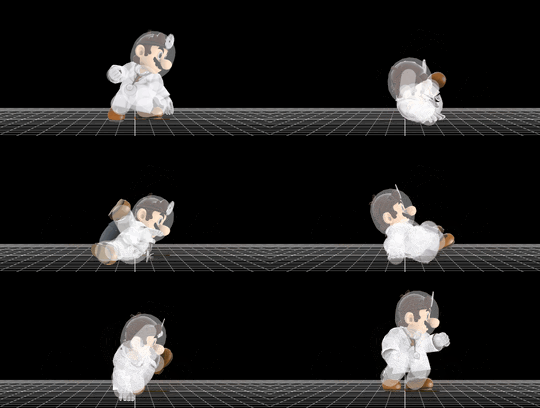
[[File:Dr.MarioDSmash.gif|thumb|270px|Hitbox visualization showing Dr. Mario's down smash.]] | [[File:Dr.MarioDSmash.gif|thumb|270px|Hitbox visualization showing Dr. Mario's down smash.]] | ||
==Overview== | ==Overview== | ||
Dr. Mario's down smash is a breakdancing sweep with low startup lag. It has good range, decent power, and is a semi-spike, making it a good finisher, and also great at gimping recoveries. It also transitions well to the second hit, so it is great at punishing rolls. It is not as reliable a finisher as his other smashes, back throw, clean up special, or sweetspotted forward aerial however due to its low vertical range and merely average power. | Dr. Mario's down smash is a breakdancing sweep with low startup lag. It has good range, decent power, and is a semi-spike, making it a good finisher, and also great at gimping recoveries. It also transitions well to the second hit, so it is great at punishing rolls. It is not as reliable a finisher as his other smashes, back throw, clean up special, or sweetspotted forward aerial however due to its low vertical range and merely average power. Its hitbox also isn't good enough for 2-framing, so it is best to use other options instead. The second hit does more damage and knockback than the first as well. | ||
==Hitboxes== | ==Hitboxes== | ||
{{SSB4HitboxTableHeader}} | {{SSB4HitboxTableHeader}} | ||
{{HitboxTableTitle|Hit 1|42}} | {{HitboxTableTitle|Hit 1|42}} | ||
| Line 12: | Line 11: | ||
|id=0 | |id=0 | ||
|part=0 | |part=0 | ||
|damage={{ChargedSmashDmgSSB4| | |damage={{ChargedSmashDmgSSB4|10}} | ||
|angle=32 | |angle=32 | ||
|bk=30 | |bk=30 | ||
| Line 31: | Line 30: | ||
|id=1 | |id=1 | ||
|part=0 | |part=0 | ||
|damage={{ChargedSmashDmgSSB4| | |damage={{ChargedSmashDmgSSB4|10}} | ||
|angle=32 | |angle=32 | ||
|bk=30 | |bk=30 | ||
| Line 51: | Line 50: | ||
|id=0 | |id=0 | ||
|part=0 | |part=0 | ||
|damage={{ChargedSmashDmgSSB4| | |damage={{ChargedSmashDmgSSB4|12}} | ||
|angle=30 | |angle=30 | ||
|bk=30 | |bk=30 | ||
| Line 70: | Line 69: | ||
|id=1 | |id=1 | ||
|part=0 | |part=0 | ||
|damage={{ChargedSmashDmgSSB4| | |damage={{ChargedSmashDmgSSB4|12}} | ||
|angle=30 | |angle=30 | ||
|bk=30 | |bk=30 | ||
| Line 86: | Line 85: | ||
|slvl=L | |slvl=L | ||
}} | }} | ||
{{HitboxTableRowNote|The damage values are untouched before being affected by Dr. Mario's 1.12x damage multiplier.|24}} | |||
|} | |} | ||
==Timing== | |||
{|class="wikitable" | |||
!Charges between | |||
|2-3 | |||
|- | |||
!Hit 1 | |||
|5-6 | |||
|- | |||
!Hit 2 | |||
|14 | |||
|- | |||
!Interruptible | |||
|44 | |||
|- | |||
!Animation length | |||
|45 | |||
|} | |||
{{FrameStripStart}} | |||
{{FrameStrip|t=Lag|c=2|e=LagChargeS}}{{FrameStrip|t=Lag|c=2|s=LagChargeE}}{{FrameStrip|t=Hitbox|c=2}}{{FrameStrip|t=Lag|c=7}}{{FrameStrip|t=Hitbox|c=1}}{{FrameStrip|t=Lag|c=29}}{{FrameStrip|t=Interruptible|c=2}} | |||
{{FrameStripEnd}} | |||
{{FrameIconLegend|lag=y|charge=y|hitbox=y|interruptible=y}} | |||
{{MvSubNavDrMario|g=SSB4}} | {{MvSubNavDrMario|g=SSB4}} | ||
[[Category:Dr. Mario (SSB4)]] | [[Category:Dr. Mario (SSB4)]] | ||
[[Category:Down smashes (SSB4)]] | [[Category:Down smashes (SSB4)]] | ||
Latest revision as of 22:32, April 12, 2022
Overview[edit]
Dr. Mario's down smash is a breakdancing sweep with low startup lag. It has good range, decent power, and is a semi-spike, making it a good finisher, and also great at gimping recoveries. It also transitions well to the second hit, so it is great at punishing rolls. It is not as reliable a finisher as his other smashes, back throw, clean up special, or sweetspotted forward aerial however due to its low vertical range and merely average power. Its hitbox also isn't good enough for 2-framing, so it is best to use other options instead. The second hit does more damage and knockback than the first as well.
Hitboxes[edit]
Timing[edit]
| Charges between | 2-3 |
|---|---|
| Hit 1 | 5-6 |
| Hit 2 | 14 |
| Interruptible | 44 |
| Animation length | 45 |
Lag time |
Charge interval |
Hitbox |
Interruptible |
|
