Falco (SSBM)/Side special: Difference between revisions
m (→Overview: ew) |
Mariogeek2 (talk | contribs) (Data from https://smashboards.com/threads/falco-hitboxes-and-frame-data.300397/ and Crazy Hand v1.31) |
||
| (One intermediate revision by one other user not shown) | |||
| Line 7: | Line 7: | ||
It is also possible to shorten the length of this move by quickly pressing the B button again after initiating the move. Since Falco travels for 4 frames, the move has 4 shortened lengths. Shortening the move is useful for making it to the [[edge]] whilst avoiding [[gimp]]ing options such as {{mvsub|Marth|SSBM|neutral attack|poss=y}}. | It is also possible to shorten the length of this move by quickly pressing the B button again after initiating the move. Since Falco travels for 4 frames, the move has 4 shortened lengths. Shortening the move is useful for making it to the [[edge]] whilst avoiding [[gimp]]ing options such as {{mvsub|Marth|SSBM|neutral attack|poss=y}}. | ||
{{ | ==Hitboxes== | ||
{{ | ===Grounded=== | ||
{{MeleeHitboxTableHeader|special=y}} | |||
{{MeleeSpecialHitboxTableRow | |||
|id=0 | |||
|damage=7% | |||
|angle=65 | |||
|bk=74 | |||
|ks=60 | |||
|fkv=0 | |||
|r=1065 | |||
|bn=0 | |||
|ypos=1536 | |||
|clang=f | |||
|rebound=f | |||
|effect=Slash | |||
|slvl=M | |||
|sfx=Slash | |||
}} | |||
|} | |||
===Aerial=== | |||
{{MeleeHitboxTableHeader|special=y}} | |||
{{MeleeSpecialHitboxTableRow | |||
|id=0 | |||
|damage=7% | |||
|angle=270 | |||
|bk=70 | |||
|ks=70 | |||
|fkv=0 | |||
|r=1065 | |||
|bn=0 | |||
|ypos=1536 | |||
|clang=f | |||
|rebound=f | |||
|effect=Slash | |||
|slvl=S | |||
|sfx=19 | |||
}} | |||
|} | |||
==Timing== | |||
Falco can cancel this move's end lag by grabbing ledge as early as frame 25. | |||
{|class="wikitable" | |||
!Hitbox | |||
|18-21 | |||
|- | |||
!Animation length | |||
|59 | |||
|} | |||
{{FrameStripStart}} | |||
{{FrameStrip|t=Blank|c=17}}{{FrameStrip|t=Hitbox|c=4}}{{FrameStrip|t=Blank|c=38}} | |||
|- | |||
{{FrameStrip|t=Lag|c=17|e=LagPropS}}{{FrameStrip|t=Lag|c=42|s=LagPropE}} | |||
{{FrameStripEnd}} | |||
===Landing lag=== | |||
{|class="wikitable" | |||
|- | |||
!Animation length (pre free fall) | |||
|20 | |||
|- | |||
!Animation length (post free fall) | |||
|3 | |||
|} | |||
{{FrameStripStart}} | |||
|'''Pre free fall''' {{FrameStrip|t=Lag|c=20}} | |||
|- | |||
|'''Post free fall''' {{FrameStrip|t=Lag|c=3}}{{FrameStrip|t=Blank|c=17}} | |||
{{FrameStripEnd}} | |||
{{FrameIconLegend|lag=y|hitbox=y}} | |||
==Similar moves== | |||
*[[Fox (SSBM)/Side special|Fox Illusion]] | |||
{{MvSubNavFalco|g=SSBM}} | {{MvSubNavFalco|g=SSBM}} | ||
Latest revision as of 23:37, November 29, 2024
Overview[edit]
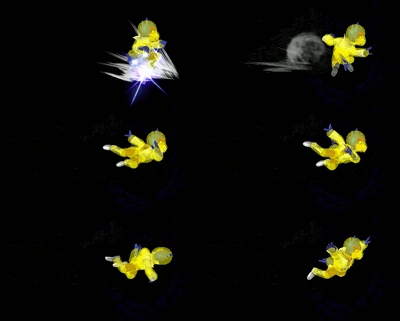
Falco's side special move is known as Falco Phantasm, a move that involves Falco dashing forward whilst leaving afterimages of himself behind. These afterimages can damage opponents, but they are very weak. The move is primarily used as a recovery move, and although it travels a rather short distance, it is Falco's best option for horizontal recoveries due to its speed. Compared to Fox Illusion, the move from which it is cloned from, Falco Phantasm travels a much shorter distance, but has quicker startup. The move also meteor smashes opponents who are hit by the afterimages, though it has very weak knockback and is very easy to meteor cancel.
It is also possible to shorten the length of this move by quickly pressing the B button again after initiating the move. Since Falco travels for 4 frames, the move has 4 shortened lengths. Shortening the move is useful for making it to the edge whilst avoiding gimping options such as Marth's neutral attack.
Hitboxes[edit]
Grounded[edit]
| ID | Part | Damage | SD | Angle | BK | KS | FKV | Radius | Bone | Offset | Clang | Rebound | Effect | G | A | Sound | Blockable | Reflectable | Absorbable | ||
|---|---|---|---|---|---|---|---|---|---|---|---|---|---|---|---|---|---|---|---|---|---|
| 0 | 0 | 7% | 0 | 74 | 60 | 0 | 4.15989 | 0 | 0.0 | 5.999616 | 0.0 | ||||||||||
Aerial[edit]
| ID | Part | Damage | SD | Angle | BK | KS | FKV | Radius | Bone | Offset | Clang | Rebound | Effect | G | A | Sound | Blockable | Reflectable | Absorbable | ||
|---|---|---|---|---|---|---|---|---|---|---|---|---|---|---|---|---|---|---|---|---|---|
| 0 | 0 | 7% | 0 | 70 | 70 | 0 | 4.15989 | 0 | 0.0 | 5.999616 | 0.0 | ||||||||||
Timing[edit]
Falco can cancel this move's end lag by grabbing ledge as early as frame 25.
| Hitbox | 18-21 |
|---|---|
| Animation length | 59 |
Landing lag[edit]
| Animation length (pre free fall) | 20 |
|---|---|
| Animation length (post free fall) | 3 |
| Pre free fall | ||||||||||||||||||||
| Post free fall |
Lag time |
Hitbox |
Similar moves[edit]
|

