Gerudo Valley: Difference between revisions
m (Turns out you can break the bridge with weight too, jumped on it a few times with 874.8 weight and accidentally broke it. I said the static RNG seed isn't useful, but it is for damage, otherwise this would've taken much longer to work out. Speaking of random, I think the sticks in the chasm have random HP... this might take a while) |
Tag: Mobile edit |
||
| (14 intermediate revisions by 9 users not shown) | |||
| Line 2: | Line 2: | ||
{{disambig2|the stage called Gerudo Valley|the music track|List of SSBU Music (The Legend of Zelda series)#Gerudo Valley (Remix)|here}} | {{disambig2|the stage called Gerudo Valley|the music track|List of SSBU Music (The Legend of Zelda series)#Gerudo Valley (Remix)|here}} | ||
{{Infobox Stage | {{Infobox Stage | ||
|subtitle = ''The Legend of Zelda: Ocarina of Time'' | |subtitle = ''{{iw|zeldawiki|The Legend of Zelda: Ocarina of Time}}'' | ||
|name = Gerudo Valley | |name = Gerudo Valley | ||
|image = {{tabber|title1=Ultimate| | |image = {{tabber|title1=Ultimate|content1=[[File:SSBU-Gerudo Valley.png|300px]]|title2=3DS|content2=[[File:Gerudovalley3ds.png|300px]]}} | ||
|caption = [[File:ZeldaSymbol.svg|50px|class=invert]]<br>Gerudo Valley as it appears in ''Smash''. | |caption = [[File:ZeldaSymbol.svg|50px|class=invert-dark]]<br>Gerudo Valley as it appears in ''Smash''. | ||
|universe = {{uv|The Legend of Zelda}} | |universe = {{uv|The Legend of Zelda}} | ||
|games = ''[[SSB4]]'' ([[SSB3DS|3DS]])<br>''[[Ultimate]]'' | |games = ''[[SSB4]]'' ([[SSB3DS|3DS]])<br>''[[Ultimate]]'' | ||
|availability = [[Starter stage|Starter]] | |availability = [[Starter stage|Starter]] | ||
|cratetype = Normal | |cratetype = Normal | ||
| Line 28: | Line 27: | ||
==Stage overview== | ==Stage overview== | ||
[[File:Gerudo Valley Fight.gif|thumb|left|Battle in the Gerudo Valley stage.]] | [[File:Gerudo Valley Fight.gif|thumb|left|Battle in the Gerudo Valley stage.]] | ||
The battle takes place in the deserted valley of the same name. | |||
The Gerudo Valley stage is a mostly flat, grounded stage. The stone and natural flooring serve as solid platforms, and a bridge crosses the chasm between the two stretches of land. Two canopies stand on each piece of land, providing soft [[platform]]s featuring the {{iw|zeldawiki|Crest of the Gerudo}}. | The Gerudo Valley stage is a mostly flat, grounded stage. The stone and natural flooring serve as solid platforms, and a bridge crosses the chasm between the two stretches of land. Two canopies stand on each piece of land, providing soft [[platform]]s featuring the {{iw|zeldawiki|Crest of the Gerudo}}. | ||
The bridge will naturally break after | The bridge will naturally break after 136-149 seconds. The bridge can be attacked, reducing the time by the amount of damage dealt in seconds (e.g. 10% damage will reduce the timer by 10 seconds). It can also be broken by {{rollover|stepping on|going from the ground to the bridge, continuously walking on the bridge doesn't count|?}} or jumping on it, reducing the time by <code>weight×0.03</code> seconds (e.g. a weight of 100 will reduce the timer by 3 seconds). Once broken, the chasm and blast line below become accessible; in ''for Nintendo 3DS'', the blast line is moved downwards to compensate but in ''Ultimate'' the blast line never moves. Two small branches protrude from each side of the chasm to serve as platforms, with the right one lower than the left, which can be broken by attacking them or by jumping on them, with heavier characters breaking them in fewer jumps. Damaging {{b|spike|stage element}}s are also present further below the two platforms which disappear when hit, deals 10% damage (has a [[flame]] effect in ''for Nintendo 3DS''), and [[fixed knockback]]—the knockback in ''for Nintendo 3DS'' is enough to send most characters above bridge, it is weaker in ''Ultimate'', sending lightweights barely above the bridge and heavyweights about halfway up the chasm. | ||
Soon after the bridge is broken, [[Koume and Kotake]] fly down laughing, and one of them casts a spell which alters one half of the stage: Koume's spell hits the left side of the stage covering it in damaging flames, while Kotake's spell hits the right side making [[freeze|freezing]] ice spikes appear. | Soon after the bridge is broken, [[Koume and Kotake]] fly down laughing, and one of them casts a spell which alters one half of the stage: Koume's spell hits the left side of the stage covering it in damaging flames, while Kotake's spell hits the right side making [[freeze|freezing]] ice spikes appear. There is a 20% chance neither will appear, making both sides safe. The fire deals 14% on the ground, 11% in the chasm, and lasts 10-12 seconds. The ice spikes deal 17% on the ground, 12% in the chasm, lasts 8-10 seconds. | ||
After 20-30 seconds, the "Song of Time" will be heard and the stage will return to normal; in ''for Nintendo 3DS'' the bridge will flash white, in ''Ultimate'' the space | After 20-30 seconds, the "Song of Time" will be heard and the stage will return to normal; in ''for Nintendo 3DS'' the bridge will flash white, in ''Ultimate'' the space above the chasm will sparkle. The bridge will repair itself over the span of 4.5 seconds after the song starts and will be unable to be damaged (either by attacking or jumping on it) for 1 second. In ''for Nintendo 3DS'', the platforms and spikes remain and the blast line will rise up shortly after the bridge is repaired, placing it slightly below the bridge. In ''Ultimate'', the platforms and spikes will fall away and any character in the chasm will receive a large amount of vertical fixed knockback to get them above the bridge—the knockback only occurs during the repairing process and is not present below the spikes. Prior to version [[List of updates (SSB4-3DS)#1.0.5|1.0.5]] of ''for Nintendo 3DS'', the blast line moved abruptly, KO'ing fighters almost instantly as a result. Once the bridge is repaired, any canopy that was broken by Koume or Kotake's spell will reappear (fully forming after 1 second) and the platforms and spikes will reappear if any were broken. | ||
The background of the stage features a waterfall, the {{s|zeldawiki|Carpenter}}s' tent, and, behind the mountains in the left side, {{s|zeldawiki|Gerudo's Fortress}} and the {{s|zeldawiki|Horseback Archery Range}}. A desert wind will blow across the stage for aesthetic effect. | The background of the stage features a waterfall, the {{s|zeldawiki|Carpenter}}s' tent, and, behind the mountains in the left side, {{s|zeldawiki|Gerudo's Fortress}} and the {{s|zeldawiki|Horseback Archery Range}}. A desert wind will blow across the stage for aesthetic effect. ''Ultimate'' added two targets on the right mountain and three targets in front of Gerudo's Fortress. | ||
===Ω forms and Battlefield form=== | ===Ω forms and Battlefield form=== | ||
In ''Super Smash Bros. for Nintendo 3DS'', the Ω form is set on a completely flat platform that extends below the [[blast line]] that also has the Gerudo symbol as the floor pattern. | In ''Super Smash Bros. for Nintendo 3DS'', the Ω form is set on a completely flat platform that extends below the [[blast line]] that also has the Gerudo symbol as the floor pattern. Walk-offs, Koume and Kotake, and the bridge are absent. | ||
In ''Super Smash Bros. Ultimate'', the main platform of the Ω form and [[Battlefield form]] is a slightly redesigned version of ''SSB4'''s Ω form; however, it does not extend below the blast line and is resized and reshaped to match {{SSBU|Final Destination}} and {{SSBU|Battlefield}}, respectively. The three [[soft platform]]s of the Battlefield form resemble the flooring of the Ω form. | In ''Super Smash Bros. Ultimate'', the main platform of the Ω form and [[Battlefield form]] is a slightly redesigned version of ''SSB4'''s Ω form; however, it does not extend below the blast line and is resized and reshaped to match {{SSBU|Final Destination}} and {{SSBU|Battlefield}}, respectively. The three [[soft platform]]s of the Battlefield form resemble the flooring of the Ω form. | ||
| Line 114: | Line 114: | ||
*Koume and Kotake's entrance animation is more exaggerated and has more flourish in ''Ultimate'' than in ''for Nintendo 3DS'', taking about one more second for them to use their spell. | *Koume and Kotake's entrance animation is more exaggerated and has more flourish in ''Ultimate'' than in ''for Nintendo 3DS'', taking about one more second for them to use their spell. | ||
*The signs on either side of the bridge can be run into to create noise. In ''for Nintendo 3DS'' the signs will sway upon being run into but in ''Ultimate'' they do not. | *The signs on either side of the bridge can be run into to create noise. In ''for Nintendo 3DS'' the signs will sway upon being run into but in ''Ultimate'' they do not. | ||
*In ''Ultimate'', [[Nightmare]] and [[Devil]] | *In ''Ultimate'', [[Nightmare]] and [[Devil]] can only be summoned from an [[Assist Trophy]] on the Battlefield and Omega forms of this stage. Additionally, [[Abra]] and [[Lugia]] can only be summoned from a [[Poké Ball]] on the stage's Battlefield and Omega forms. | ||
{{SSB4Stages}} | {{SSB4Stages}} | ||
Latest revision as of 02:03, July 2, 2024
| The Legend of Zelda: Ocarina of Time Gerudo Valley | |
|---|---|
 Gerudo Valley as it appears in Smash. | |
| Universe | The Legend of Zelda |
| Appears in | SSB4 (3DS) Ultimate |
| Availability | Starter |
| Crate type | Normal |
| Maximum players | 4 (3DS) 8 (Ultimate) |
| Article on Zelda Wiki | Gerudo Valley |
Gerudo Valley (ゲルドの谷, Gerudo Valley) is a stage in Super Smash Bros. for Nintendo 3DS and Super Smash Bros. Ultimate. It is one of two stages from the Zelda universe in for Nintendo 3DS, alongside Spirit Train.
In for Nintendo 3DS, Ganondorf is fought here for his unlocking battle and in Ultimate, Sheik is fought here for her unlocking battle.
Stage overview[edit]
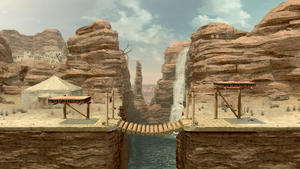
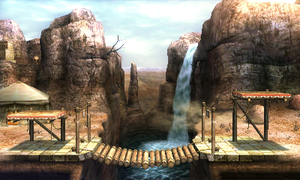
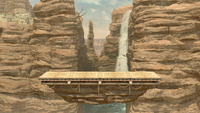
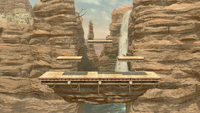
The battle takes place in the deserted valley of the same name. The Gerudo Valley stage is a mostly flat, grounded stage. The stone and natural flooring serve as solid platforms, and a bridge crosses the chasm between the two stretches of land. Two canopies stand on each piece of land, providing soft platforms featuring the Crest of the Gerudo.
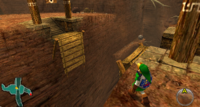
The bridge will naturally break after 136-149 seconds. The bridge can be attacked, reducing the time by the amount of damage dealt in seconds (e.g. 10% damage will reduce the timer by 10 seconds). It can also be broken by stepping on or jumping on it, reducing the time by weight×0.03 seconds (e.g. a weight of 100 will reduce the timer by 3 seconds). Once broken, the chasm and blast line below become accessible; in for Nintendo 3DS, the blast line is moved downwards to compensate but in Ultimate the blast line never moves. Two small branches protrude from each side of the chasm to serve as platforms, with the right one lower than the left, which can be broken by attacking them or by jumping on them, with heavier characters breaking them in fewer jumps. Damaging spikes are also present further below the two platforms which disappear when hit, deals 10% damage (has a flame effect in for Nintendo 3DS), and fixed knockback—the knockback in for Nintendo 3DS is enough to send most characters above bridge, it is weaker in Ultimate, sending lightweights barely above the bridge and heavyweights about halfway up the chasm.
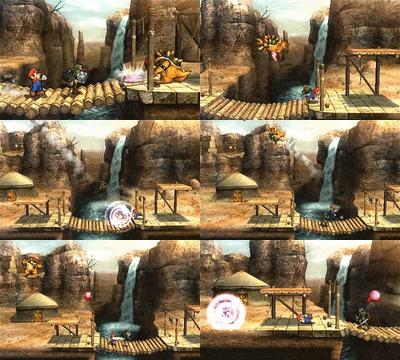
Soon after the bridge is broken, Koume and Kotake fly down laughing, and one of them casts a spell which alters one half of the stage: Koume's spell hits the left side of the stage covering it in damaging flames, while Kotake's spell hits the right side making freezing ice spikes appear. There is a 20% chance neither will appear, making both sides safe. The fire deals 14% on the ground, 11% in the chasm, and lasts 10-12 seconds. The ice spikes deal 17% on the ground, 12% in the chasm, lasts 8-10 seconds.
After 20-30 seconds, the "Song of Time" will be heard and the stage will return to normal; in for Nintendo 3DS the bridge will flash white, in Ultimate the space above the chasm will sparkle. The bridge will repair itself over the span of 4.5 seconds after the song starts and will be unable to be damaged (either by attacking or jumping on it) for 1 second. In for Nintendo 3DS, the platforms and spikes remain and the blast line will rise up shortly after the bridge is repaired, placing it slightly below the bridge. In Ultimate, the platforms and spikes will fall away and any character in the chasm will receive a large amount of vertical fixed knockback to get them above the bridge—the knockback only occurs during the repairing process and is not present below the spikes. Prior to version 1.0.5 of for Nintendo 3DS, the blast line moved abruptly, KO'ing fighters almost instantly as a result. Once the bridge is repaired, any canopy that was broken by Koume or Kotake's spell will reappear (fully forming after 1 second) and the platforms and spikes will reappear if any were broken.
The background of the stage features a waterfall, the Carpenters' tent, and, behind the mountains in the left side, Gerudo's Fortress and the Horseback Archery Range. A desert wind will blow across the stage for aesthetic effect. Ultimate added two targets on the right mountain and three targets in front of Gerudo's Fortress.
Ω forms and Battlefield form[edit]
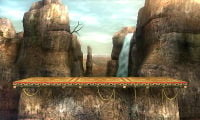
In Super Smash Bros. for Nintendo 3DS, the Ω form is set on a completely flat platform that extends below the blast line that also has the Gerudo symbol as the floor pattern. Walk-offs, Koume and Kotake, and the bridge are absent.
In Super Smash Bros. Ultimate, the main platform of the Ω form and Battlefield form is a slightly redesigned version of SSB4's Ω form; however, it does not extend below the blast line and is resized and reshaped to match Final Destination and Battlefield, respectively. The three soft platforms of the Battlefield form resemble the flooring of the Ω form.
Hazards Off[edit]
With hazards off in Ultimate, the bridge cannot be attacked or broken, and Koume and Kotake never appear.
Origin[edit]
- See also: Koume & Kotake.
This stage is based on Gerudo Valley from The Legend of Zelda: Ocarina of Time. It is a long, deserted valley that acts as the gateway to the domain of the Gerudo, and Link has to traverse it in order to reach Gerudo's Fortress and the Haunted Wasteland. Aesthetically, this stage is more similar to how Gerudo Valley appears in the remake, The Legend of Zelda: Ocarina of Time 3D.
In Ocarina of Time, the Gerudo decided to destroy the bridge over Zora's River to prevent intruders from entering their land. Carpenters then set up a camp nearby and attempted to repair it; however, they were later captured by the Gerudo and held captive in their fortress. After Link infiltrates the fortress and rescues them all, the bridge is finally repaired.
The symbol on the platforms represents the Gerudo tribe. In the original Ocarina of Time it was different, but it was replaced with the current version in all subsequent games (including ports and remakes of Ocarina) due to its resemblance to the Islamic star and crescent.
Gallery[edit]
Super Smash Bros. for Nintendo 3DS[edit]
The stage after being frozen by Kotake, with Donkey Kong and Bowser being frozen.
A clearer view of the lower part of the stage, with spikes visible in SSB4.
A close-up of Kotake and Koume in SSB4.
Super Smash Bros. Ultimate[edit]
Ken alongside Koume on the stage.
Dark Samus using her forward aerial on Dark Pit on the stage.
Villager falling in the iced Gerudo Valley in Ultimate.
Steve burning King K. Rool with a Flint and Steel on the stage.
Names in other languages[edit]
Trivia[edit]
- This is the only stage in for Nintendo 3DS to use a new remix by default and an old remix as an alternative.
- Koume and Kotake's entrance animation is more exaggerated and has more flourish in Ultimate than in for Nintendo 3DS, taking about one more second for them to use their spell.
- The signs on either side of the bridge can be run into to create noise. In for Nintendo 3DS the signs will sway upon being run into but in Ultimate they do not.
- In Ultimate, Nightmare and Devil can only be summoned from an Assist Trophy on the Battlefield and Omega forms of this stage. Additionally, Abra and Lugia can only be summoned from a Poké Ball on the stage's Battlefield and Omega forms.
