Meta Knight (SSBB)/Neutral attack: Difference between revisions
m (Robot: Automated text replacement (-\|rawflags=([0-9A-Fa-f]{8}) +|rawflags={{subst:User:Toomai/Flags template|\1}})) |
No edit summary |
||
| (14 intermediate revisions by 5 users not shown) | |||
| Line 1: | Line 1: | ||
{{ArticleIcons|ssbb=y}} | {{ArticleIcons|ssbb=y}} | ||
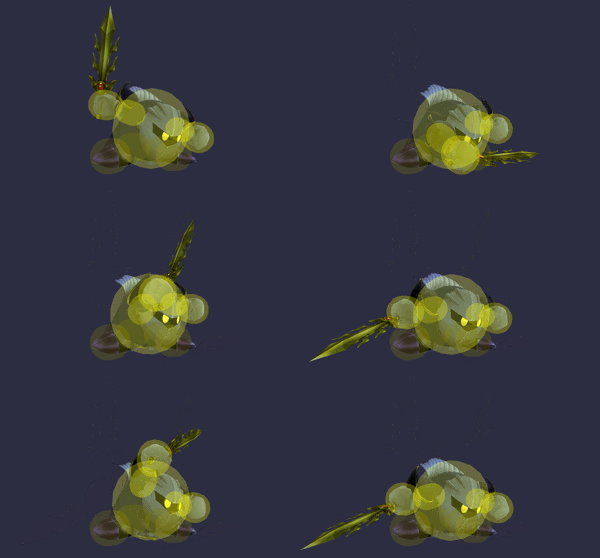
[[File:MetaKnightJabSSBB.gif|thumb|300px|Hitbox visualization showing Meta Knight's rapid jab.]] | |||
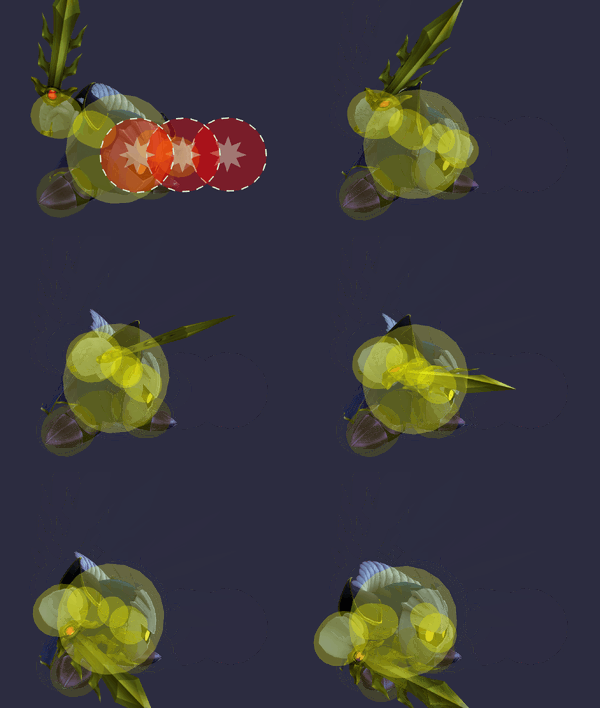
[[File:MetaKnightJabEndSSBB.gif|thumb|300px|Hitbox visualization showing Meta Knight's rapid jab finisher.]] | |||
==Overview== | ==Overview== | ||
When the attack button is pressed while standing still, {{SSBB|Meta Knight}} will shout a battle cry, and [[slash]] with [[Galaxia]] in several directions. If the button is held, {{SSBB|Meta Knight}} will continue to slash all around him, which can be done indefinitely. Opponents that are hit may get temporarily stuck in the barrage if they don't [[SDI]] properly. This move is mostly situational as it is little more than a [[punish]]ing tool against opponents that recklessly [[approach]] Meta Knight, and some of Meta Knight's attacks with greater [[reach]] and less [[ending lag]] tend to be more practical for this purpose, most notably his {{mvsub|Meta Knight|SSBB|neutral special}}. Opponents with [[disjointed]] hitboxes such as {{SSBB|Marth}} can easily hit Meta Knight during this move. Like most of Meta Knight's moves, this move has [[transcendent priority]]. | |||
When the attack button is pressed while standing still, {{SSBB|Meta Knight}} will shout a battle cry, and [[slash]] with Galaxia in several directions. If the button is held, Meta Knight will continue to slash all around him, which can be done indefinitely. Opponents that are hit may get temporarily stuck in the barrage if they don't [[SDI]] properly. This move is mostly situational as it is little more than a [[punish]]ing tool against opponents that recklessly [[approach]] Meta Knight, and some of Meta Knight's attacks with greater [[reach]] and less [[ending lag]] tend to be more practical for this purpose. Opponents with [[disjointed]] hitboxes such as {{SSBB|Marth}} can easily hit Meta Knight during this move. Like most of Meta Knight's moves, this move has [[transcendent priority]]. | |||
==Hitboxes== | ==Hitboxes== | ||
| Line 20: | Line 20: | ||
|ypos=288000 | |ypos=288000 | ||
|zpos=360000 | |zpos=360000 | ||
|rawflags=00100010100000110000011000000010 | |rawflags=00100010100000110000011000000010 | ||
}} | }} | ||
| Line 41: | Line 34: | ||
|ypos=288000 | |ypos=288000 | ||
|zpos=888000 | |zpos=888000 | ||
|rawflags=00100010100000110000011000000010 | |rawflags=00100010100000110000011000000010 | ||
}} | }} | ||
| Line 63: | Line 49: | ||
|ypos=360000 | |ypos=360000 | ||
|zpos=432000 | |zpos=432000 | ||
|rawflags=00100010100000110000011000000010 | |rawflags=00100010100000110000011000000010 | ||
}} | }} | ||
| Line 84: | Line 63: | ||
|ypos=672000 | |ypos=672000 | ||
|zpos=888000 | |zpos=888000 | ||
|rawflags=00100010100000110000011000000010 | |rawflags=00100010100000110000011000000010 | ||
}} | }} | ||
| Line 106: | Line 78: | ||
|ypos=336000 | |ypos=336000 | ||
|zpos=-552000 | |zpos=-552000 | ||
|rawflags=00100010100000110000011000000010 | |rawflags=00100010100000110000011000000010 | ||
}} | }} | ||
| Line 127: | Line 92: | ||
|ypos=336000 | |ypos=336000 | ||
|zpos=-216000 | |zpos=-216000 | ||
|rawflags=00100010100000110000011000000010 | |rawflags=00100010100000110000011000000010 | ||
}} | }} | ||
| Line 147: | Line 105: | ||
|bn=0 | |bn=0 | ||
|ypos=336000 | |ypos=336000 | ||
|rawflags=00100010100000110000011000000010 | |rawflags=00100010100000110000011000000010 | ||
}} | }} | ||
| Line 169: | Line 120: | ||
|ypos=384000 | |ypos=384000 | ||
|zpos=432000 | |zpos=432000 | ||
|rawflags=00100010100000110000011000000010 | |rawflags=00100010100000110000011000000010 | ||
}} | }} | ||
| Line 190: | Line 134: | ||
|ypos=624000 | |ypos=624000 | ||
|zpos=816000 | |zpos=816000 | ||
|rawflags=00100010100000110000011000000010 | |rawflags=00100010100000110000011000000010 | ||
}} | }} | ||
| Line 212: | Line 149: | ||
|ypos=384000 | |ypos=384000 | ||
|zpos=-120000 | |zpos=-120000 | ||
|rawflags=00100010100000110000011000000010 | |rawflags=00100010100000110000011000000010 | ||
}} | }} | ||
| Line 233: | Line 163: | ||
|ypos=336000 | |ypos=336000 | ||
|zpos=-624000 | |zpos=-624000 | ||
|rawflags=00100010100000110000011000000010 | |rawflags=00100010100000110000011000000010 | ||
}} | }} | ||
{{HitboxTableTitle| | {{HitboxTableTitle|Finisher|24}} | ||
{{BrawlHitboxTableRow | {{BrawlHitboxTableRow | ||
|char=Meta Knight | |char=Meta Knight | ||
| Line 255: | Line 178: | ||
|ypos=300000 | |ypos=300000 | ||
|zpos=840000 | |zpos=840000 | ||
|rawflags=00100010100000110000011001000010 | |rawflags=00100010100000110000011001000010 | ||
}} | }} | ||
| Line 276: | Line 192: | ||
|ypos=300000 | |ypos=300000 | ||
|zpos=540000 | |zpos=540000 | ||
|rawflags=00100010100000110000011001000010 | |rawflags=00100010100000110000011001000010 | ||
}} | }} | ||
| Line 297: | Line 206: | ||
|ypos=300000 | |ypos=300000 | ||
|zpos=240000 | |zpos=240000 | ||
|rawflags=00100010100000110000011001000010 | |rawflags=00100010100000110000011001000010 | ||
}} | }} | ||
| Line 309: | Line 211: | ||
==Timing== | ==Timing== | ||
While the loop animation restarts on frame 28, the loop itself cannot end until frame 30 at the earliest. | |||
{|class="wikitable" | {|class="wikitable" | ||
!First loop frame | !First loop frame | ||
| Line 331: | Line 234: | ||
|27 | |27 | ||
|- | |- | ||
! | !Finisher | ||
| | |1 | ||
|- | |- | ||
!Animation length | !Animation length (ending) | ||
| | |11 | ||
|} | |} | ||
{{FrameStripStart}} | {{FrameStripStart}} | ||
{{FrameStrip|t=Lag|c=5|e=LagLoopS}}{{FrameStrip|t=Lag|c=1|s=LagLoopE}}{{FrameStrip|t=Hitbox|c=1}}{{FrameStrip|t=Lag|c=3}}{{FrameStrip|t=Hitbox|c=1}}{{FrameStrip|t=Lag|c=3}}{{FrameStrip|t=Hitbox|c=1}}{{FrameStrip|t=Lag|c=4}}{{FrameStrip|t=Hitbox|c=1}}{{FrameStrip|t=Lag|c=3}}{{FrameStrip|t=Hitbox|c=1}}{{FrameStrip|t=Lag|c= | {{FrameStrip|t=Lag|c=5|e=LagLoopS}}{{FrameStrip|t=Lag|c=1|s=LagLoopE}}{{FrameStrip|t=Hitbox|c=1}}{{FrameStrip|t=Lag|c=3}}{{FrameStrip|t=Hitbox|c=1}}{{FrameStrip|t=Lag|c=3}}{{FrameStrip|t=Hitbox|c=1}}{{FrameStrip|t=Lag|c=4}}{{FrameStrip|t=Hitbox|c=1}}{{FrameStrip|t=Lag|c=3}}{{FrameStrip|t=Hitbox|c=1}}{{FrameStrip|t=Lag|c=4}}{{FrameStrip|t=Hitbox|c=1|e=HitboxLoopS}}{{FrameStrip|t=Hitbox|c=1|s=HitboxLoopE}}{{FrameStrip|t=Lag|c=10}} | ||
{{FrameStripEnd}} | {{FrameStripEnd}} | ||
| Line 345: | Line 248: | ||
==Trivia== | ==Trivia== | ||
*Meta Knight is the only character to | *{{SSBB|Meta Knight}} is the only character to possess a neutral infinite without having any single hits beforehand. | ||
*Meta Knight is also the only character in the game who possesses a neutral infinite with a finisher with a proper hitbox. Other characters either possess no finisher or have a weak windbox as a finisher. | |||
{{MvSubNavMetaKnight|g=SSBB}} | {{MvSubNavMetaKnight|g=SSBB}} | ||
Latest revision as of 21:16, May 19, 2024
Overview[edit]
When the attack button is pressed while standing still, Meta Knight will shout a battle cry, and slash with Galaxia in several directions. If the button is held, Meta Knight will continue to slash all around him, which can be done indefinitely. Opponents that are hit may get temporarily stuck in the barrage if they don't SDI properly. This move is mostly situational as it is little more than a punishing tool against opponents that recklessly approach Meta Knight, and some of Meta Knight's attacks with greater reach and less ending lag tend to be more practical for this purpose, most notably his neutral special. Opponents with disjointed hitboxes such as Marth can easily hit Meta Knight during this move. Like most of Meta Knight's moves, this move has transcendent priority.
Hitboxes[edit]
Timing[edit]
While the loop animation restarts on frame 28, the loop itself cannot end until frame 30 at the earliest.
| First loop frame | 6 |
|---|---|
| Hit 1 | 7 |
| Hit 2 | 11 |
| Hit 3 | 15 |
| Hit 4 | 20 |
| Hit 5 | 24 |
| Last loop frame | 27 |
| Finisher | 1 |
| Animation length (ending) | 11 |
Lag time |
Hitbox |
Loop point |
Trivia[edit]
- Meta Knight is the only character to possess a neutral infinite without having any single hits beforehand.
- Meta Knight is also the only character in the game who possesses a neutral infinite with a finisher with a proper hitbox. Other characters either possess no finisher or have a weak windbox as a finisher.
|

