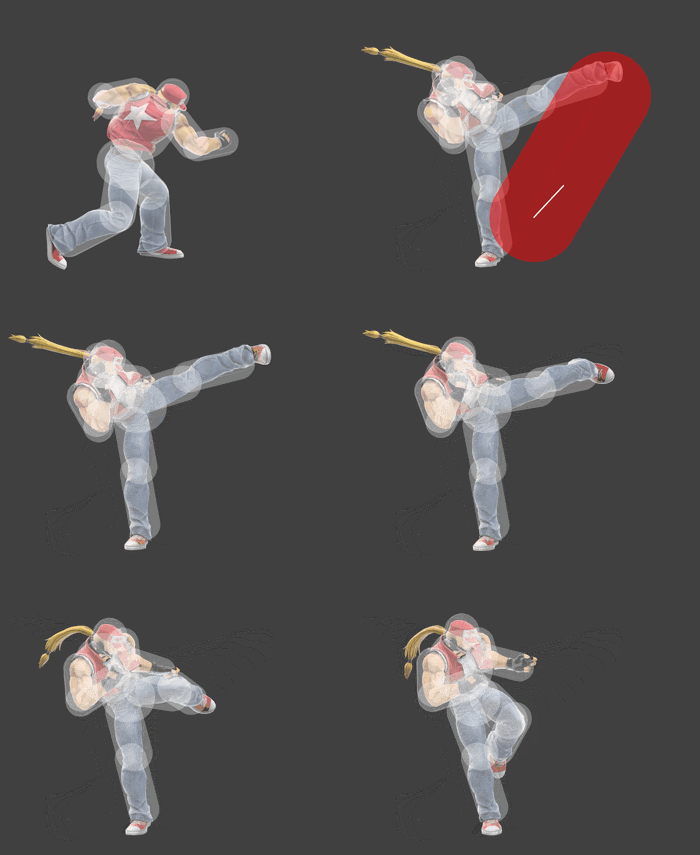
Terry (SSBU)/Neutral attack/Hit 3: Difference between revisions
(New Page: {{ArticleIcons|ssbu=y}} thumb|450px|Hitbox visualization showing Terry's third jab. {{competitive expertise}} ==Overview== Made completely useless thanks to Pow...) |
No edit summary |
||
| (2 intermediate revisions by 2 users not shown) | |||
| Line 1: | Line 1: | ||
{{ArticleIcons|ssbu=y}} | {{ArticleIcons|ssbu=y}} | ||
[[File:TerryJab3.gif|thumb| | [[File:TerryJab3.gif|thumb|350px|Hitbox visualization showing Terry's third jab.]] | ||
==Overview== | ==Overview== | ||
A side kick. This move is rarely seen unless a {{SSBU|Terry}} player misinputs, as [[Rising Tackle]] and [[Power Dunk]] are optimal options out of the [[Terry (SSBU)/Neutral attack/Hit 2|2nd hit of neutral attack]]. | |||
This move deals a large amount of damage for a simple neutral attack, making Terry's jab combo one of the most damaging in the game. It also has a long-lasting hitbox, with 4 active frames. However, it cannot be [[cancel]]led into special moves, making it generally not worth going for. | |||
Humorously, this move can hit many opponents on the ledge<ref>https://docs.google.com/spreadsheets/d/1RE1IKdmC0zSVlUe7dm3XugWJ7zkMe2lBAjNUepi__4I/edit#gid=0</ref>. As a result of this, this attack has utility when ledgetrapping or aiming to 2-frame for its decently long-lasting hitbox. However, it lacks practicality due to the requirement to use the previous parts of the move to do it. Given that opponents will [[ledge attack]] upon seeing a poorly spaced neutral attack to avoid the trap, this feature rarely sees use. | |||
==Hitboxes== | ==Hitboxes== | ||
{{UltimateHitboxTableHeader}} | {{UltimateHitboxTableHeader}} | ||
| Line 28: | Line 33: | ||
==Timing== | ==Timing== | ||
If followed up from frames 9-19 of Terry's second jab, the move can be canceled into a Final Smash for the remainder of its duration after hitting an opponent. | |||
{|class="wikitable" | {|class="wikitable" | ||
!Hitbox | !Hitbox | ||
|7-10 | |7-10 | ||
|- | |||
!Final Smash cancel window (from jab 2) | |||
|7-33 | |||
|- | |- | ||
!Interruptible | !Interruptible | ||
| Line 40: | Line 49: | ||
{{FrameStripStart}} | {{FrameStripStart}} | ||
{{FrameStrip|t=Lag|c=6}}{{FrameStrip|t=Hitbox|c=4}}{{FrameStrip|t=Lag|c=23}}{{FrameStrip|t=Interruptible|c=13}} | !Hitboxes {{FrameStrip|t=Lag|c=6}}{{FrameStrip|t=Hitbox|c=4}}{{FrameStrip|t=Lag|c=23}}{{FrameStrip|t=Interruptible|c=13}} | ||
|- | |||
!FS cancel {{FrameStrip|t=Blank|c=6}}{{FrameStrip|t=Continuable|c=27}}{{FrameStrip|t=Blank|c=13}} | |||
{{FrameStripEnd}} | {{FrameStripEnd}} | ||
{{FrameIconLegend|lag=y|hitbox=y|interruptible=y}} | {{FrameIconLegend|lag=y|hitbox=y|continuable=y|interruptible=y}} | ||
==Trivia== | |||
*This move is tied with {{SSBU|King K. Rool}} for the highest damage neutral attack hit 3 in the game. | |||
==References== | |||
{{reflist}} | |||
{{MvSubNavTerry|g=SSBU}} | {{MvSubNavTerry|g=SSBU}} | ||
[[Category:Terry (SSBU)]] | [[Category:Terry (SSBU)]] | ||
[[Category:Neutral attacks (SSBU)]] | [[Category:Neutral attacks (SSBU)]] | ||
Latest revision as of 16:43, August 6, 2022
Overview[edit]
A side kick. This move is rarely seen unless a Terry player misinputs, as Rising Tackle and Power Dunk are optimal options out of the 2nd hit of neutral attack.
This move deals a large amount of damage for a simple neutral attack, making Terry's jab combo one of the most damaging in the game. It also has a long-lasting hitbox, with 4 active frames. However, it cannot be cancelled into special moves, making it generally not worth going for.
Humorously, this move can hit many opponents on the ledge[1]. As a result of this, this attack has utility when ledgetrapping or aiming to 2-frame for its decently long-lasting hitbox. However, it lacks practicality due to the requirement to use the previous parts of the move to do it. Given that opponents will ledge attack upon seeing a poorly spaced neutral attack to avoid the trap, this feature rarely sees use.
Hitboxes[edit]
Timing[edit]
If followed up from frames 9-19 of Terry's second jab, the move can be canceled into a Final Smash for the remainder of its duration after hitting an opponent.
| Hitbox | 7-10 |
|---|---|
| Final Smash cancel window (from jab 2) | 7-33 |
| Interruptible | 34 |
| Animation length | 46 |
| Hitboxes | ||||||||||||||||||||||||||||||||||||||||||||||
|---|---|---|---|---|---|---|---|---|---|---|---|---|---|---|---|---|---|---|---|---|---|---|---|---|---|---|---|---|---|---|---|---|---|---|---|---|---|---|---|---|---|---|---|---|---|---|
| FS cancel |
Lag time |
Hitbox |
Continuable |
Interruptible |
Trivia[edit]
- This move is tied with King K. Rool for the highest damage neutral attack hit 3 in the game.
References[edit]
|
