Welcome to SmashWiki! Log in or create an account and join the community, and don't forget to read this first!
Notices
The Skill parameter has been removed from Smasher infoboxes, and in its place are the new "Best historical ranking" and "Best tournament result" parameters. SmashWiki needs help adding these new parameters to Smasher infoboxes, refer to the guidelines here for what should be included in these new parameters.
When adding results to Smasher pages, include each tournament's entrant number in addition to the player's placement, and use the {{Trn}} template with the matching game specified. Please also fix old results on Smasher pages that do not abide to this standard. Refer to our Smasher article guidelines to see how results tables should be formatted.
Check out our project page for ongoing projects that SmashWiki needs help with.
Super Smash Bros. Ultimate

Terry (SSBU)/Neutral attack/Hit 3

From SmashWiki, the Super Smash Bros. wiki
Jump to navigationJump to search
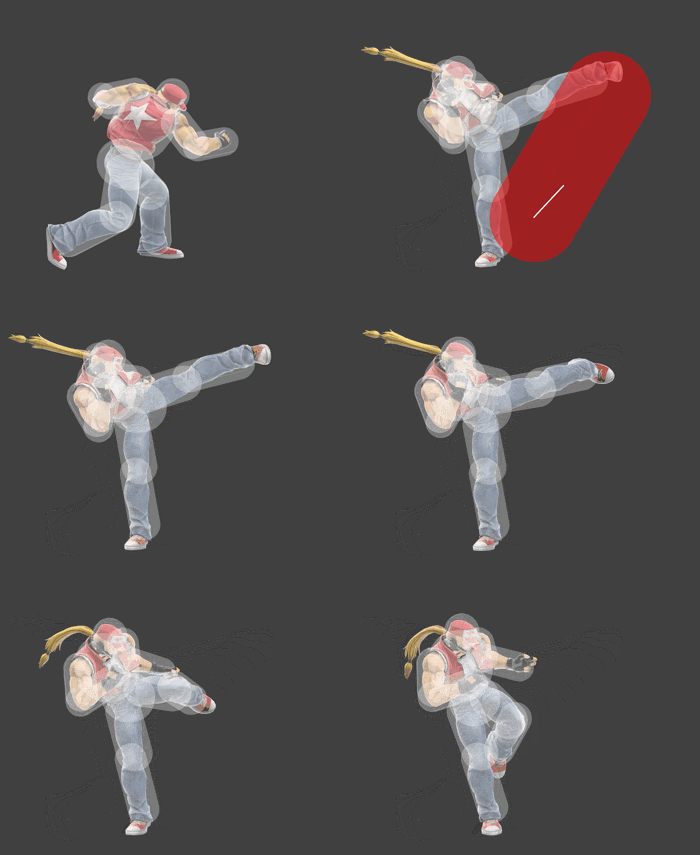
Hitbox visualization showing Terry's third jab.

Overview[edit]

A side kick. This move is rarely seen unless a Terry player misinputs, as Rising Tackle and Power Dunk are optimal options out of the 2nd hit of neutral attack.

This move deals a large amount of damage for a simple neutral attack, making Terry's jab combo one of the most damaging in the game. It also has a long-lasting hitbox, with 4 active frames. However, it cannot be cancelled into special moves, making it generally not worth going for.

Humorously, this move can hit many opponents on the ledge[1]. As a result of this, this attack has utility when ledgetrapping or aiming to 2-frame for its decently long-lasting hitbox. However, it lacks practicality due to the requirement to use the previous parts of the move to do it. Given that opponents will ledge attack upon seeing a poorly spaced neutral attack to avoid the trap, this feature rarely sees use.

Hitboxes[edit]

ID Part Rehit rate Damage SD Angle Angle type BK KS FKV Set weight Radius Bone Offset SDI× T% Clang Rebound Effect Type G A Sound Direct Hit bits Hit part Blockable Reflectable Absorbable Flinchless No GFX Heedless
Hit 1
0 0 0 7.0% 0 AngleIcon47.png Standard 70 60 0 HitboxTableIcon(False).png 4.0 top 0.0 4.0 to 15.0 4.0 to 10.5 1.5× 1.0× 0% HitboxTableIcon(Clang).png HitboxTableIcon(Rebound).png Normal (effect) Foot (type) HitboxTableIcon(GroundedTrue).png HitboxTableIcon(AerialTrue).png M Terry Kick SpecialsDirect.png All All HitboxTableIcon(Blockable).png HitboxTableIcon(Unreflectable).png HitboxTableIcon(Unabsorbable).png HitboxTableIcon(False).png HitboxTableIcon(False).png HitboxTableIcon(False).png

Timing[edit]

If followed up from frames 9-19 of Terry's second jab, the move can be canceled into a Final Smash for the remainder of its duration after hitting an opponent.

Hitbox 7-10
Final Smash cancel window (from jab 2) 7-33
Interruptible 34
Animation length 46
Hitboxes  FrameIcon(Lag).png FrameIcon(Lag).png FrameIcon(Lag).png FrameIcon(Lag).png FrameIcon(Lag).png FrameIcon(Lag).png FrameIcon(Hitbox).png FrameIcon(Hitbox).png FrameIcon(Hitbox).png FrameIcon(Hitbox).png FrameIcon(Lag).png FrameIcon(Lag).png FrameIcon(Lag).png FrameIcon(Lag).png FrameIcon(Lag).png FrameIcon(Lag).png FrameIcon(Lag).png FrameIcon(Lag).png FrameIcon(Lag).png FrameIcon(Lag).png FrameIcon(Lag).png FrameIcon(Lag).png FrameIcon(Lag).png FrameIcon(Lag).png FrameIcon(Lag).png FrameIcon(Lag).png FrameIcon(Lag).png FrameIcon(Lag).png FrameIcon(Lag).png FrameIcon(Lag).png FrameIcon(Lag).png FrameIcon(Lag).png FrameIcon(Lag).png FrameIcon(Interruptible).png FrameIcon(Interruptible).png FrameIcon(Interruptible).png FrameIcon(Interruptible).png FrameIcon(Interruptible).png FrameIcon(Interruptible).png FrameIcon(Interruptible).png FrameIcon(Interruptible).png FrameIcon(Interruptible).png FrameIcon(Interruptible).png FrameIcon(Interruptible).png FrameIcon(Interruptible).png FrameIcon(Interruptible).png
FS cancel  FrameIcon(Blank).png FrameIcon(Blank).png FrameIcon(Blank).png FrameIcon(Blank).png FrameIcon(Blank).png FrameIcon(Blank).png FrameIcon(Continuable).png FrameIcon(Continuable).png FrameIcon(Continuable).png FrameIcon(Continuable).png FrameIcon(Continuable).png FrameIcon(Continuable).png FrameIcon(Continuable).png FrameIcon(Continuable).png FrameIcon(Continuable).png FrameIcon(Continuable).png FrameIcon(Continuable).png FrameIcon(Continuable).png FrameIcon(Continuable).png FrameIcon(Continuable).png FrameIcon(Continuable).png FrameIcon(Continuable).png FrameIcon(Continuable).png FrameIcon(Continuable).png FrameIcon(Continuable).png FrameIcon(Continuable).png FrameIcon(Continuable).png FrameIcon(Continuable).png FrameIcon(Continuable).png FrameIcon(Continuable).png FrameIcon(Continuable).png FrameIcon(Continuable).png FrameIcon(Continuable).png FrameIcon(Blank).png FrameIcon(Blank).png FrameIcon(Blank).png FrameIcon(Blank).png FrameIcon(Blank).png FrameIcon(Blank).png FrameIcon(Blank).png FrameIcon(Blank).png FrameIcon(Blank).png FrameIcon(Blank).png FrameIcon(Blank).png FrameIcon(Blank).png FrameIcon(Blank).png
Legend (1 square = 1 frame)
Lag
Lag time
Hitbox
Hitbox
FrameIcon(Continuable).png
Continuable
Interruptibility
Interruptible

Trivia[edit]

  • This move is tied with King K. Rool for the highest damage neutral attack hit 3 in the game.

References[edit]