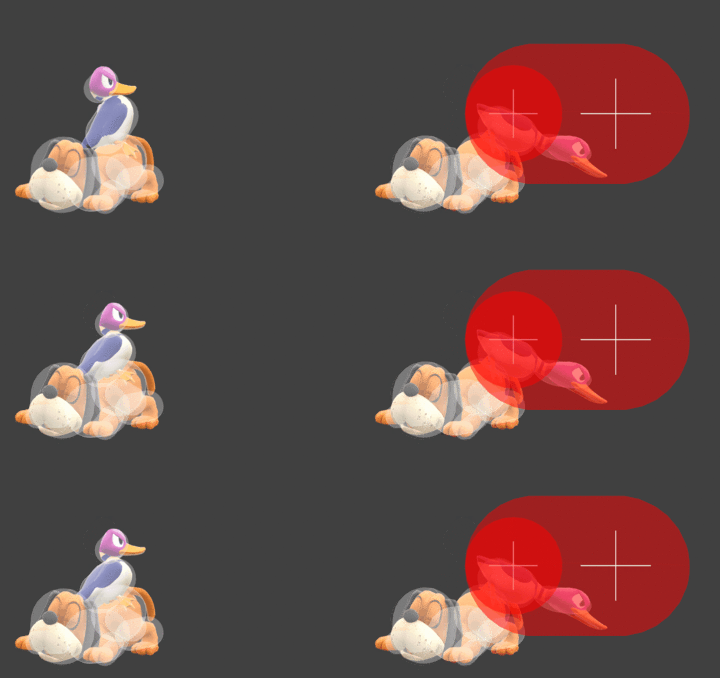
Duck Hunt (SSBU)/Neutral attack/Infinite: Difference between revisions
From SmashWiki, the Super Smash Bros. wiki
Jump to navigationJump to search
(New Page: {{ArticleIcons|ssbu=y}} {{competitive expertise}} thumb|360px|Hitbox visualization showing DuckHunt's rapid jab. File:DuckHuntRapidJabFinisherSSBU.gi...) |
No edit summary |
||
| (2 intermediate revisions by 2 users not shown) | |||
| Line 7: | Line 7: | ||
==Hitboxes== | ==Hitboxes== | ||
{{UltimateHitboxTableHeader}} | {{UltimateHitboxTableHeader}} | ||
! Hitstun | |||
! Shieldstun | |||
{{HitboxTableTitle|Rapid jab|42}} | {{HitboxTableTitle|Rapid jab|42}} | ||
{{UltimateHitboxTableRow | {{UltimateHitboxTableRow | ||
| Line 12: | Line 14: | ||
|damage=0.4% | |damage=0.4% | ||
|angle=361 | |angle=361 | ||
|af=3 | |||
|bk=16 | |bk=16 | ||
|ks=15 | |ks=15 | ||
| Line 29: | Line 32: | ||
|rebound=f | |rebound=f | ||
}} | }} | ||
|'''+2''' frames | |||
|5× | |||
{{UltimateHitboxTableRow | {{UltimateHitboxTableRow | ||
|id=1 | |id=1 | ||
|damage=0.4% | |damage=0.4% | ||
|angle=361 | |angle=361 | ||
|af=3 | |||
|bk=12 | |bk=12 | ||
|ks=10 | |ks=10 | ||
| Line 50: | Line 56: | ||
|rebound=f | |rebound=f | ||
}} | }} | ||
|'''+2''' frames | |||
|5× | |||
{{HitboxTableTitle|Rapid jab finisher|42}} | {{HitboxTableTitle|Rapid jab finisher|42}} | ||
{{UltimateHitboxTableRow | {{UltimateHitboxTableRow | ||
| Line 55: | Line 63: | ||
|damage=3.0% | |damage=3.0% | ||
|angle=74 | |angle=74 | ||
|af=3 | |||
|bk=70 | |bk=70 | ||
|ks=140 | |ks=140 | ||
| Line 71: | Line 80: | ||
|rebound=f | |rebound=f | ||
}} | }} | ||
|— | |||
|— | |||
{{UltimateHitboxTableRow | {{UltimateHitboxTableRow | ||
|id=1 | |id=1 | ||
|damage=3.0% | |damage=3.0% | ||
|angle=74 | |angle=74 | ||
|af=3 | |||
|bk=70 | |bk=70 | ||
|ks=140 | |ks=140 | ||
| Line 91: | Line 103: | ||
|rebound=f | |rebound=f | ||
}} | }} | ||
|— | |||
|— | |||
{{UltimateHitboxTableRow | {{UltimateHitboxTableRow | ||
|id=2 | |id=2 | ||
|damage=3.0% | |damage=3.0% | ||
|angle=74 | |angle=74 | ||
|af=3 | |||
|bk=70 | |bk=70 | ||
|ks=140 | |ks=140 | ||
| Line 111: | Line 126: | ||
|rebound=f | |rebound=f | ||
}} | }} | ||
|— | |||
|— | |||
|} | |} | ||
==Timing== | ==Timing== | ||
Interruptibility and animation length are | After one full loop, releasing the attack button at any point causes the infinite to transition into the finisher. Interruptibility and animation length are for the finisher only. | ||
{|class="wikitable" | {|class="wikitable" | ||
!Rapid | !Loop points | ||
|5, 7, 9, 11 | |2-3, 19-20 | ||
|- | |||
!Rapid jab | |||
|5, 7, 9, 11, 13, 15, 17, 19 | |||
|- | |- | ||
!Finisher | !Finisher | ||
Latest revision as of 12:56, July 31, 2022
Overview[edit]
Hitboxes[edit]
Timing[edit]
After one full loop, releasing the attack button at any point causes the infinite to transition into the finisher. Interruptibility and animation length are for the finisher only.
| Loop points | 2-3, 19-20 |
|---|---|
| Rapid jab | 5, 7, 9, 11, 13, 15, 17, 19 |
| Finisher | 4 |
| Interruptible | 46 |
| Animation length | 50 |
Lag time |
Hitbox |
Loop point |
Interruptible |
|


