Snake (SSBU)/Down smash: Difference between revisions
m (Protected "Snake (SSBU)/Down smash": Bot: Protecting a list of files. ([Edit=Allow only autoconfirmed users] (indefinite) [Move=Allow only autoconfirmed users] (indefinite))) |
(→Timing) |
||
| (4 intermediate revisions by 3 users not shown) | |||
| Line 1: | Line 1: | ||
{{ArticleIcons|ssbu=y}} | {{ArticleIcons|ssbu=y}} | ||
[[File:SnakeDSmashSSBU.gif|thumb| | [[File:SnakeDSmashSSBU.gif|thumb|350px|Hitbox visualization showing Snake's down smash.]] | ||
==Overview== | ==Overview== | ||
Snake performs a double sided kick. The first hit has fast [[startup]] at frame 8, making it Snake's fastest smash attack, and is a strong [[semi-spike]] that launches opponents at a direction that is very difficult to recover from. The back hit, while difficult to land at times, is much more powerful than the front and is relatively safe on shield (-14 on shield). In addition to this, both hits have great [[range]] as the disjointed hitbox reaches far beyond Snake's feet, giving the move reliable [[edgeguard]]ing and [[2 frame punish|2-framing]] potential. Lastly, due to hitting on both sides, it can be used to punish [[roll]]s and provides good coverage to Snake's sides should his opponent become unpredictable. | |||
Although it lacks any serious glaring flaws, it does have a few worth mentioning. While its back hit is difficult to punish on shield, its front hit is very unsafe and easily punishable if used on shield. Its back hit is also difficult to connect, while its front hit does not have reliable KO potential until high percents despite its edgeguarding potential. Thus, it is an overall situational and niche move that is best suited for [[read]]s when not used for edgeguards. | |||
==Hitboxes== | ==Hitboxes== | ||
{{UltimateHitboxTableHeader}} | {{UltimateHitboxTableHeader}} | ||
{{HitboxTableTitle|Hit 1| | {{HitboxTableTitle|Hit 1|50}} | ||
{{UltimateHitboxTableRow | {{UltimateHitboxTableRow | ||
|id=0 | |id=0 | ||
| Line 42: | Line 45: | ||
|slvl=M | |slvl=M | ||
}} | }} | ||
{{HitboxTableTitle|Hit 2| | {{HitboxTableTitle|Hit 2|50}} | ||
{{UltimateHitboxTableRow | {{UltimateHitboxTableRow | ||
|id=0 | |id=0 | ||
| Line 84: | Line 87: | ||
{|class="wikitable" | {|class="wikitable" | ||
!Charges between | !Charges between | ||
| | |5-6 | ||
|- | |- | ||
!Hit 1 | !Hit 1 | ||
| Line 100: | Line 103: | ||
{{FrameStripStart}} | {{FrameStripStart}} | ||
{{FrameStrip|t=Lag|c= | {{FrameStrip|t=Lag|c=5|e=LagChargeS}}{{FrameStrip|t=Lag|c=2|s=LagChargeE}}{{FrameStrip|t=Hitbox|c=3}}{{FrameStrip|t=Lag|c=9}}{{FrameStrip|t=Hitbox|c=3}}{{FrameStrip|t=Lag|c=22}}{{FrameStrip|t=Interruptible|c=6}} | ||
{{FrameStripEnd}} | {{FrameStripEnd}} | ||
Latest revision as of 12:15, July 17, 2022
Overview[edit]
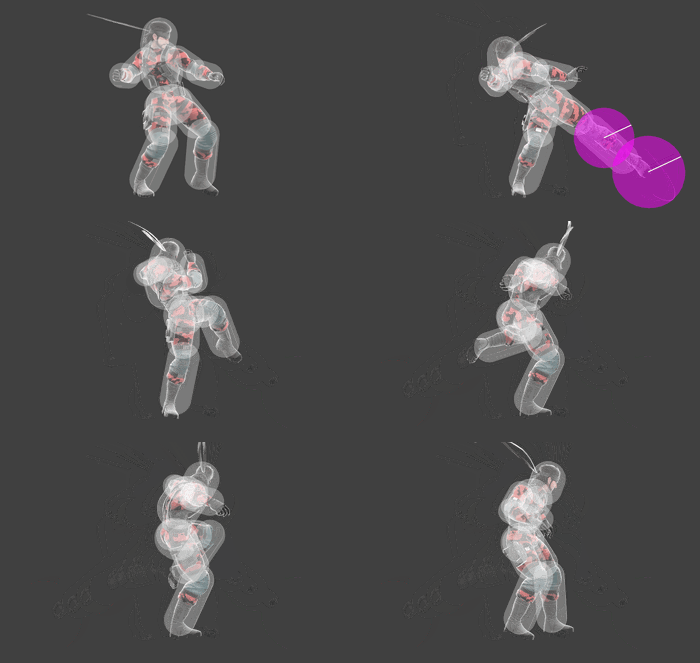
Snake performs a double sided kick. The first hit has fast startup at frame 8, making it Snake's fastest smash attack, and is a strong semi-spike that launches opponents at a direction that is very difficult to recover from. The back hit, while difficult to land at times, is much more powerful than the front and is relatively safe on shield (-14 on shield). In addition to this, both hits have great range as the disjointed hitbox reaches far beyond Snake's feet, giving the move reliable edgeguarding and 2-framing potential. Lastly, due to hitting on both sides, it can be used to punish rolls and provides good coverage to Snake's sides should his opponent become unpredictable.
Although it lacks any serious glaring flaws, it does have a few worth mentioning. While its back hit is difficult to punish on shield, its front hit is very unsafe and easily punishable if used on shield. Its back hit is also difficult to connect, while its front hit does not have reliable KO potential until high percents despite its edgeguarding potential. Thus, it is an overall situational and niche move that is best suited for reads when not used for edgeguards.
Hitboxes[edit]
Timing[edit]
| Charges between | 5-6 |
|---|---|
| Hit 1 | 8-10 |
| Hit 2 | 20-22 |
| Interruptible | 45 |
| Animation length | 50 |
Lag time |
Charge interval |
Hitbox |
Interruptible |
|
