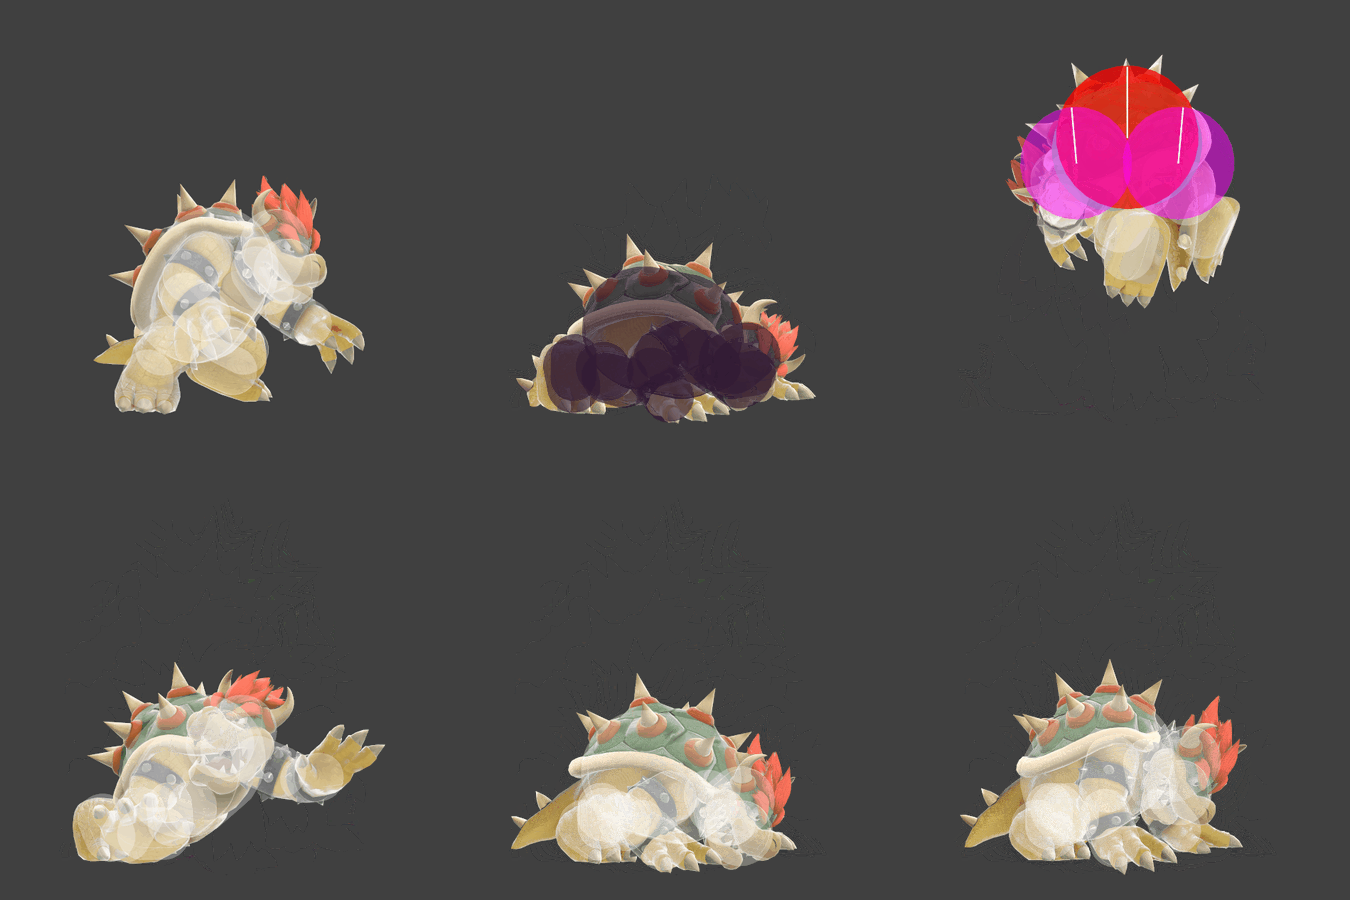
Bowser (SSBU)/Up smash: Difference between revisions
From SmashWiki, the Super Smash Bros. wiki
Jump to navigationJump to search
(New Page: {{ArticleIcons|ssbu=y}} thumb|450px|Hitbox visualization showing Bowser's up smash. {{competitive expertise}} ==Overview== ==Hitboxes== {{UltimateHitboxTab...) |
No edit summary |
||
| (2 intermediate revisions by 2 users not shown) | |||
| Line 1: | Line 1: | ||
{{ArticleIcons|ssbu=y}} | {{ArticleIcons|ssbu=y}} | ||
[[File:BowserUSmashSSBU.gif|thumb|450px|Hitbox visualization showing Bowser's up smash.]] | [[File:BowserUSmashSSBU.gif|thumb|450px|Hitbox visualization showing Bowser's up smash.]] | ||
==Overview== | ==Overview== | ||
Hops to thrust his shell upwards while spinning. Deals the most [[damage]] to opponents who come into contact with Bowser's shell spikes, while other opponents get hit by the sourspots on his head and tail or the landing hitbox instead. The sweetspot [[KO|KOs]] at around 80% uncharged, making it the strongest [[up smash]] in the game. Grants damaged-based [[armor]] (frames 11-15) and [[invincibility]] on his shell (frames 14-27), making it an excellent anti-air tool that is hard to compete with. | |||
==Hitboxes== | ==Hitboxes== | ||
{{UltimateHitboxTableHeader}} | {{UltimateHitboxTableHeader}} | ||
{{HitboxTableTitle|Clean hit| | {{HitboxTableTitle|Clean hit|42}} | ||
{{UltimateHitboxTableRow | {{UltimateHitboxTableRow | ||
|id=0 | |id=0 | ||
| Line 48: | Line 49: | ||
|damage={{ChargedSmashDmgSSBU|16.0}} | |damage={{ChargedSmashDmgSSBU|16.0}} | ||
|angle=85 | |angle=85 | ||
|af=4 | |||
|bk=23 | |bk=23 | ||
|ks=100 | |ks=100 | ||
| Line 63: | Line 65: | ||
|rebound=f | |rebound=f | ||
}} | }} | ||
{{HitboxTableTitle|Landing hit| | {{HitboxTableTitle|Landing hit|42}} | ||
{{UltimateHitboxTableRow | {{UltimateHitboxTableRow | ||
|id=0 | |id=0 | ||
|damage={{ChargedSmashDmgSSBU|12.0}} | |damage={{ChargedSmashDmgSSBU|12.0}} | ||
|angle=70 | |angle=70 | ||
|af=4 | |||
|bk=30 | |bk=30 | ||
|ks=70 | |ks=70 | ||
| Line 77: | Line 80: | ||
|zpos=-7.5 to 4.0 | |zpos=-7.5 to 4.0 | ||
|ff=1.0 | |ff=1.0 | ||
|type= | |type=Body | ||
|effect=Stab | |effect=Stab | ||
|sfx=Kick | |sfx=Kick | ||
|slvl= | |slvl=M | ||
|a=f | |a=f | ||
}} | }} | ||
|} | |} | ||
==Timing== | ==Timing== | ||
The damage-based armor has a threshold of 8%. | |||
{|class="wikitable" | {|class="wikitable" | ||
!Charges between | !Charges between | ||
|9-10 | |9-10 | ||
|- | |- | ||
! | !Damage-based armor | ||
|11-15 | |11-15 | ||
|- | |- | ||
| Line 109: | Line 114: | ||
{{FrameStripStart}} | {{FrameStripStart}} | ||
!Hitboxes {{FrameStrip|t=Lag|c=9|e=LagChargeS}}{{FrameStrip|t=Lag|c=6|s=LagChargeE}}{{FrameStrip|t=Hitbox|c=8}}{{FrameStrip|t=Lag|c=13}}{{FrameStrip|t=Hitbox|c=1}}{{FrameStrip|t=Lag|c=20}}{{FrameStrip|t=Interruptible|c=22}} | |||
|- | |- | ||
!Body {{FrameStrip|t=Vulnerable|c=10}}{{FrameStrip|t=Armour|c=5}}{{FrameStrip|t=Vulnerable|c=64}} | |||
|- | |- | ||
!Shell {{FrameStrip|t=Vulnerable|c=10}}{{FrameStrip|t=Armour|c=3}}{{FrameStrip|t=Invincible|c=14}}{{FrameStrip|t=Vulnerable|c=52}} | |||
{{FrameStripEnd}} | {{FrameStripEnd}} | ||
Latest revision as of 23:13, June 17, 2022
Overview[edit]
Hops to thrust his shell upwards while spinning. Deals the most damage to opponents who come into contact with Bowser's shell spikes, while other opponents get hit by the sourspots on his head and tail or the landing hitbox instead. The sweetspot KOs at around 80% uncharged, making it the strongest up smash in the game. Grants damaged-based armor (frames 11-15) and invincibility on his shell (frames 14-27), making it an excellent anti-air tool that is hard to compete with.
Hitboxes[edit]
Timing[edit]
The damage-based armor has a threshold of 8%.
| Charges between | 9-10 |
|---|---|
| Damage-based armor | 11-15 |
| Shell invincible | 14-27 |
| Clean hit | 16-23 |
| Landing hit | 37 |
| Interruptible | 58 |
| Animation length | 79 |
| Hitboxes | |||||||||||||||||||||||||||||||||||||||||||||||||||||||||||||||||||||||||||||||
|---|---|---|---|---|---|---|---|---|---|---|---|---|---|---|---|---|---|---|---|---|---|---|---|---|---|---|---|---|---|---|---|---|---|---|---|---|---|---|---|---|---|---|---|---|---|---|---|---|---|---|---|---|---|---|---|---|---|---|---|---|---|---|---|---|---|---|---|---|---|---|---|---|---|---|---|---|---|---|---|
| Body | |||||||||||||||||||||||||||||||||||||||||||||||||||||||||||||||||||||||||||||||
| Shell |
Lag time |
Charge interval |
Hitbox |
Hitbox change |
Vulnerable |
Invincible |
Armour |
Interruptible |
|
