Sonic (SSBU)/Down smash: Difference between revisions
From SmashWiki, the Super Smash Bros. wiki
Jump to navigationJump to search
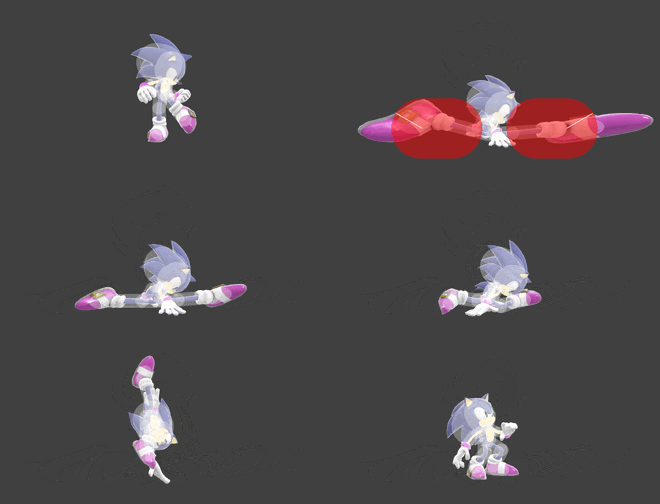
Smash Master (talk | contribs) (New Page: {{ArticleIcons|ssbu=y}} thumb|330px|Hitbox visualization showing Sonic's down smash. {{competitive expertise}} ==Overview== A split kick, similar to {{SSBU|...) |
m (→Hitboxes) |
||
| (6 intermediate revisions by 4 users not shown) | |||
| Line 6: | Line 6: | ||
==Hitboxes== | ==Hitboxes== | ||
{{UltimateHitboxTableHeader}} | {{UltimateHitboxTableHeader}} | ||
{{UltimateHitboxTableRow | {{UltimateHitboxTableRow | ||
|id=0 | |id=0 | ||
|damage={{ChargedSmashDmgSSBU|12}} | |damage={{ChargedSmashDmgSSBU|12.0}} | ||
|angle=30 | |angle=30 | ||
|bk=50 | |bk=50 | ||
| Line 17: | Line 15: | ||
|r=5.0 | |r=5.0 | ||
|bn=top | |bn=top | ||
|ypos=2.0 | |ypos=2.0 | ||
|zpos=13.0 | |zpos=13.0 to 8.0 | ||
|type=Foot | |type=Foot | ||
|sfx=Kick | |sfx=Kick | ||
| Line 27: | Line 23: | ||
{{UltimateHitboxTableRow | {{UltimateHitboxTableRow | ||
|id=1 | |id=1 | ||
|damage={{ChargedSmashDmgSSBU|12}} | |damage={{ChargedSmashDmgSSBU|12.0}} | ||
|angle=30 | |angle=30 | ||
|bk=50 | |bk=50 | ||
| Line 35: | Line 30: | ||
|r=5.0 | |r=5.0 | ||
|bn=top | |bn=top | ||
|ypos=2.0 | |ypos=2.0 | ||
|zpos=11.0 | |zpos=-11.0 to -6.0 | ||
|type=Foot | |type=Foot | ||
|sfx=Kick | |sfx=Kick | ||
|slvl=M | |slvl=M | ||
| Line 58: | Line 50: | ||
|- | |- | ||
!Animation length | !Animation length | ||
| | |69 | ||
|} | |} | ||
{{FrameStripStart}} | {{FrameStripStart}} | ||
{{FrameStrip|t=Lag|c=5|e=LagChargeS}}{{FrameStrip|t=Lag|c=6|s=LagChargeE}}{{FrameStrip|t=Hitbox|c=2}}{{FrameStrip|t=Lag|c=41}}{{FrameStrip|t=Interruptible|c= | {{FrameStrip|t=Lag|c=5|e=LagChargeS}}{{FrameStrip|t=Lag|c=6|s=LagChargeE}}{{FrameStrip|t=Hitbox|c=2}}{{FrameStrip|t=Lag|c=41}}{{FrameStrip|t=Interruptible|c=15}} | ||
{{FrameStripEnd}} | {{FrameStripEnd}} | ||
{{FrameIconLegend|lag=y|charge=y|hitbox=y|interruptible=y}} | {{FrameIconLegend|lag=y|charge=y|hitbox=y|interruptible=y}} | ||
| Line 68: | Line 60: | ||
{{MvSubNavSonic|g=SSBU}} | {{MvSubNavSonic|g=SSBU}} | ||
[[Category:Sonic (SSBU)]] | [[Category:Sonic (SSBU)]] | ||
[[Category: | [[Category:Down smashes (SSBU)]] | ||
Latest revision as of 15:16, April 8, 2022
Overview[edit]
A split kick, similar to Fox and Falco's down smashes. It has the lowest amount of start-up lag out of Sonic's smash attacks and hits on both sides, which make it useful for punishing rolls. It is also a semi-spike, which makes it very useful for edge-guarding. However, it lasts for only 2 frames, and has considerable ending lag.
Hitboxes[edit]
Timing[edit]
| Charges between | 5-6 |
|---|---|
| Hitboxes | 12-13 |
| Interruptible | 55 |
| Animation length | 69 |
Lag time |
Charge interval |
Hitbox |
Interruptible |
|

