Super Smash Bros. Melee

Donkey Kong (SSBM)/Back aerial: Difference between revisions

From SmashWiki, the Super Smash Bros. wiki
Jump to navigationJump to search
(→‎Hitboxes: Fixed hitbox ID.)
No edit summary
Line 3: Line 3:
{{competitive expertise}}
==Overview==
==Overview==
DK does a midair kick behind him, which has [[Sex kick]] properties. One of DK's best moves due to its long range and decent speed and knockback. It is also quite safe on shield, both when [[SHFFL]]d (which makes it +/- 0 on block), and when spaced. The weaker hit is an occasionally useful combo extender which can allow DK to followup with another aerial. It can combo from {{mvsub|Donkey Kong|SSBM|up throw}} against most midfallers and fastfallers, and has reasonable kill potential past 100%. An all around good aerial that's a staple of DK's play.
Due to the fact that DK's hitboxes facing forwards are generally a lot less useful than this move, DK players will often use his {{mvsub|Donkey Kong|SSBM|neutral special}} to turnaround before putting out an aerial; with good timing, it is possible to do this and land a back aerial within a shorthop.
==Hitboxes==
==Hitboxes==
{{MeleeHitboxTableHeader}}

Revision as of 12:26, January 22, 2022

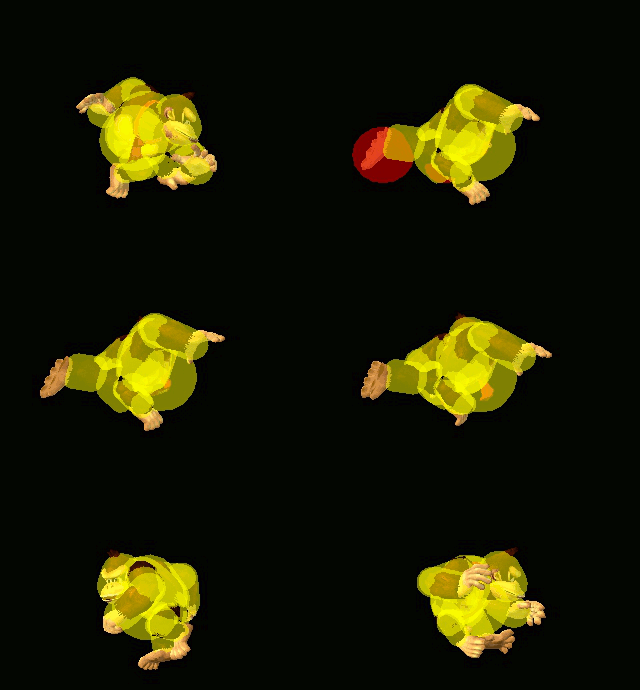
Hitbox visualization showing Donkey Kong's back aerial.
Competitive.png This article or section may require competitive expertise.
You can discuss this issue on the talk page or edit this page to improve it.

Overview

DK does a midair kick behind him, which has Sex kick properties. One of DK's best moves due to its long range and decent speed and knockback. It is also quite safe on shield, both when SHFFLd (which makes it +/- 0 on block), and when spaced. The weaker hit is an occasionally useful combo extender which can allow DK to followup with another aerial. It can combo from up throw against most midfallers and fastfallers, and has reasonable kill potential past 100%. An all around good aerial that's a staple of DK's play.

Due to the fact that DK's hitboxes facing forwards are generally a lot less useful than this move, DK players will often use his neutral special to turnaround before putting out an aerial; with good timing, it is possible to do this and land a back aerial within a shorthop.

Hitboxes

ID Part Damage SD Angle BK KS FKV Radius Bone Offset Clang Rebound Effect G A Sound
Clean hit
0 0 13% 0 Sakurai angle 10 100 0 5.859 0 0.0 6.655824 -16.4052 HitboxTableIcon(Clang).png HitboxTableIcon(Rebound).png Normal (effect) HitboxTableIcon(GroundedTrue).png HitboxTableIcon(AerialTrue).png L Kick
1 0 13% 0 Sakurai angle 10 100 0 3.906 0 0.0 4.655952 -5.655888 HitboxTableIcon(Clang).png HitboxTableIcon(Rebound).png Normal (effect) HitboxTableIcon(GroundedTrue).png HitboxTableIcon(AerialTrue).png L Kick
Late hit
0 0 9% 0 Sakurai angle 0 100 0 5.4684 0 0.0 6.655824 -16.4052 HitboxTableIcon(Clang).png HitboxTableIcon(Rebound).png Normal (effect) HitboxTableIcon(GroundedTrue).png HitboxTableIcon(AerialTrue).png M Kick
1 0 9% 0 Sakurai angle 0 100 0 3.5154 0 0.0 4.655952 -5.655888 HitboxTableIcon(Clang).png HitboxTableIcon(Rebound).png Normal (effect) HitboxTableIcon(GroundedTrue).png HitboxTableIcon(AerialTrue).png M Kick

Timing

Initial autocancel 1-6
Clean hit 7-9
Late hit 10-15
Ending autocancel 20-
Interruptible 32
Animation length 39
FrameIcon(Lag).png FrameIcon(Lag).png FrameIcon(Lag).png FrameIcon(Lag).png FrameIcon(Lag).png FrameIcon(Lag).png FrameIcon(Hitbox).png FrameIcon(Hitbox).png FrameIcon(HitboxChangeS).png FrameIcon(HitboxChangeE).png FrameIcon(Hitbox).png FrameIcon(Hitbox).png FrameIcon(Hitbox).png FrameIcon(Hitbox).png FrameIcon(Hitbox).png FrameIcon(Lag).png FrameIcon(Lag).png FrameIcon(Lag).png FrameIcon(Lag).png FrameIcon(Lag).png FrameIcon(Lag).png FrameIcon(Lag).png FrameIcon(Lag).png FrameIcon(Lag).png FrameIcon(Lag).png FrameIcon(Lag).png FrameIcon(Lag).png FrameIcon(Lag).png FrameIcon(Lag).png FrameIcon(Lag).png FrameIcon(Lag).png FrameIcon(Interruptible).png FrameIcon(Interruptible).png FrameIcon(Interruptible).png FrameIcon(Interruptible).png FrameIcon(Interruptible).png FrameIcon(Interruptible).png FrameIcon(Interruptible).png FrameIcon(Interruptible).png
FrameIcon(Autocancel).png FrameIcon(Autocancel).png FrameIcon(Autocancel).png FrameIcon(Autocancel).png FrameIcon(Autocancel).png FrameIcon(Autocancel).png FrameIcon(Blank).png FrameIcon(Blank).png FrameIcon(Blank).png FrameIcon(Blank).png FrameIcon(Blank).png FrameIcon(Blank).png FrameIcon(Blank).png FrameIcon(Blank).png FrameIcon(Blank).png FrameIcon(Blank).png FrameIcon(Blank).png FrameIcon(Blank).png FrameIcon(Blank).png FrameIcon(Autocancel).png FrameIcon(Autocancel).png FrameIcon(Autocancel).png FrameIcon(Autocancel).png FrameIcon(Autocancel).png FrameIcon(Autocancel).png FrameIcon(Autocancel).png FrameIcon(Autocancel).png FrameIcon(Autocancel).png FrameIcon(Autocancel).png FrameIcon(Autocancel).png FrameIcon(Autocancel).png FrameIcon(Autocancel).png FrameIcon(Autocancel).png FrameIcon(Autocancel).png FrameIcon(Autocancel).png FrameIcon(Autocancel).png FrameIcon(Autocancel).png FrameIcon(Autocancel).png FrameIcon(Autocancel).png

Landing lag

Animation length 15
L-cancelled animation length 7
Normal  FrameIcon(Lag).png FrameIcon(Lag).png FrameIcon(Lag).png FrameIcon(Lag).png FrameIcon(Lag).png FrameIcon(Lag).png FrameIcon(Lag).png FrameIcon(Lag).png FrameIcon(Lag).png FrameIcon(Lag).png FrameIcon(Lag).png FrameIcon(Lag).png FrameIcon(Lag).png FrameIcon(Lag).png FrameIcon(Lag).png
L-cancelled  FrameIcon(Lag).png FrameIcon(Lag).png FrameIcon(Lag).png FrameIcon(Lag).png FrameIcon(Lag).png FrameIcon(Lag).png FrameIcon(Lag).png FrameIcon(Blank).png FrameIcon(Blank).png FrameIcon(Blank).png FrameIcon(Blank).png FrameIcon(Blank).png FrameIcon(Blank).png FrameIcon(Blank).png FrameIcon(Blank).png
Legend (1 square = 1 frame)
Lag
Lag time
Hitbox
Hitbox
FrameIcon(HitboxChangeS).pngFrameIcon(HitboxChangeE).png
Hitbox change
Auto-canceling
Autocancel
Interruptibility
Interruptible