Donkey Kong (SSBM)/Up smash: Difference between revisions
From SmashWiki, the Super Smash Bros. wiki
Jump to navigationJump to search
No edit summary |
No edit summary |
||
| (2 intermediate revisions by one other user not shown) | |||
| Line 3: | Line 3: | ||
{{competitive expertise}} | {{competitive expertise}} | ||
==Overview== | ==Overview== | ||
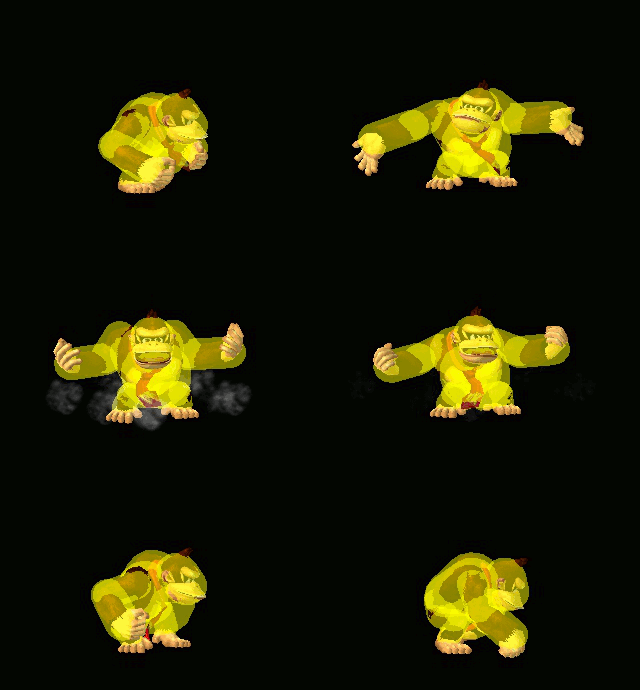
Donkey Kong does a clapping attack above his head. Quite a powerful up smash, comparable in strength to PAL Fox's {{mvsub|Fox|SSBM|up smash}}. Due to the high hitbox, it is very difficult to hit against grounded opponents. As a result, it is generally only usable when combo'd into, such as from {{mvsub|Donkey Kong|SSBM|up throw}} or {{mvsub|Donkey Kong|SSBM|down aerial}}. It can be used to hit through platforms, giving it some use as a platform [[tech chase]] tool. It also easily combos from {{mvsub|Donkey Kong|SSBM|up throw}} on {{SSBM|Fox}} and {{SSBM|Falco}} if they do no DI; if they DI away, you can instead do {{mvsub|Donkey Kong|SSBM|up special}}, giving Donkey Kong potent kill confirms. | |||
==Hitboxes== | ==Hitboxes== | ||
{{MeleeHitboxTableHeader}} | {{MeleeHitboxTableHeader}} | ||
| Line 21: | Line 22: | ||
}} | }} | ||
{{MeleeHitboxTableRow | {{MeleeHitboxTableRow | ||
|id= | |id=1 | ||
|damage={{ChargedSmashDmgSSBM|18}} | |damage={{ChargedSmashDmgSSBM|18}} | ||
|sd=4 | |sd=4 | ||
| Line 57: | Line 58: | ||
{{FrameStripEnd}} | {{FrameStripEnd}} | ||
{{FrameIconLegend|lag=y|hitbox=y|vulnerable=y|intangible=y}} | {{FrameIconLegend|lag=y|charge=y|hitbox=y|vulnerable=y|intangible=y}} | ||
{{MvSubNavDonkeyKong|g=SSBM}} | {{MvSubNavDonkeyKong|g=SSBM}} | ||
[[Category:Donkey Kong (SSBM)]] | [[Category:Donkey Kong (SSBM)]] | ||
[[Category:Up smashes (SSBM)]] | [[Category:Up smashes (SSBM)]] | ||
Latest revision as of 12:10, January 22, 2022
Overview[edit]
Donkey Kong does a clapping attack above his head. Quite a powerful up smash, comparable in strength to PAL Fox's up smash. Due to the high hitbox, it is very difficult to hit against grounded opponents. As a result, it is generally only usable when combo'd into, such as from up throw or down aerial. It can be used to hit through platforms, giving it some use as a platform tech chase tool. It also easily combos from up throw on Fox and Falco if they do no DI; if they DI away, you can instead do up special, giving Donkey Kong potent kill confirms.
Hitboxes[edit]
| ID | Part | Damage | SD | Angle | BK | KS | FKV | Radius | Bone | Offset | Clang | Rebound | Effect | G | A | Sound | ||
|---|---|---|---|---|---|---|---|---|---|---|---|---|---|---|---|---|---|---|
| 0 | 0 | 18% | 4 | 40 | 93 | 0 | 6.8355 | 52 | 5.987898 | 0.0 | 0.0 | |||||||
| 1 | 0 | 18% | 4 | 40 | 93 | 0 | 6.8355 | 30 | 5.987898 | 0.0 | 0.0 | |||||||
Timing[edit]
| Charges between | 7-8 |
|---|---|
| Intangibility | 12-16 (Head & Arms) |
| Hitboxes | 14-16 |
| Animation length | 53 |
| Hitboxes | |||||||||||||||||||||||||||||||||||||||||||||||||||||
| Head & Arms |
Lag time |
Charge interval |
Hitbox |
Vulnerable |
Intangible |
|

