Kirby (SSB)/Down aerial: Difference between revisions
SuperSqank (talk | contribs) |
SuperSqank (talk | contribs) No edit summary |
||
| Line 3: | Line 3: | ||
==Overview== | ==Overview== | ||
[[File:Kirby Down Aerial Hitbox Smash 64.gif|thumb|The hitbox of Kirby's dair.]] | [[File:Kirby Down Aerial Hitbox Smash 64.gif|thumb|The hitbox of Kirby's dair.]] | ||
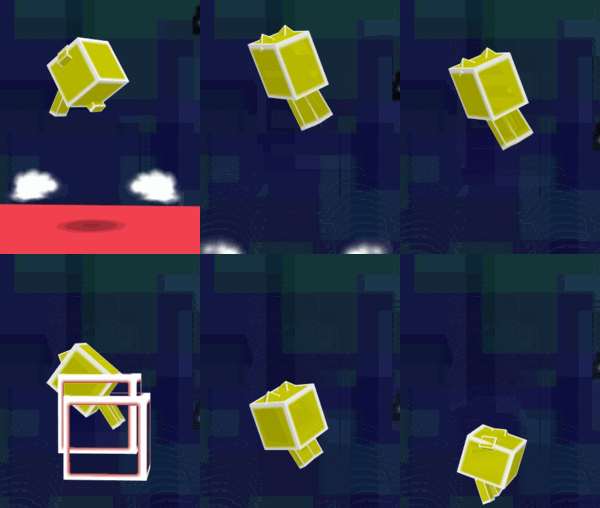
Kirby does a drill kick, consisting of 10 hits and dealing 3% damage per hit. Unlike most drill kicks, it does not have set knockback; making it noticeably more powerful than other drill kicks. Because of this, It is a very useful move for [[edgeguarding]] as it is a powerful [[meteor smash]] that can KO at medium percentages. It can also drag opponents down, and is easy to recover from due to Kirby's long-distanced vertical recovery. It has some [[combo]] use, including being able to lead into a majority of Kirby's moves with an {{mvsub|Kirby|SSB|up tilt}} being his most useful option. At high percents, it can lead into an {{mvsub|Kirby|SSB|up smash}} for a KO. It also highly safe on shield; leaving Kirby at +4 frames if he perfectly [[Z-cancel]]s or [[auto-cancel]]s the move. This can lead into a guaranteed up tilt; leading to free shield | Kirby does a drill kick, consisting of 10 hits and dealing 3% damage per hit. Unlike most drill kicks, it does not have set knockback; making it noticeably more powerful than other drill kicks. Because of this, It is a very useful move for [[edgeguarding]] as it is a powerful [[meteor smash]] that can KO at medium percentages. It can also drag opponents down, and is easy to recover from due to Kirby's long-distanced vertical recovery. It has some [[combo]] use, including being able to lead into a majority of Kirby's moves with an {{mvsub|Kirby|SSB|up tilt}} being his most useful option. At high percents, it can lead into an {{mvsub|Kirby|SSB|up smash}} for a KO. It also highly safe on shield; leaving Kirby at +4 frames if he perfectly [[Z-cancel]]s or [[auto-cancel]]s the move. This can lead into a guaranteed up tilt; leading to a free [[shield break combo]]. | ||
Like most of his other aerials, if the move is not Z-cancelled, there will be a landing hitbox which deals somewhat high set horizontal knockback. This makes the move's landing hit safe if it connects (especially compared to most other drill kicks) although the move has high landing lag; so the landing hit cannot be used to combo and Kirby will be left in a vulnerable position if the landing hit does not connect. Because of this, the move should still be Z-cancelled. | Like most of his other aerials, if the move is not Z-cancelled, there will be a landing hitbox which deals somewhat high set horizontal knockback. This makes the move's landing hit safe if it connects (especially compared to most other drill kicks) although the move has high landing lag; so the landing hit cannot be used to combo and Kirby will be left in a vulnerable position if the landing hit does not connect. Because of this, the move should still be Z-cancelled. | ||
Revision as of 18:34, January 13, 2020
Overview
Kirby does a drill kick, consisting of 10 hits and dealing 3% damage per hit. Unlike most drill kicks, it does not have set knockback; making it noticeably more powerful than other drill kicks. Because of this, It is a very useful move for edgeguarding as it is a powerful meteor smash that can KO at medium percentages. It can also drag opponents down, and is easy to recover from due to Kirby's long-distanced vertical recovery. It has some combo use, including being able to lead into a majority of Kirby's moves with an up tilt being his most useful option. At high percents, it can lead into an up smash for a KO. It also highly safe on shield; leaving Kirby at +4 frames if he perfectly Z-cancels or auto-cancels the move. This can lead into a guaranteed up tilt; leading to a free shield break combo.
Like most of his other aerials, if the move is not Z-cancelled, there will be a landing hitbox which deals somewhat high set horizontal knockback. This makes the move's landing hit safe if it connects (especially compared to most other drill kicks) although the move has high landing lag; so the landing hit cannot be used to combo and Kirby will be left in a vulnerable position if the landing hit does not connect. Because of this, the move should still be Z-cancelled.
The move does have some weaknesses. Because the move is a drill kick, it can be SDIed, but due to its speed and range, it cannot be SDIed as easily as most other drills. Additionally since the move does not have set knockback, it will put opponents into tumble at 24%-39% (depending on the opponent's weight). While this is very useful off stage, it is also detrimental on stage as the opponent can tech; avoiding any potential followups. Because of this, the move's primary use is for edgeguarding beyond low percents.
Overall, the move is a highly effective and useful move; being one of Kirby's best tools.
Hitboxes
Timing
| Initial autocancel | 1-3 |
|---|---|
| Hits | 4-5, 7-8, 10-11, 13-14, 16-17, 19-20, 22-23, 25-26, 28-29, 31-32 |
| Ending autocancel | 33- |
| Animation length | 49 |
Landing lag
| Hitbox | 1 |
|---|---|
| Animation length | 37 |
| L-cancelled animation length | 4 |
| Normal | |||||||||||||||||||||||||||||||||||||
| L-cancelled |
Lag time |
Hitbox |
Autocancel |
Similar moves
