SSBM Icon.png

Donkey Kong (SSBM)/Neutral attack/Hit 1: Difference between revisions

From SmashWiki, the Super Smash Bros. wiki
Jump to navigationJump to search
(→‎Overview: Corrected a mistake regarding the move's order in slowest jabs.)
 
Line 3: Line 3:
{{competitive expertise}}
==Overview==
==Overview==
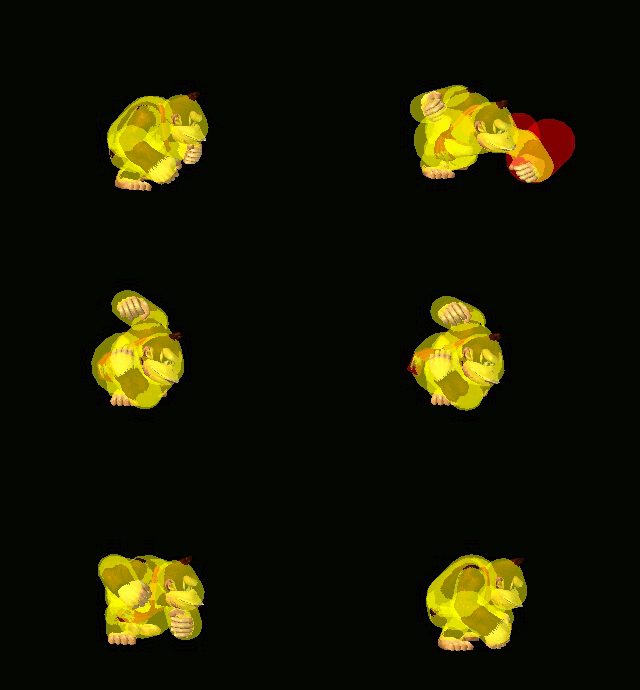
DK does a cross punch in front of him. Being tied with [[Jigglypuff (SSBM)/Neutral attack/Hit 1|Jigglypuff]] for the seventh slowest jab, in terms of startup, the move sees little use in competitive play. It combos into little, except his [[Donkey Kong (SSBM)/Neutral attack/Hit 2|jab 2]], and loses out on speed to his grounded [[Donkey Kong (SSBM)/Up special|up-B]], which comes out on frame 3. The move's primary use is to [[Lock|jab reset]] knocked-down opponents.
DK does a cross punch in front of him. Being tied with [[Jigglypuff (SSBM)/Neutral attack/Hit 1|Jigglypuff]] for the sixth slowest jab, in terms of startup, the move sees little use in competitive play. It combos into little, except his [[Donkey Kong (SSBM)/Neutral attack/Hit 2|jab 2]], and loses out on speed to his grounded [[Donkey Kong (SSBM)/Up special|up-B]], which comes out on frame 3. The move's primary use is to [[Lock|jab reset]] knocked-down opponents.


==Hitboxes==
==Hitboxes==

Latest revision as of 14:05, July 5, 2024

Hitbox visualization showing Donkey Kong's first jab.
Competitive.png This article or section may require competitive expertise.
You can discuss this issue on the talk page or edit this page to improve it.

Overview[edit]

DK does a cross punch in front of him. Being tied with Jigglypuff for the sixth slowest jab, in terms of startup, the move sees little use in competitive play. It combos into little, except his jab 2, and loses out on speed to his grounded up-B, which comes out on frame 3. The move's primary use is to jab reset knocked-down opponents.

Hitboxes[edit]

ID Part Damage SD Angle BK KS FKV Radius Bone Offset Clang Rebound Effect G A Sound
0 0 4% 0 Sakurai angle 0 100 0 4.6872 30 4.655952 0.0 0.0 HitboxTableIcon(Clang).png HitboxTableIcon(Rebound).png EffectIcon(Normal).png HitboxTableIcon(GroundedTrue).png HitboxTableIcon(AerialTrue).png M Punch
1 0 4% 0 Sakurai angle 0 100 0 3.5154 30 -1.32804 0.0 0.0 HitboxTableIcon(Clang).png HitboxTableIcon(Rebound).png EffectIcon(Normal).png HitboxTableIcon(GroundedTrue).png HitboxTableIcon(AerialTrue).png M Punch
2 0 4% 0 Sakurai angle 0 100 0 2.7342 43 0.0 0.0 0.0 HitboxTableIcon(Clang).png HitboxTableIcon(Rebound).png EffectIcon(Normal).png HitboxTableIcon(GroundedTrue).png HitboxTableIcon(AerialTrue).png M Punch

Timing[edit]

Hitboxes 5-7
Earliest continuable 10
Animation length 24
FrameIcon(Lag).png FrameIcon(Lag).png FrameIcon(Lag).png FrameIcon(Lag).png FrameIcon(Hitbox).png FrameIcon(Hitbox).png FrameIcon(Hitbox).png FrameIcon(Lag).png FrameIcon(Lag).png FrameIcon(LagContinuableS).png FrameIcon(LagContinuableE).png FrameIcon(Lag).png FrameIcon(Lag).png FrameIcon(Lag).png FrameIcon(Lag).png FrameIcon(Lag).png FrameIcon(Lag).png FrameIcon(Lag).png FrameIcon(Lag).png FrameIcon(Lag).png FrameIcon(Lag).png FrameIcon(Lag).png FrameIcon(Lag).png FrameIcon(Lag).png
Legend (1 square = 1 frame)
FrameIcon(Lag).png
Lag time
FrameIcon(Hitbox).png
Hitbox
FrameIcon(BlankContinuableS).pngFrameIcon(BlankContinuableE).png
Earliest continuable point