Fox (SSBM)/Neutral attack/Hit 1
Overview[edit]
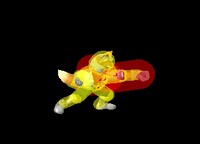
Fox does a quick punch. This is most commonly referred to as Fox's jab. It is his second quickest attack next to shine, as the hitbox activates on the second frame. It is useful for it's quick start-up, low lag, decent range, and combo potential. It can, however, be susceptible to out of shield punishes and crouch cancel counters as well as strong ground attacks and disjointed attacks which out-prioritize it.
Neutral[edit]
In neutral, jab is in many ways out-shined by Fox's down special, which is faster, cannot be crouch canceled, has less lag, and does more knockback (until very high percents). Jab is still useful though because of its range in front of Fox and the different potential follow-up options. The following is a full examination of jab's strengths and weaknesses:
Strengths
- Quick start-up: Though the hitbox comes out on frame 2, Fox only extends his fist on frame 3. Even so, the attack is Fox's second fastest attack behind shine. The quick speed helps to hit first in close encounters which your opponent may choose a slower option. Also, at this speed it is impossible to react with a defensive option or DI on reaction. The opponent must be prepared for the attack beforehand to respond appropriately. This fact is vital to a move which is made useless by proper DI.
- Low lag: Only 12 frames of cooldown lag leaves little time to punish a whiffed jab, especially because of how Fox lunges his body forward and pulls himself back. For this reason it can be a useful move to use when concerned about an opponent trying to evade and punish your hit.
- Good range: A key advantage over using shine, jab has covers a solid area in front of Fox.
- Follow-up potential: A weak hit with a launch angle of 70 results several strong follow-up possibilities as discussed in the section below. This is also sometimes an advantage over using shine, because Fox sometimes has stronger follow-up options from a jab than a shine. For example, jab can lead to an upsmash on Jigglypuff, but a shine cannot.
Weaknesses
- Weak hitbox: Low knockback means it is easily crouch canceled or even only ASDI down, which is a glaring flaw against grounded opponents with quick crouch cancel counters.
- Short active hitbox: The hitbox is only active for 2 frames, which makes it useless for walling out opponents.
- Low priority: Opposing ground attacks of 13% damage or more will override the jab hitbox (most smash attacks and some tilts).
- Small disjoint: Jab is unlikely to do better than trade with most attacks, and attacks with high disjoint such as Marth's fair will almost surely override it.
Shielded[edit]
Jab (unstaled) has a frame disadvantage of 9 to 10 on connecting with full shield according to the following calculation:
Shieldstun (7) - Hitlag (4) - Total Duration (15) + Hitbox (2 to 3) = -9 to -10
From a mathematical standpoint, jab can be punished out of shield by the average grab which is effective on frame 7. However, this dependent on the reaction time, timing, and out of shield options of the shielder as well as the spacing and use of jab 2 of the attacker. The window for a shield grab is only a few frames, and in some cases it is possible for the attacker to space the jab out of range of the shielder's out of shield options. Immediate use of jab 2 also leaves the shielder with only as few as 3 frames, which if disregarded may catch the shielder's counter option. However, jab 2 is more easily punished than jab 1 if shield is held and use of auto-smash DI down can render even a connected jab as punishable.
Conclusion
Overall, jab is generally safe from shield punishes when performed from it's maximum range, but it is a risky choice within shield grab range. In the best case, a jab can bait a whiffed or late out of shield punish, and in the worst case, a jab will be punished by a well-timed grab or strong character-specific option.
Crouch Canceled[edit]
Jab is very susceptible to crouch canceling at even high percents, and even ASDI (auto-smash direction influence) down is equally effective at most percents. Depending on the situation, the defender will have about a 10 to 15 frame advantage, with access to their full moveset (in contrast to the limited options in shield). This means more characters will have faster attacks with more range to counter than from in shield. A poorly spaced jab can be crouch cancel countered easily by the full cast, and even a well-spaced jab may not be safe against most characters.
It is recommended to use jab sparingly against grounded opponents for this reason. One must consider the risk-reward for connecting the jab as well as if it will be anticipated. Jab is too quick to crouch cancel on reaction, so if the opponent is not prepared to crouch cancel, the jab will hit safely. Consider using moves that cannot be crouch canceled (shine, grab, dair) frequently to condition the opponent to not try crouch canceling.
Follow-ups[edit]
Up Smash[edit]
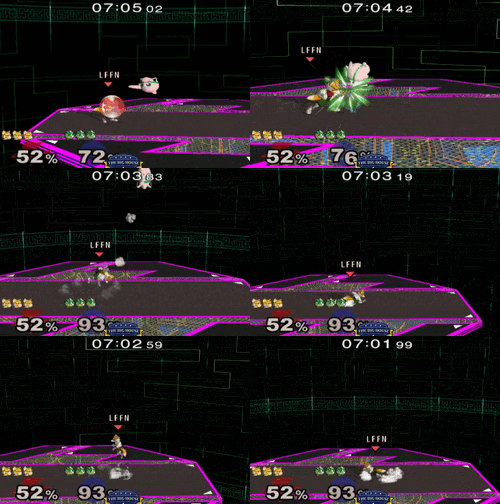
Fox's Jab to Up Smash combo is among the most effective combos in the game for finishing the opponent's stock. Jab is generally safer to use in neutral than Up Smash because of so much less lag, and it's speed allows it to connect in situations Up Smash may not. When the Jab is initiated, the Fox player must react to whether the hit connected and if it can be followed-up with the opponent's DI. It is a good example of a hit confirm because the Jab hit is relatively safe, and it is necessary to react immediately after the hit with an Up Smash if possible. The combo is especially used on floaty characters at a guaranteed KO percentage to finish a stock. It usually isn't used to build damage because the risk/reward compared to other options which can likely lead to more than two hits.
The combo is not completely guaranteed at any percent. Jab does not have a lot of hitstun, so often the opponent can jump out if timed well. Whether DI should be up or away is dependent on position when hit, character, and percent. In general, floatier characters hit higher out of the air want to DI or SDI up so that they never drop low enough to be hit by sweetspot Up Smash. Otherwise, DI or SDI away can make the combo difficult or impossible to reach, and is the best option in many situations, but of course the best option is to crouch cancel counter the Jab.
Grab[edit]
Grab is a useful follow-up to Jab when Up Smash will not KO and/or Jab does not do enough knockback to keep the opponent in the air for the up smash before they can land and shield (this is especially true of fast fallers who will fall to the ground too quickly to up smash them until high percents). Against some characters at certain percents, this is a true combo, but it can be an effective follow-up even if it is not inescapable.
The advantage is even if they land on the ground before your follow-up, there are 3 frames of landing lag and the opponent may only have a few frames to do an action before the grab connects. The quickest, most common defensive actions (shield and crouching) can be buffered and will cover most follow-up options, but both of these options are vulnerable to a grab. A quick, weak attack may be an option for your opponent, but holding down can allow Fox to counter any quick attacks that would connect before his grab. Only a buffered roll or spot dodge is likely to escape this follow-up, and the opponent can be punished for consistently committing to one of these options.
Fox's up throw leads to guaranteed follow-ups against many characters, and so Jab - Grab can be an effective way to create an up throw opportunity.
Down Smash[edit]
Jab Reset[edit]
Jab Pop-up[edit]
Hitboxes[edit]
| ID | Part | Damage | SD | Angle | BK | KS | FKV | Radius | Bone | Offset | Clang | Rebound | Effect | G | A | Sound | ||
|---|---|---|---|---|---|---|---|---|---|---|---|---|---|---|---|---|---|---|
| 0 | 0 | 4% | 0 | 0 | 100 | 0 | 3.327912 | 25 | 0.0 | 0.0 | 4.655952 | |||||||
| 1 | 0 | 4% | 0 | 0 | 100 | 0 | 3.327912 | 25 | 0.0 | 0.0 | 0.0 | |||||||
| Hitlag | 4 |
|---|---|
| Shieldstun | 7 |
NOTE: hitlag and shieldstun values assume completely unstaled hitbox.
Timing[edit]
Attack[edit]
| Hitbox | 2-3 |
|---|---|
| Interruptible | 16 |
| Window of jab 2 | 3-31 |
| Jab 2 earliest start | 6 |
| Animation length | 17 |
Lag time |
Hitbox |
Continuable |
Earliest continuable point |
Interruptible |
Similar moves[edit]

