Super Smash Bros. Ultimate

Wii Fit Trainer (SSBU)/Forward tilt

From SmashWiki, the Super Smash Bros. wiki
< Wii Fit Trainer (SSBU)
Revision as of 08:47, April 12, 2023 by PorpleBot (talk | contribs) (Text replacement - "|thumb|right" to "|thumb")
(diff) ← Older revision | Latest revision (diff) | Newer revision → (diff)
Jump to navigationJump to search
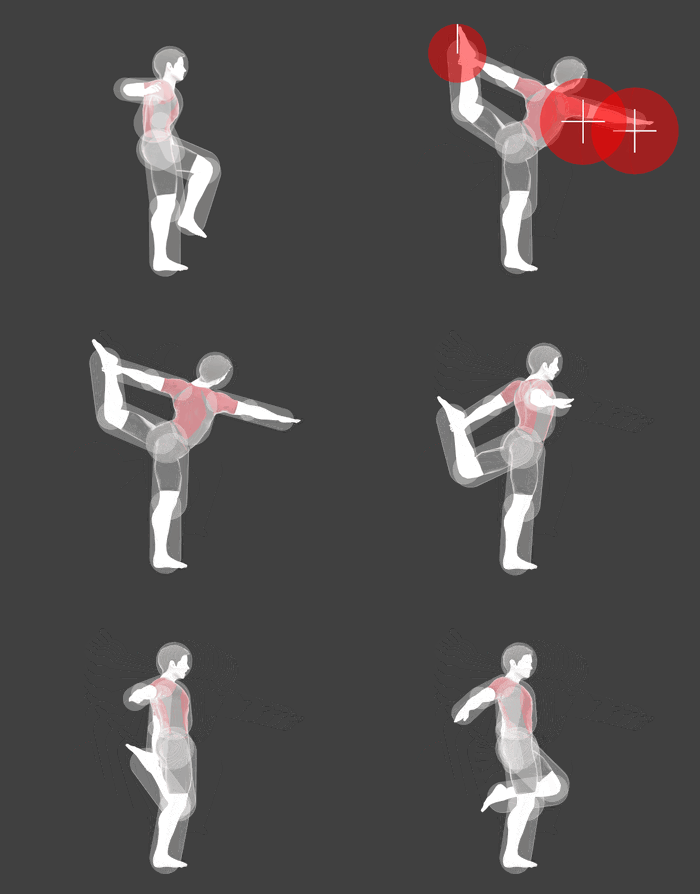
Hitbox visualization showing Wii Fit Trainer's forward tilt.

Overview[edit]

Wii Fit Trainer performs the Dancer pose, attacking with both an outstretched arm in front of her and a raised leg behind her. This move is the staple of Wii Fit Trainer's ground game, being one of her fastest grounded options after jab and up tilt, coming out on frame 6 on both sides. The move is active for 5 frames, which can sometimes allow it to catch early spotdodges or ledge getups. Together between the arm and leg hitboxes, the move can cover a fairly large area, sometimes even working as a decent antiair. The arm hit of the move is a notoriously powerful horizontal kill move for its speed; if near the ledge, it will KO most characters by 100% with Deep Breathing (if not earlier) and around 25% later without Deep Breathing. It also serves as a good "get-off-me" tool, allowing Wii Fit Trainer to quickly put space between herself and her opponent even at low percents, which can then allow her to charge Sun Salutation, activate Deep Breathing, or simply gain stage control. Because of the fairly high positioning of the arm's hitboxes, it can also sometimes be used to catch jumps and landings. The leg hit of forward tilt launches the opponent straight up and is still a decent kill move, although it tends to KO opponents roughly 40% later than the arm hit without the help of a platform. However, the leg hit makes up for its lower kill power with combo potential; it combos into itself or up tilt at low percents and aerials at mid percents, most notably up aerial. Despite this, the leg hit of forward tilt is typically overshadowed by up tilt, which is almost always a better combo-starting option. Forward tilt can also be pivot canceled, greatly improving its horizontal coverage.

The fatal flaw of Wii Fit Trainer's forward tilt is its glaring blindspots both on the arm and leg hits. For the arm hit, a large blindspot is left directly below Wii Fit Trainer's outstretched arm, leaving the move extremely susceptible to short characters and pancaking, hampering its whiff-punish capabilities. The leg hit's blindspot is simply a result of its poor horizontal reach as well as the lower hitbox's single active frame, causing the move to often whiff even when it seems that the opponent is almost touching Wii Fit Trainer.

Hitboxes[edit]

ID Part Rehit rate Damage SD Angle Angle type BK KS FKV Set weight Radius Bone Offset SDI× T% Clang Rebound Effect Type G A Sound Direct Hit bits Hit part Blockable Reflectable Absorbable Flinchless No GFX Heedless
Clean hit
0 0 0 11.0% 0 Sakurai angle Forward 50 85 0 HitboxTableIcon(False).png 3.7 top 0.0 11.9 8.6 1.0× 1.0× 0% HitboxTableIcon(Clang).png HitboxTableIcon(Rebound).png Normal (effect) Hand (type) HitboxTableIcon(GroundedTrue).png HitboxTableIcon(AerialTrue).png L Punch SpecialsDirect.png All All HitboxTableIcon(Blockable).png HitboxTableIcon(Unreflectable).png HitboxTableIcon(Unabsorbable).png HitboxTableIcon(False).png HitboxTableIcon(False).png HitboxTableIcon(False).png
1 0 0 11.0% 0 Sakurai angle Forward 50 85 0 HitboxTableIcon(False).png 3.7 top 0.0 12.7 4.2 1.0× 1.0× 0% HitboxTableIcon(Clang).png HitboxTableIcon(Rebound).png Normal (effect) Hand (type) HitboxTableIcon(GroundedTrue).png HitboxTableIcon(AerialTrue).png L Punch SpecialsDirect.png All All HitboxTableIcon(Blockable).png HitboxTableIcon(Unreflectable).png HitboxTableIcon(Unabsorbable).png HitboxTableIcon(False).png HitboxTableIcon(False).png HitboxTableIcon(False).png
2 0 0 11.0% 0 AngleIcon90.png Standard 50 85 0 HitboxTableIcon(False).png 2.5 top 0.0 18.5 -6.5 1.0× 1.0× 0% HitboxTableIcon(Clang).png HitboxTableIcon(Rebound).png Normal (effect) Foot (type) HitboxTableIcon(GroundedTrue).png HitboxTableIcon(AerialTrue).png L Kick SpecialsDirect.png All All HitboxTableIcon(Blockable).png HitboxTableIcon(Unreflectable).png HitboxTableIcon(Unabsorbable).png HitboxTableIcon(False).png HitboxTableIcon(False).png HitboxTableIcon(False).png
3 0 0 11.0% 0 AngleIcon90.png Standard 50 85 0 HitboxTableIcon(False).png 2.5 top 0.0 8.2 -7.5 1.0× 1.0× 0% HitboxTableIcon(Clang).png HitboxTableIcon(Rebound).png Normal (effect) Foot (type) HitboxTableIcon(GroundedTrue).png HitboxTableIcon(AerialTrue).png L Kick SpecialsDirect.png All All HitboxTableIcon(Blockable).png HitboxTableIcon(Unreflectable).png HitboxTableIcon(Unabsorbable).png HitboxTableIcon(False).png HitboxTableIcon(False).png HitboxTableIcon(False).png
Late hit
0 0 0 11.0% 0 Sakurai angle Forward 50 85 0 HitboxTableIcon(False).png 3.7 top 0.0 11.9 8.6 1.0× 1.0× 0% HitboxTableIcon(Clang).png HitboxTableIcon(Rebound).png Normal (effect) Hand (type) HitboxTableIcon(GroundedTrue).png HitboxTableIcon(AerialTrue).png L Punch SpecialsDirect.png All All HitboxTableIcon(Blockable).png HitboxTableIcon(Unreflectable).png HitboxTableIcon(Unabsorbable).png HitboxTableIcon(False).png HitboxTableIcon(False).png HitboxTableIcon(False).png
1 0 0 11.0% 0 Sakurai angle Forward 50 85 0 HitboxTableIcon(False).png 3.7 top 0.0 12.7 4.2 1.0× 1.0× 0% HitboxTableIcon(Clang).png HitboxTableIcon(Rebound).png Normal (effect) Hand (type) HitboxTableIcon(GroundedTrue).png HitboxTableIcon(AerialTrue).png L Punch SpecialsDirect.png All All HitboxTableIcon(Blockable).png HitboxTableIcon(Unreflectable).png HitboxTableIcon(Unabsorbable).png HitboxTableIcon(False).png HitboxTableIcon(False).png HitboxTableIcon(False).png
2 0 0 11.0% 0 AngleIcon90.png Standard 50 85 0 HitboxTableIcon(False).png 2.5 top 0.0 18.5 -6.5 1.0× 1.0× 0% HitboxTableIcon(Clang).png HitboxTableIcon(Rebound).png Normal (effect) Foot (type) HitboxTableIcon(GroundedTrue).png HitboxTableIcon(AerialTrue).png L Kick SpecialsDirect.png All All HitboxTableIcon(Blockable).png HitboxTableIcon(Unreflectable).png HitboxTableIcon(Unabsorbable).png HitboxTableIcon(False).png HitboxTableIcon(False).png HitboxTableIcon(False).png

Timing[edit]

Clean hit 6
Late hit 7-10
Interruptible 33
Animation length 47
FrameIcon(Lag).png FrameIcon(Lag).png FrameIcon(Lag).png FrameIcon(Lag).png FrameIcon(Lag).png FrameIcon(HitboxChangeS).png FrameIcon(HitboxChangeE).png FrameIcon(Hitbox).png FrameIcon(Hitbox).png FrameIcon(Hitbox).png FrameIcon(Lag).png FrameIcon(Lag).png FrameIcon(Lag).png FrameIcon(Lag).png FrameIcon(Lag).png FrameIcon(Lag).png FrameIcon(Lag).png FrameIcon(Lag).png FrameIcon(Lag).png FrameIcon(Lag).png FrameIcon(Lag).png FrameIcon(Lag).png FrameIcon(Lag).png FrameIcon(Lag).png FrameIcon(Lag).png FrameIcon(Lag).png FrameIcon(Lag).png FrameIcon(Lag).png FrameIcon(Lag).png FrameIcon(Lag).png FrameIcon(Lag).png FrameIcon(Lag).png FrameIcon(Interruptible).png FrameIcon(Interruptible).png FrameIcon(Interruptible).png FrameIcon(Interruptible).png FrameIcon(Interruptible).png FrameIcon(Interruptible).png FrameIcon(Interruptible).png FrameIcon(Interruptible).png FrameIcon(Interruptible).png FrameIcon(Interruptible).png FrameIcon(Interruptible).png FrameIcon(Interruptible).png FrameIcon(Interruptible).png FrameIcon(Interruptible).png FrameIcon(Interruptible).png
Legend (1 square = 1 frame)
Lag
Lag time
Hitbox
Hitbox
FrameIcon(HitboxChangeS).pngFrameIcon(HitboxChangeE).png
Hitbox change
Interruptibility
Interruptible