| Welcome to SmashWiki! Log in or create an account and join the community, and don't forget to read this first! |
| Notices |
|---|
| The Skill parameter has been removed from Smasher infoboxes, and in its place are the new "Best historical ranking" and "Best tournament result" parameters. SmashWiki needs help adding these new parameters to Smasher infoboxes, refer to the guidelines here for what should be included in these new parameters. |
| When adding results to Smasher pages, include each tournament's entrant number in addition to the player's placement, and use the {{Trn}} template with the matching game specified. Please also fix old results on Smasher pages that do not abide to this standard. Refer to our Smasher article guidelines to see how results tables should be formatted. |
| Check out our project page for ongoing projects that SmashWiki needs help with. |
Falco (SSBB)/Down throw
Overview
Falco throws his opponent to the ground, dealing 3% damage, then shoots them with his Blaster, dealing 6% more damage for a total of 9%. Unlike his back throw and up throw, the laser shots are guaranteed to hit unless Falco is interrupted during the throw animation. The throw does very weak horizontal knockback, and can chaingrab most characters at low percentages. This can be ended with a DACUS (or just an up smash on its own) or, if the opponent is knocked offstage, a down aerial meteor smash, though it is possible to SDI the knockback back onto the stage. While the d-throw →daircombo isn't too reliable due to meteor cancelling (especially at lower percentages), it is very effective on other Falcos and Wolf, due to the former having a slow and poor vertical recovery, and the latter suffering a 60 frame meteor cancel delay, allowing an easy edgehog. (While Fox also has a rather slow vertical recovery, his rising fair is enough to prevent an edgehog.) Down aerial can also be used onstage to start a tech-chase. The chaingrab is overall useful for racking up damage, being able to achieve as much as 50% using a Gatling Combo.
On floaty characters a regrab is possible from 0-20%, on characters with moderate falling speeds a regrab is possible from 0-40%, and on characters with fast falling speeds, a regrab is possible from 0-~50%. Followups possible include a down aerial, BDACUS, and Gatling Combo - on floaties this can be done from 20-30%, on characters with moderate falling speeds this can be done from 40-50%, and on fastfallers this can be done from 50-60%. However, the possible followups may be character dependant - for example, on Peach, dair and Gatling Combo are not possible, but a BDACUS is. Also, past 50%, a read is required for an actual followup due to the opponent being able to DI easily, or simply air dodge after the grab. Trivial followup options that aren't nearly as effective include jab, forward tilt, and dash attack.
A very situational technique is the DFS (Drill Footstool Spike) - in which Falco performs a down aerial followup to the throw offstage and it is meteor cancelled, he can use a footstool jump off of the opponent. However, the opponent can usually edge sweetspot while jumping, unless they meteor cancel too late or delay their jump.
Also, if the throw is used and followed by the first hit of his neutral combo while buffered at above 80% and the opponent DIs down, there is a chance to knock the opponent onto the ground, opening a laser lock opportunity. However, this is too situational and difficult to perform to be effective.

Throw data
Throw
| ID | Damage | Angle | BK | KS | FKV | Bone | SDIx | FFx | T% | Type | Effect | Sound | |
|---|---|---|---|---|---|---|---|---|---|---|---|---|---|
| #! | 1% | Standard | 45 | 130 | 0 | bn! | 1.0x | None | 0% | File:TypeIcon(Throw).png | ?! ...! | ||
| #! | 3% | Standard | 60 | 100 | 0 | bn! | 1.0x | None | 0% | File:TypeIcon(Release).png | ?! ...! | ||
Blaster shots
| ID | Part | Rehit rate | Damage | SD | Angle | BK | KS | FKV | Radius | Bone | Offset | SDIx | H× | T% | Clang | Rebound | Type | Effect | G | A | Sound | Direct | Blockable | Reflectable | Absorbable | Flinchless | Heedless | Piercing | Strechy | ?2 | ?5 | ?6 | ?11 | Hit Bits | ||||
|---|---|---|---|---|---|---|---|---|---|---|---|---|---|---|---|---|---|---|---|---|---|---|---|---|---|---|---|---|---|---|---|---|---|---|---|---|---|---|
| 0 | 0 | 0 | 2% | 0 | f2! | 60 | 80 | 0 | 9.6 | 0 | 0.0 | 0.0 | 4.0 | 1.0x | 0.25x | 0% | no flags 1 data specified | no flags 2 data specified | ||||||||||||||||||||
Timing
| Invincible | 1-8 |
|---|---|
| Blaster shot 1 | 23 |
| Blaster shot 2 | 25 |
| Blaster shot 3 | 28 |
| Blaster shot 4 | 31 |
| Throw | 33 |
| Animation length | 43 |
| Throw | |||||||||||||||||||||||||||||||||||||||||||
| Hurtboxes |
Lag time |
Vulnerable |
Invincible |
Prop event |
Throw point |
Gallery
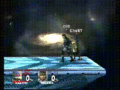
Falco following up his chaingrab with a Gatling Combo.
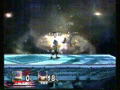
Down throw followed by a down aerial meteor smash.


Chain throw list
This is a list of how many chain throws Falco can get on the whole cast, made by DEHF. This list goes by least chained character to greatest. It should be noted though, that this list likely does not factor in DI or escape techniques such as Marth's Dolphin Slash. However, if one can correctly buffer all of Falco's grabs, this issue is, for the most part, negligible.
| Throws | Character | Damage |
|---|---|---|
| 2 | JigglypuffW | 0-17 |
| 3 | SamusW, PeachW, LucarioW | 0-25 |
| 4 | Kirby | 0-31 |
| 5 | Mr. Game & WatchW, Squirtle | 0-37 |
| 6 | Diddy Kong, Meta Knight, Pit, Ice Climbers, R.O.B.W, Fox, Falco, Pikachu, Marth, ZeldaW, Sheik, Zero Suit SamusD, Ness, Lucas, Toon Link, Sonic | 0-43 |
| 7 | Ike, Ganondorf, Charizard, Ivysaur, Olimar, Wolf, Wario, Link, Yoshi, Mario, Luigi, King Dedede, Captain Falcon | 0-48 |
| 8 | Donkey Kong, Snake, Bowser | 0-53 |
W = must walk in order to get max chain grabs possible
D = must dash grab in order to get max chain grabs possible
Related moves

.png)
.png)