From SmashWiki, the Super Smash Bros. wiki

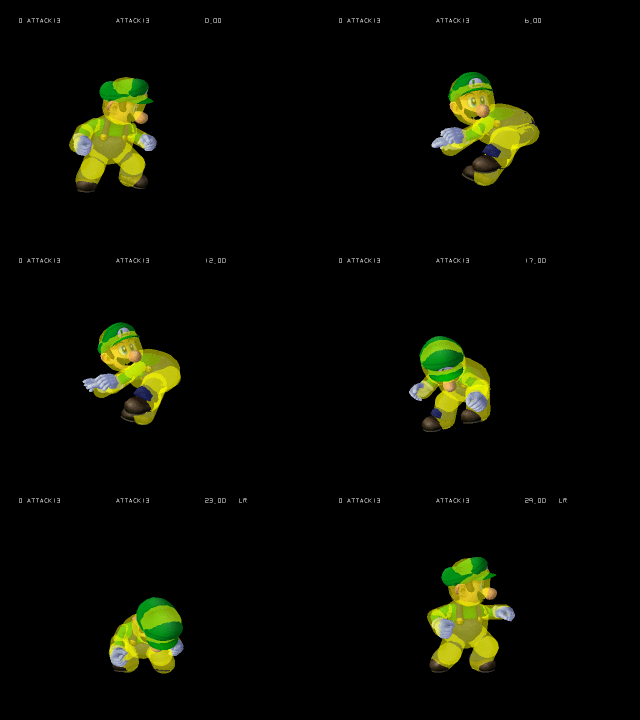
Hitbox visualization showing Luigi's third jab.
Overview
Similar to Captain Falcon's jab 3, Luigi lunges his lower body forward, doing a hip check on the opponent. Between the two moves, Luigi's has less than half the active frames, but a much shorter recovery; in addition, it has one hitbox, as opposed to Falcon's, which has an early hit and late hit. It is generally considered to be weaker, but much less risky, since the Luigi player doesn't have to worry about unintentionally activating a rapid jab, as well as the fact that it can be done from a wavedash.
The move sees occasional use in tournament play. It can be used to cover Luigi after performing an unsafe jab 1 or jab 2 against a crouching or shielding opponent; in these instances, the best scenario is to hit the opponent as they're attempting to punish the unsafe jabs. It's generally more rewarding than hitting the opponent with just jab 1, as it deals more damage and has scaling knockback, being able to tumble Fox at 88%. This comes at the cost of being much more telegraphed, as the entire move lasts 22 frames (well-within the timeframe of humans' reaction time), and must be preceded by jab 1 & 2; at low-mid percents (greater than 27% on Fox), it deals enough hitstun to be positive on hit, although this can still lose to crouch canceling and ASDI-down. At higher percents, when it begins to tumble the opponent, it becomes much more safe to throw out, and generally becomes very rewarding as it can lead to a tech chase.
The move also sees use niche use in edgeguarding. Generally, Luigi wants to use his powerful aerials, like forward air or down air, which are significantly stronger. However, between a 4-frame jumpsquat and the startup on his aerials, the player may not be able to react to the opponent's recovery in time if they choose a quick option, such as Falco's Phantasm, a move with an 18-frame startup, which is just barely within a human's reaction time. If the Falco attempts to recover to stage using Phantasm, the Luigi can react, hitting him with jab 1 (Luigi's fastest move) before following up with jab 2 & 3 to prevent Falco from grabbing the ledge, knocking him away & resetting the situation.
Hitboxes
| ID |
Part |
Damage |
SD |
Angle |
BK |
KS |
FKV |
Radius |
Bone |
Offset |
Clang |
Rebound |
Effect |
G |
A |
Sound
|
| 0 |
0 |
5% |
0 |
 |
10 |
100 |
0 |
4.6872 |
55 |
0.0 |
6.2496 |
8.2026 |
 |
 |
 |
 |
 |
 Kick Kick
|
Timing
| Hitboxes
|
5-6
|
| Interruptible
|
22
|
| Animation length
|
30
|
