Welcome to SmashWiki! Log in or create an account and join the community, and don't forget to read this first!
Notices
The Skill parameter has been removed from Smasher infoboxes, and in its place are the new "Best historical ranking" and "Best tournament result" parameters. SmashWiki needs help adding these new parameters to Smasher infoboxes, refer to the guidelines here for what should be included in these new parameters.
When adding results to Smasher pages, include each tournament's entrant number in addition to the player's placement, and use the {{Trn}} template with the matching game specified. Please also fix old results on Smasher pages that do not abide to this standard. Refer to our Smasher article guidelines to see how results tables should be formatted.
Check out our project page for ongoing projects that SmashWiki needs help with.
Super Smash Bros. 4

Bowser Jr. (SSB4)/Up special/Default

From SmashWiki, the Super Smash Bros. wiki
< Bowser Jr. (SSB4)‎ | Up special
Revision as of 14:54, April 21, 2021 by Zeckemyro (talk | contribs)
(diff) ← Older revision | Latest revision (diff) | Newer revision → (diff)
Jump to navigationJump to search
This article is about the hitbox visualization in Super Smash Bros. 4. For the move itself, see Abandon Ship!.
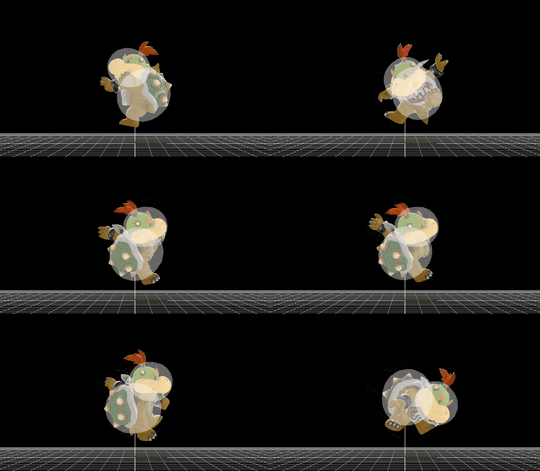
Hitbox visualization showing Bowser Jr.'s Abandon Ship!'s hammer attack.

Overview

Bowser Jr. ejects himself from the Junior Clown Car. The Junior Clown Car slowly falls to the ground and then explodes with high power when the move is used in midair, whereas it will simply explode after a brief period when used on the ground. Deals 5% on contract and 13%from the explosion. The move covers a decent amount of vertical distance, and is flexible with horizontal steering. When Bowser Jr. is out of the Junior Clown Car, he is not rendered helpless and can still dodge or attack with a hammer, which is powerful enough to KO at medium to high percentages. Deals either 15% or 10%. However, taking any weak hit while out of the Junior Clown Car prevents another use of the move without button mashing or landing.

Hitboxes

ID Part Damage SD Angle BK KS FKV Radius Bone Offset SDIx T% Clang Rebound Type Effect G A Sound Direct
Clown car hit
0 0 5% 0 AngleIcon80.png 50 25 0 6.0 0 0.0 6.0 0.0 1.0x 1.0x 0% HitboxTableIcon(NoClang).png HitboxTableIcon(NoRebound).png Weapon (type) Normal (effect) HitboxTableIcon(GroundedTrue).png HitboxTableIcon(AerialTrue).png L Kick SpecialsIndirect.png
Clown car explosion
0 0 13% 0 AngleIcon55.png 85 70 0 14.0 0 0.0 6.0 0.0 1.0x 1.0x 0% HitboxTableIcon(Clang).png HitboxTableIcon(NoRebound).png Explosive (type) Flame (effect) HitboxTableIcon(GroundedTrue).png HitboxTableIcon(AerialTrue).png L Explosion SpecialsIndirect.png
Hammer attack (Hit 1)
0 0 15% 0 Sakurai angle 50 90 0 6.5 0 0.0 8.0 -12.0 1.0x 1.2x 0% HitboxTableIcon(Clang).png HitboxTableIcon(Rebound).png Weapon (type) Normal (effect) HitboxTableIcon(GroundedTrue).png HitboxTableIcon(AerialTrue).png L Kick SpecialsDirect.png
1 0 10% 0 Sakurai angle 50 90 0 3.0 0 0.0 8.0 -10.0 1.0x 1.2x 0% HitboxTableIcon(Clang).png HitboxTableIcon(Rebound).png Weapon (type) Normal (effect) HitboxTableIcon(GroundedTrue).png HitboxTableIcon(AerialTrue).png M Kick SpecialsDirect.png
Hammer attack (Hit 2)
0 0 15% 0 Sakurai angle 50 90 0 6.5 0 0.0 8.0 12.5 1.0x 1.2x 0% HitboxTableIcon(Clang).png HitboxTableIcon(Rebound).png Weapon (type) Normal (effect) HitboxTableIcon(GroundedTrue).png HitboxTableIcon(AerialTrue).png L Kick SpecialsDirect.png
1 0 10% 0 Sakurai angle 50 90 0 3.0 0 0.0 8.0 10.0 1.0x 1.2x 0% HitboxTableIcon(Clang).png HitboxTableIcon(Rebound).png Weapon (type) Normal (effect) HitboxTableIcon(GroundedTrue).png HitboxTableIcon(AerialTrue).png M Kick SpecialsDirect.png

Timing

Hammer Attack

Hit 1 8
Hit 2 13
Interruptible 40
Animation length 44
FrameIcon(Lag).png FrameIcon(Lag).png FrameIcon(Lag).png FrameIcon(Lag).png FrameIcon(Lag).png FrameIcon(Lag).png FrameIcon(Lag).png FrameIcon(Hitbox).png FrameIcon(Lag).png FrameIcon(Lag).png FrameIcon(Lag).png FrameIcon(Lag).png FrameIcon(Hitbox).png FrameIcon(Lag).png FrameIcon(Lag).png FrameIcon(Lag).png FrameIcon(Lag).png FrameIcon(Lag).png FrameIcon(Lag).png FrameIcon(Lag).png FrameIcon(Lag).png FrameIcon(Lag).png FrameIcon(Lag).png FrameIcon(Lag).png FrameIcon(Lag).png FrameIcon(Lag).png FrameIcon(Lag).png FrameIcon(Lag).png FrameIcon(Lag).png FrameIcon(Lag).png FrameIcon(Lag).png FrameIcon(Lag).png FrameIcon(Lag).png FrameIcon(Lag).png FrameIcon(Lag).png FrameIcon(Lag).png FrameIcon(Lag).png FrameIcon(Lag).png FrameIcon(Lag).png FrameIcon(Interruptible).png FrameIcon(Interruptible).png FrameIcon(Interruptible).png FrameIcon(Interruptible).png FrameIcon(Interruptible).png
Legend (1 square = 1 frame)
Lag
Lag time
Hitbox
Hitbox
Interruptibility
Interruptible