Super Smash Bros. 4

Falco (SSB4)/Down smash: Difference between revisions

From SmashWiki, the Super Smash Bros. wiki
Jump to navigationJump to search
No edit summary
(added an overview and update history for the move.)
Line 1: Line 1:
{{ArticleIcons|ssb4=y}}
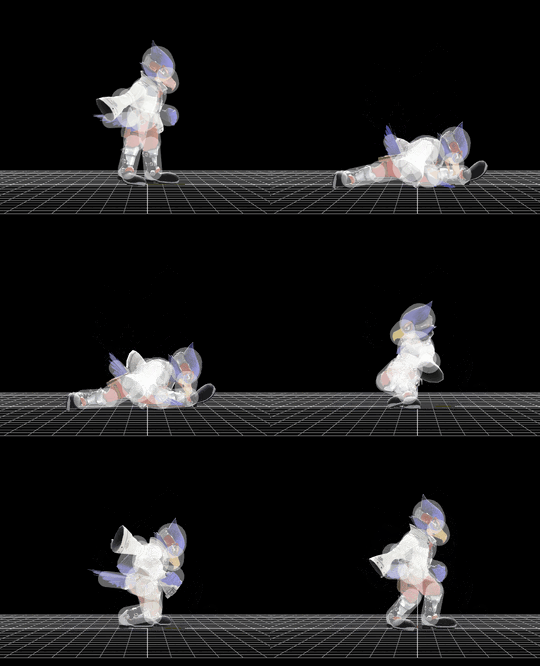
[[File:FalcoDSmash.gif|thumb|270px|Hitbox visualization showing Falco's down smash.]]
[[File:FalcoDSmash.gif|thumb|270px|Hitbox visualization showing Falco's down smash.]]
{{competitive expertise}}
 
==Overview==
Falco performs a split kick, hitting both sides. It has decent power and speed, as well as being disjointed due to leg intangibility, although its overall range is still relatively poor. It launches at a [[semi-spike]] angle, and combined with the ability to hit under ledges, it makes an effective edgeguarding tool. The attack also has 2 hitboxes on the thighs of Falco that have much weaker knockback and launch upwards, as well as dealing less damage. Usually these hitboxes aren't hit often as they are out-prioritized by the sweetspots, however.
 
==Update history==
{{GameIcon|ssb4}} [[1.1.4]]
*{{buff|Down smash has higher knockback growth|76|78.}}


==Hitboxes==
==Hitboxes==

Revision as of 02:54, October 26, 2018

Hitbox visualization showing Falco's down smash.

Overview

Falco performs a split kick, hitting both sides. It has decent power and speed, as well as being disjointed due to leg intangibility, although its overall range is still relatively poor. It launches at a semi-spike angle, and combined with the ability to hit under ledges, it makes an effective edgeguarding tool. The attack also has 2 hitboxes on the thighs of Falco that have much weaker knockback and launch upwards, as well as dealing less damage. Usually these hitboxes aren't hit often as they are out-prioritized by the sweetspots, however.

Update history

Super Smash Bros. 4 1.1.4

  • Buff Down smash has higher knockback growth: 76 → 78.

Hitboxes

ID Part Damage SD Angle BK KS FKV Radius Bone Offset SDIx T% Clang Rebound Type Effect G A Sound Direct
0 0 15% 0 AngleIcon25.png 20 78 0 4.3 0 0.0 1.7 9.1 1.0x 1.0x 40% HitboxTableIcon(Clang).png HitboxTableIcon(Rebound).png Foot (type) Normal (effect) HitboxTableIcon(GroundedTrue).png HitboxTableIcon(AerialTrue).png L Kick SpecialsDirect.png
1 0 15% 0 AngleIcon25.png 20 78 0 4.3 0 0.0 1.7 -12.0 1.0x 1.0x 40% HitboxTableIcon(Clang).png HitboxTableIcon(Rebound).png Foot (type) Normal (effect) HitboxTableIcon(GroundedTrue).png HitboxTableIcon(AerialTrue).png L Kick SpecialsDirect.png
2 0 12% 0 AngleIcon80.png 20 78 0 3.5 0 0.0 1.7 3.0 1.0x 1.0x 40% HitboxTableIcon(Clang).png HitboxTableIcon(Rebound).png Foot (type) Normal (effect) HitboxTableIcon(GroundedTrue).png HitboxTableIcon(AerialTrue).png L Kick SpecialsDirect.png
3 0 12% 0 AngleIcon80.png 20 78 0 3.5 0 0.0 1.7 -5.1 1.0x 1.0x 40% HitboxTableIcon(Clang).png HitboxTableIcon(Rebound).png Foot (type) Normal (effect) HitboxTableIcon(GroundedTrue).png HitboxTableIcon(AerialTrue).png L Kick SpecialsDirect.png

Timing

Charges between 2-3
Hitboxes 7-9
Legs intangible 3-7
Interruptible 47
Animation length 52
Hitboxes  FrameIcon(Lag).png FrameIcon(LagChargeS).png FrameIcon(LagChargeE).png FrameIcon(Lag).png FrameIcon(Lag).png FrameIcon(Lag).png FrameIcon(Hitbox).png FrameIcon(Hitbox).png FrameIcon(Hitbox).png FrameIcon(Lag).png FrameIcon(Lag).png FrameIcon(Lag).png FrameIcon(Lag).png FrameIcon(Lag).png FrameIcon(Lag).png FrameIcon(Lag).png FrameIcon(Lag).png FrameIcon(Lag).png FrameIcon(Lag).png FrameIcon(Lag).png FrameIcon(Lag).png FrameIcon(Lag).png FrameIcon(Lag).png FrameIcon(Lag).png FrameIcon(Lag).png FrameIcon(Lag).png FrameIcon(Lag).png FrameIcon(Lag).png FrameIcon(Lag).png FrameIcon(Lag).png FrameIcon(Lag).png FrameIcon(Lag).png FrameIcon(Lag).png FrameIcon(Lag).png FrameIcon(Lag).png FrameIcon(Lag).png FrameIcon(Lag).png FrameIcon(Lag).png FrameIcon(Lag).png FrameIcon(Lag).png FrameIcon(Lag).png FrameIcon(Lag).png FrameIcon(Lag).png FrameIcon(Lag).png FrameIcon(Lag).png FrameIcon(Lag).png FrameIcon(Interruptible).png FrameIcon(Interruptible).png FrameIcon(Interruptible).png FrameIcon(Interruptible).png FrameIcon(Interruptible).png FrameIcon(Interruptible).png
Legs  FrameIcon(Vulnerable).png FrameIcon(Vulnerable).png FrameIcon(Intangible).png FrameIcon(Intangible).png FrameIcon(Intangible).png FrameIcon(Intangible).png FrameIcon(Intangible).png FrameIcon(Vulnerable).png FrameIcon(Vulnerable).png FrameIcon(Vulnerable).png FrameIcon(Vulnerable).png FrameIcon(Vulnerable).png FrameIcon(Vulnerable).png FrameIcon(Vulnerable).png FrameIcon(Vulnerable).png FrameIcon(Vulnerable).png FrameIcon(Vulnerable).png FrameIcon(Vulnerable).png FrameIcon(Vulnerable).png FrameIcon(Vulnerable).png FrameIcon(Vulnerable).png FrameIcon(Vulnerable).png FrameIcon(Vulnerable).png FrameIcon(Vulnerable).png FrameIcon(Vulnerable).png FrameIcon(Vulnerable).png FrameIcon(Vulnerable).png FrameIcon(Vulnerable).png FrameIcon(Vulnerable).png FrameIcon(Vulnerable).png FrameIcon(Vulnerable).png FrameIcon(Vulnerable).png FrameIcon(Vulnerable).png FrameIcon(Vulnerable).png FrameIcon(Vulnerable).png FrameIcon(Vulnerable).png FrameIcon(Vulnerable).png FrameIcon(Vulnerable).png FrameIcon(Vulnerable).png FrameIcon(Vulnerable).png FrameIcon(Vulnerable).png FrameIcon(Vulnerable).png FrameIcon(Vulnerable).png FrameIcon(Vulnerable).png FrameIcon(Vulnerable).png FrameIcon(Vulnerable).png FrameIcon(Vulnerable).png FrameIcon(Vulnerable).png FrameIcon(Vulnerable).png FrameIcon(Vulnerable).png FrameIcon(Vulnerable).png FrameIcon(Vulnerable).png
Legend (1 square = 1 frame)
Lag
Lag time
ChargeCharge
Charge interval
Hitbox
Hitbox
FrameIcon(Vulnerable).png
Vulnerable
Intangibility
Intangible
Interruptibility
Interruptible